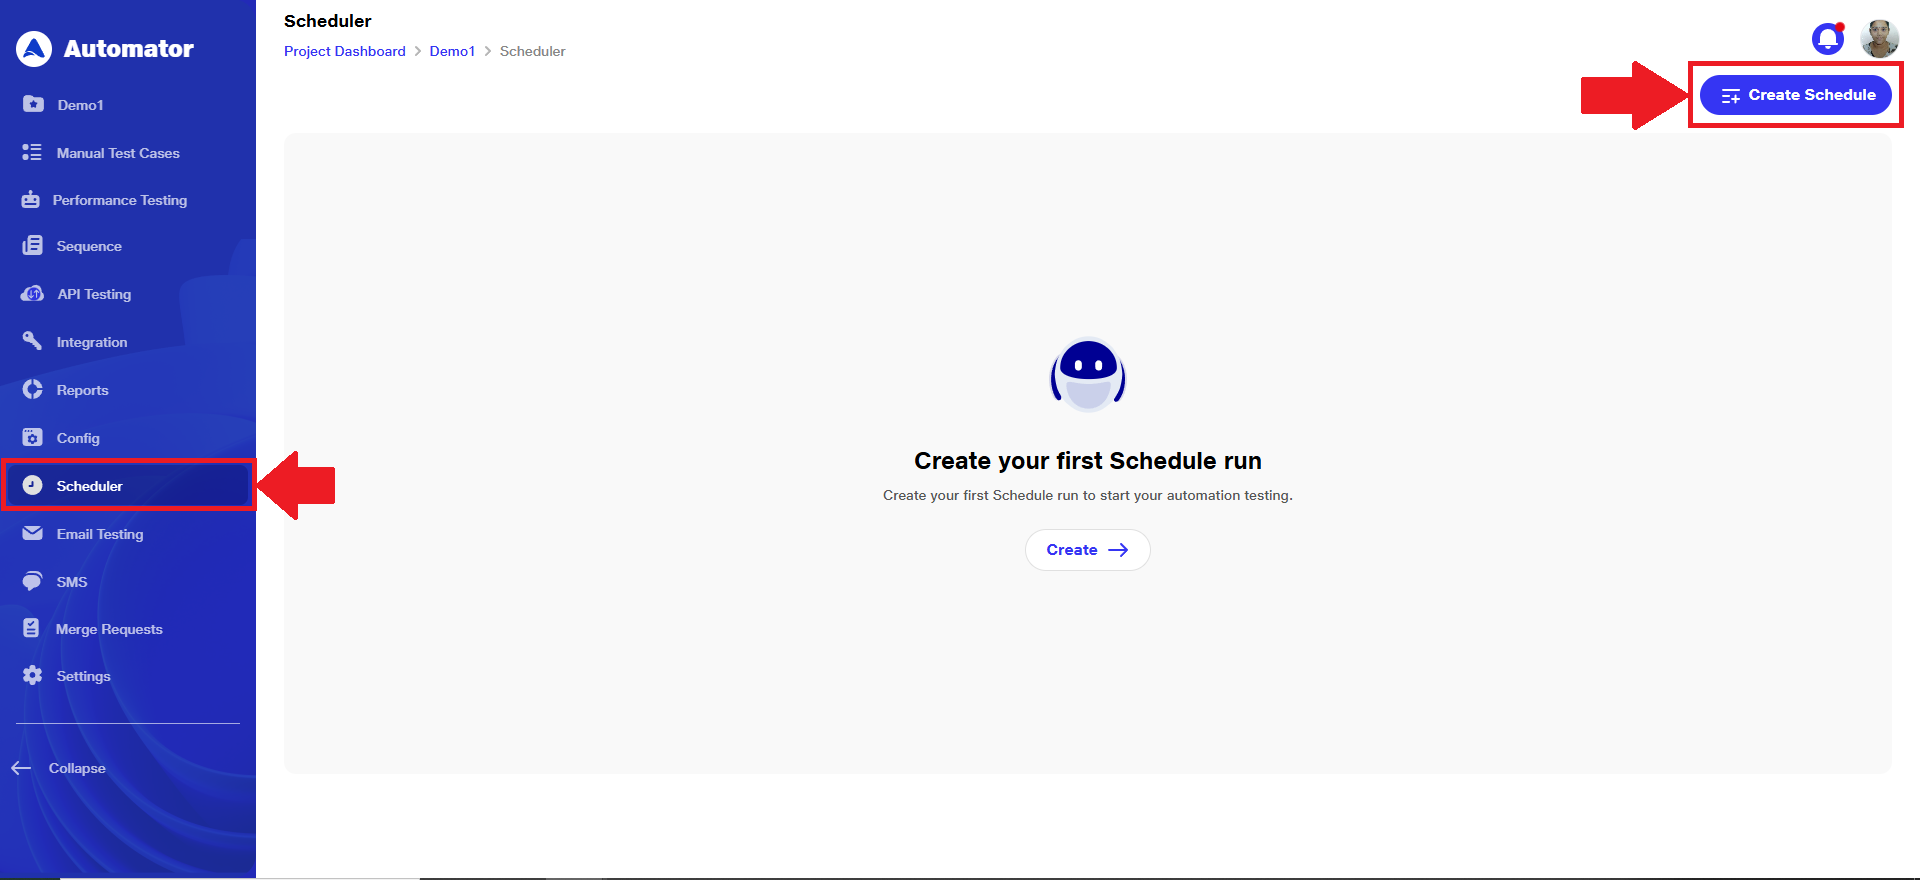
Scheduler
With the Automator.ai , testers gain the capability to seamlessly schedule the execution of entire test suites or specific test scenarios, aligning with project timelines, release cycles, and testing priorities.
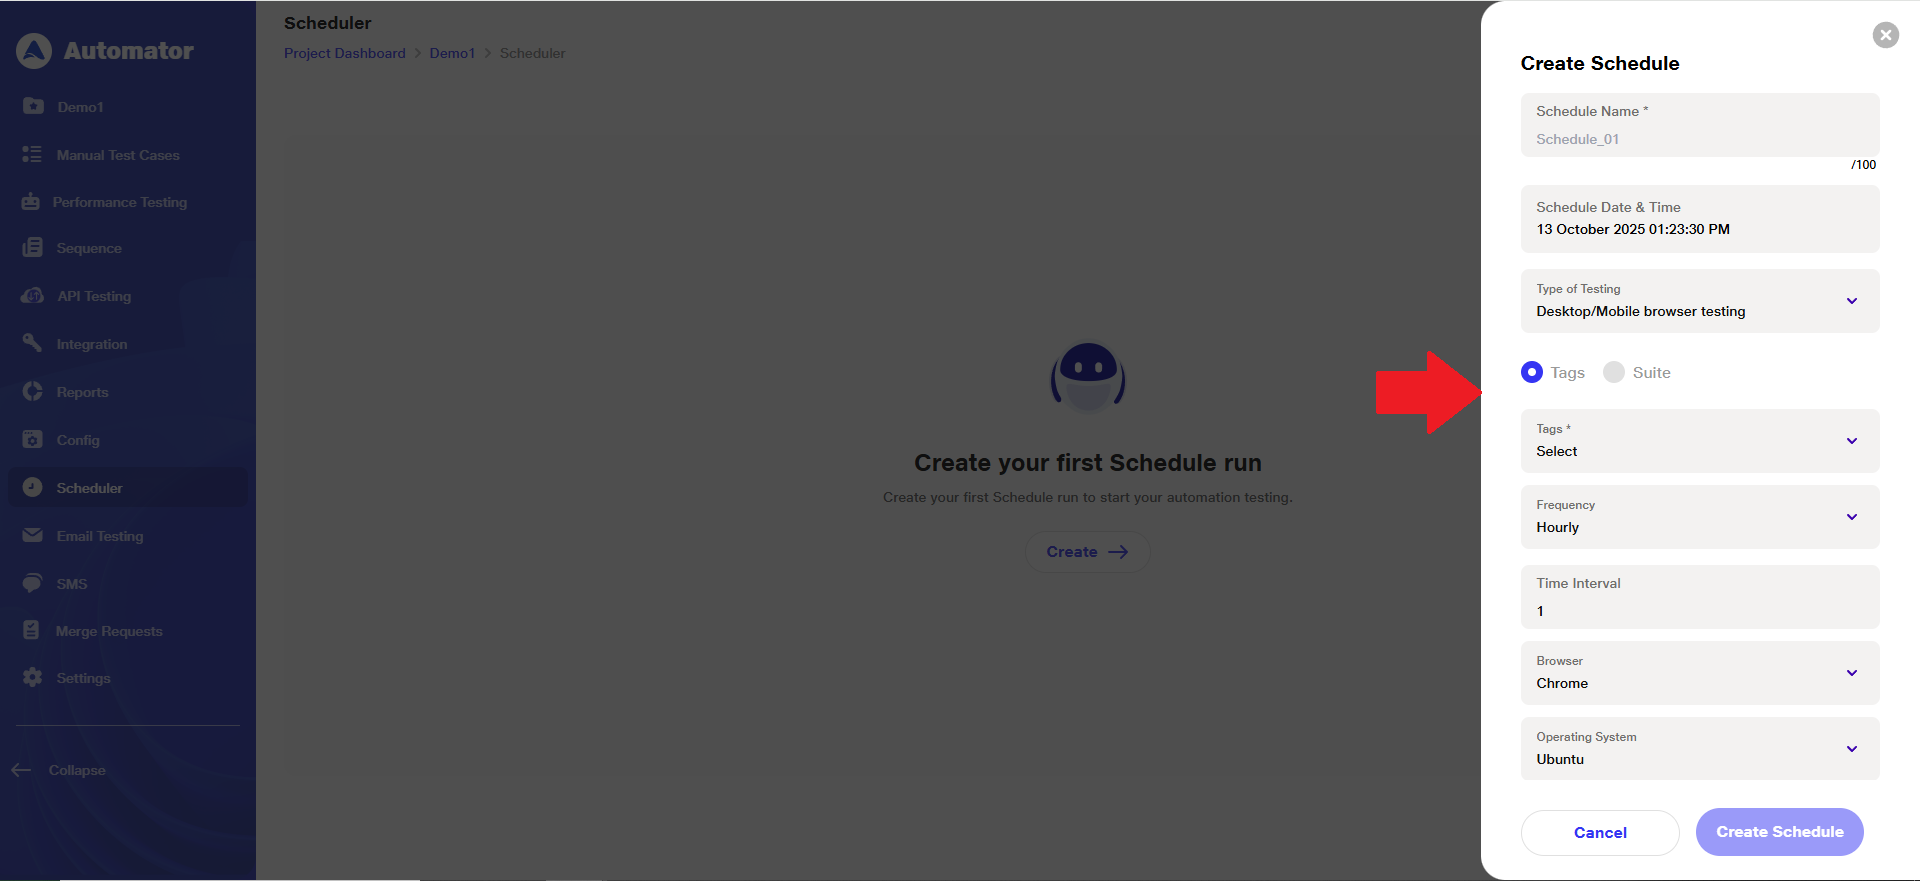
Users enjoy the flexibility of scheduling test executions for specific dates and recurring intervals, including daily, hourly, weekly, or monthly frequencies.
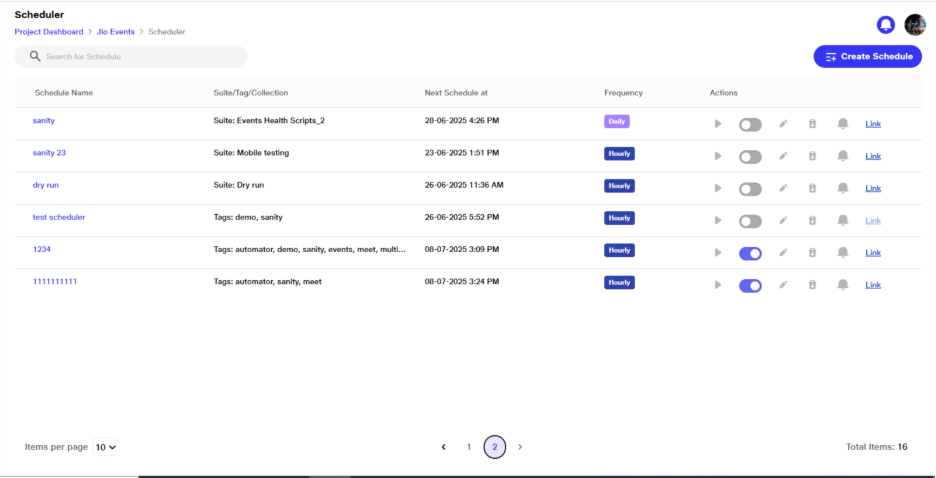
In the scheduler section, users are presented with a comprehensive list of scheduled runs. This interface offers functionalities such as run button, toggle button, editing schedules, deleting entries, and configuring email notifications for detailed reports.
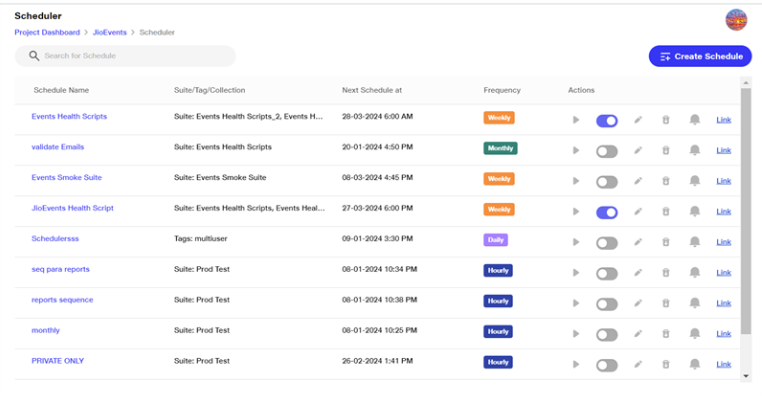
Scheduler test execution can be initiated instantly through the play button, allowing users to run tests as per his need
Once execution is schedule then without clearing the schedule settings user can pause the scheduled executions by using the toggle button to switch off the particular schedule. The plan will be paused until it is enabled again .
User can make Changes such as adjusting execution time, recurrence frequency, and notification alerts can be made using the edit option.
Users have the option to receive detailed reports of suite and scenario executions via email notifications. These reports include vital information such as total tests executed, passed, failed, and not executed, facilitating timely issue identification and resolution
For Recurring plans display the next scheduled execution date and time, providing clarity on upcoming executions. not when the plan was first scheduled
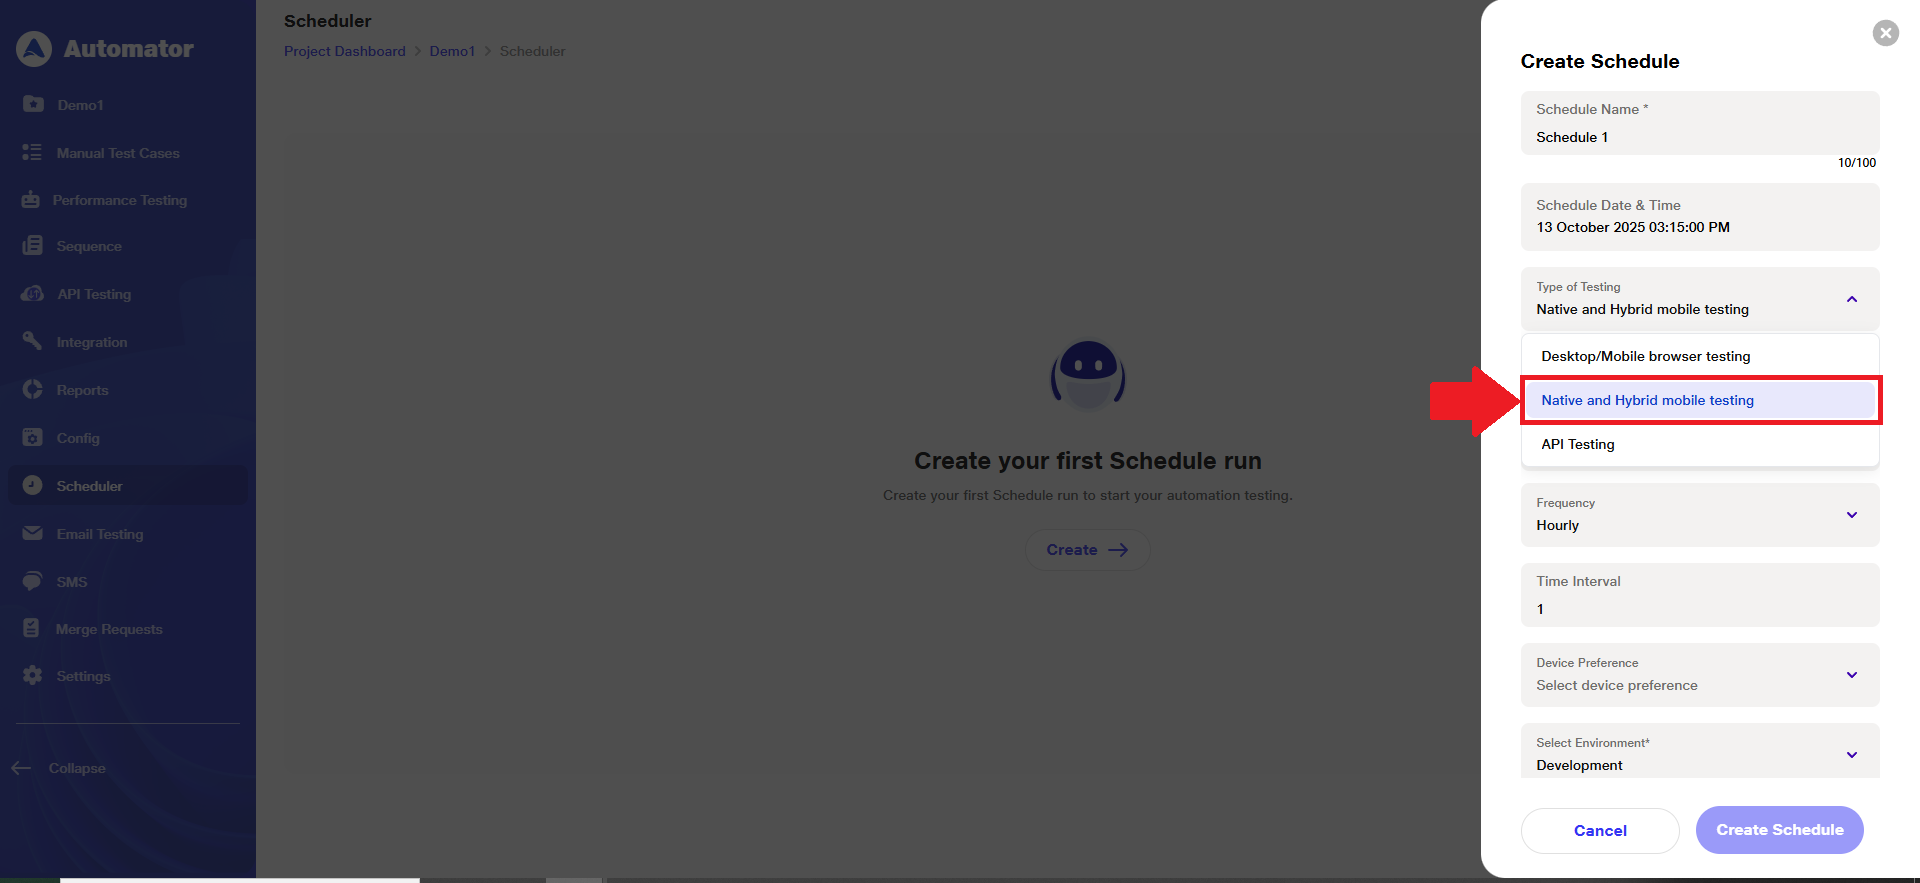
User can schedule executions based on Type of of testing selected
Desktop/Mobile browser testing
Native and Hybrid mobile testing
API Testing
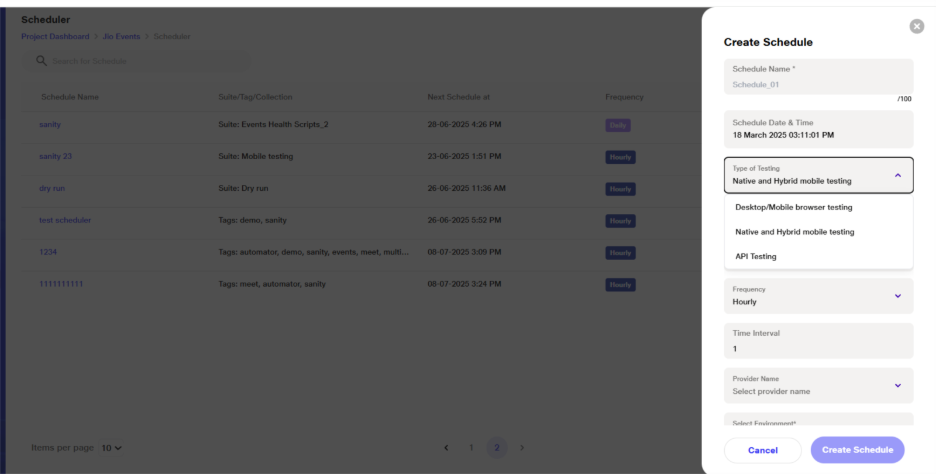
Desktop and Native and Hybrid mobile testing execution through Scheduler
For Desktop/Mobile browser testing, users have options to specify the browser, operating system, resolution, and environment settings.
Under Desktop/Mobile browser testing and Native and Hybrid mobile testing, users can choose between tags or suites.
Based on the selected type of testing, only the suites linked to that type of testing (as defined during suite creation) will be filtered and shown for selection in the scheduled run.
Multiple tags or multiple suites can be selected, and specific scenarios from a selected suite can also be chosen for the run.

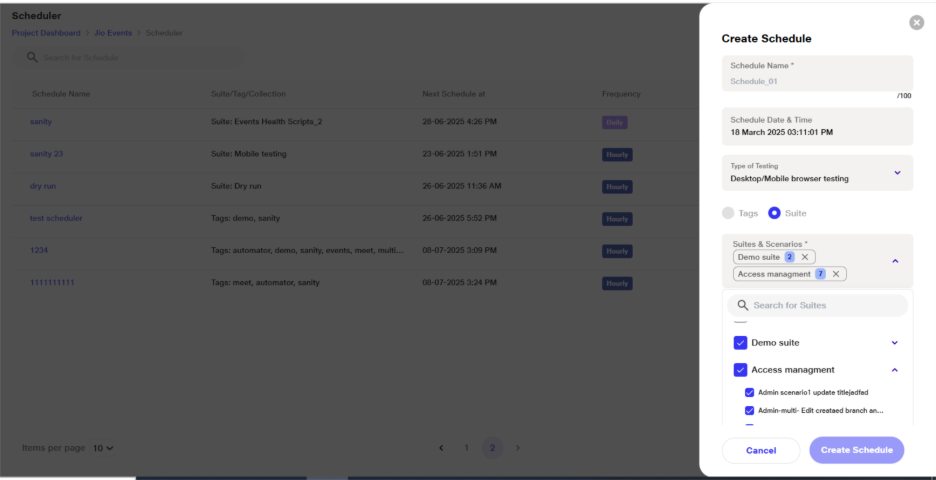
While scheduling scenario execution based on tags or suites user will need to provide following input:
Frequency: How often the API requests are sent. It could be set to run at intervals like every hour, every day, weekly or monthly
Time Interval: The specific duration between consecutive runs of the API collection. For example, 10 sec, 20 sec
Browser: The web browser environment where the API requests might be simulated or tested. This can affect how the requests are processed and tested. User can select from chrome, Firefox, edge available in drop drown
Operating System (OS): The system software on which the API collection runner is operating. Ubuntu and windows os is available
Resolution: While typically associated with screen display, in the context of API testing, it might refer to the level of detail or scope of the test results reported. User can check the list of resolution available in dropdown.
Environment: The specific configuration settings used during the test runs, which might from pre created environment.
These parameters help in defining how and under what conditions the API tests are executed, ensuring consistent and reliable testing across different scenarios.
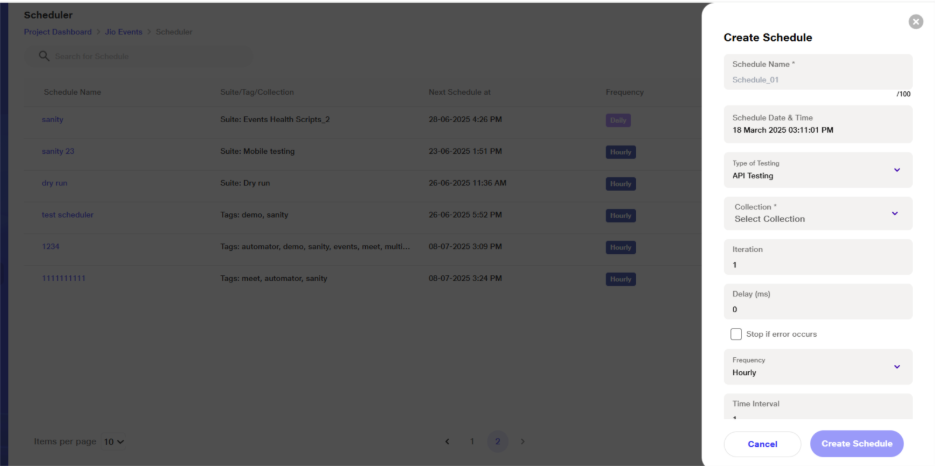
API Testing execution through Scheduler
For API Testing, users can define test data sets, specify the execution environment, and determine the number of iterations the collection should undergo.
While scheduling scenario execution based on API collection user will need to provide following input:
Iteration refers to the number of times the entire collection of requests is executed. Each iteration runs the sequence of requests from start to finish.
Delay is the amount of time (in milliseconds) the runner waits between executing each request within an iteration. This can be used to simulate real-world usage or to avoid hitting rate limits.
Stop if error occurs is an option that halts the execution of the collection when an error is encountered. This can help identify issues early and prevent subsequent tests from running in a failed state.
Test Data Set: A collection of input data used to run the API tests with different inputs
Upon completion of executions, comprehensive reports are generated, detailing test execution progress, test coverage, and identified defects.
Reports of suites, scenarios & API collection which are scheduled for execution will be accesible in the UI & API report section respectively.
Automator enhances testing efficiency by reducing manual effort. Testers can ensure that critical functionalities are thoroughly tested on a regular basis by using scheduler, promoting software quality and reliability.
With flexible scheduling options and automated execution capabilities, testers can achieve increased efficiency, improved test coverage, and reliable testing outcomes,ultimately contributing to the overall success of software projects.
Customise email subject of Scheduler
The customizable scheduler email subject allows users to instantly grasp the job status in their preferred format. This tailored subject line enhances visibility, enabling efficient tracking and monitoring across multiple schedulers for streamlined review and management.
Creating Scheduler
Navigate to the Scheduler page for the respective project.
Click Create Schedule to set up a new scheduler.
Access Manage Notification Tab
Click on the Notification icon for the desired scheduler.
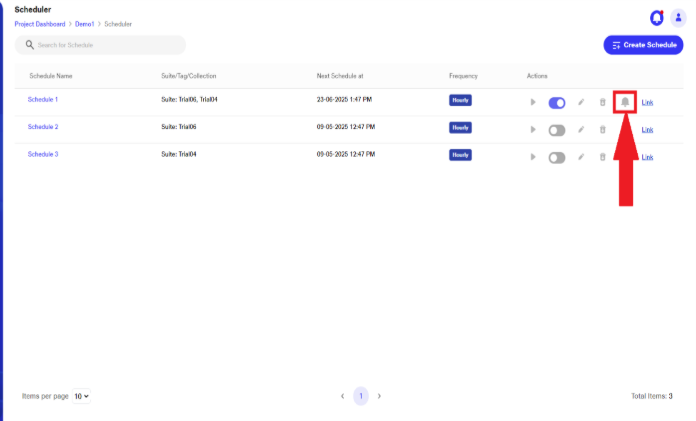
The Manage Notification tab will open automatically.
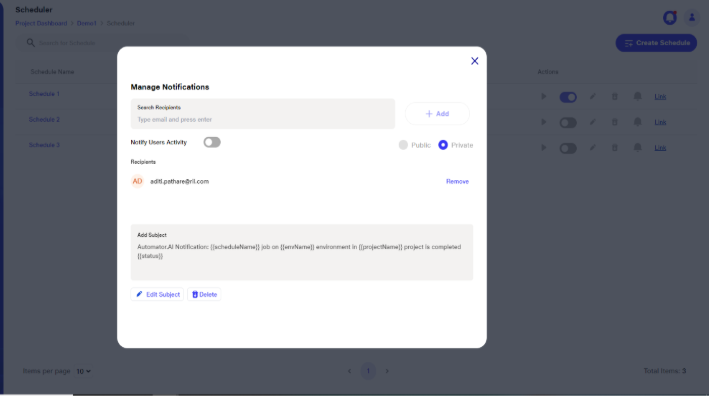
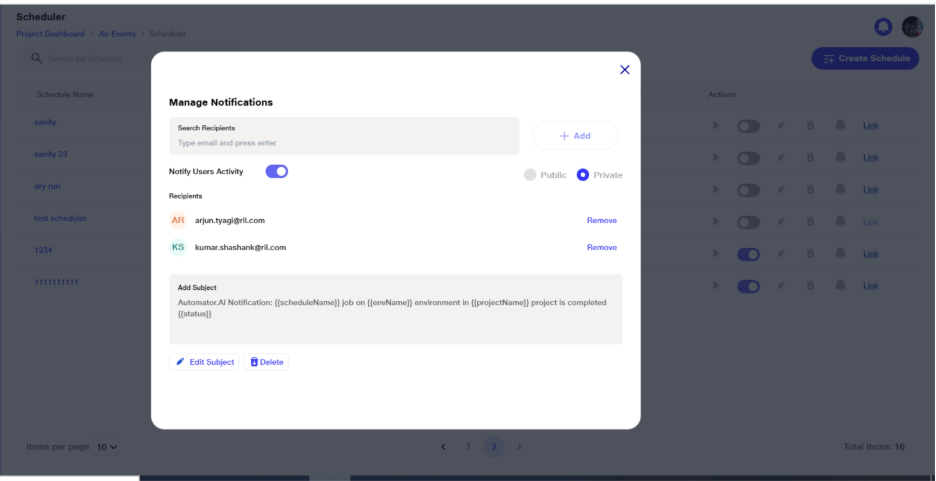
Adding recipients for notifying about the schedule run
In the Search Recipients field, the user can search for members from the project whom they want to notify about the scheduled run.
Once the desired users are selected, the user can click on the Add button. Upon clicking the Add button, the newly added users will appear in the recipients list.

View Default Subject Line
By default, the email notification subject line is set to: Automator.AI Notification: %schedule Name % job on %env name% environment in %project name% project is completed %pass/Fail%.
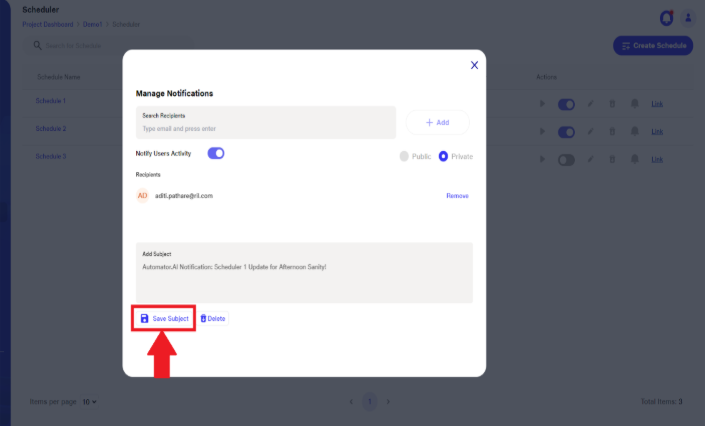
Edit Email Subject
Click on Edit Subject to enable the subject textbox for editing.
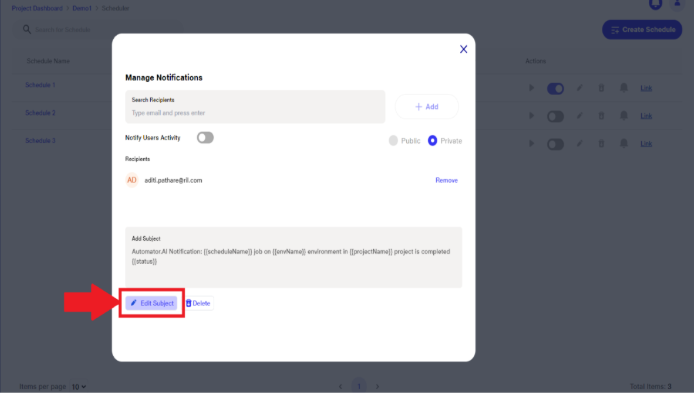
The subject line supports up to 254 characters.
After editing, click Save Subject to apply the changes.
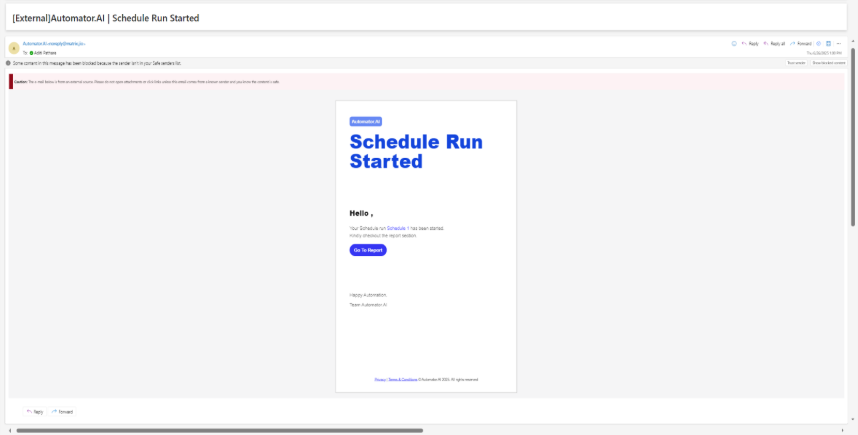
Scheduler Triggering
Once the subject is saved, the user will receive a scheduler notification with the updated subject line whenever the scheduler runs.
Below is a reference example of the email notification received before the scheduler starts:
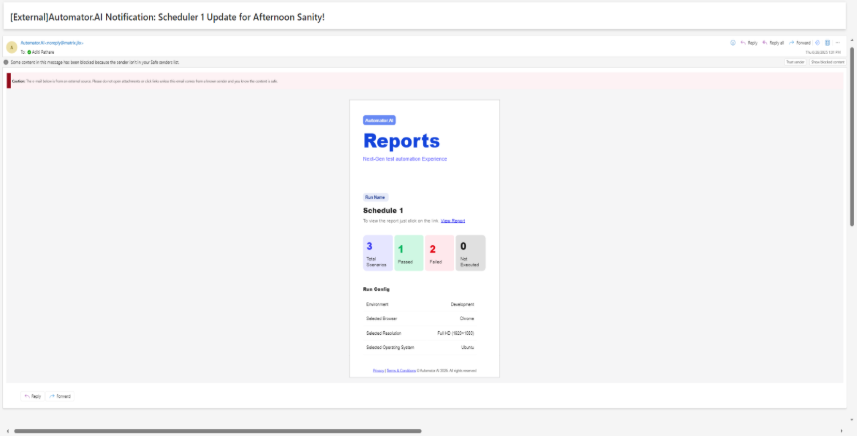
After the execution is completed, the user will also receive a completion notification with the updated subject, as shown in the following image:
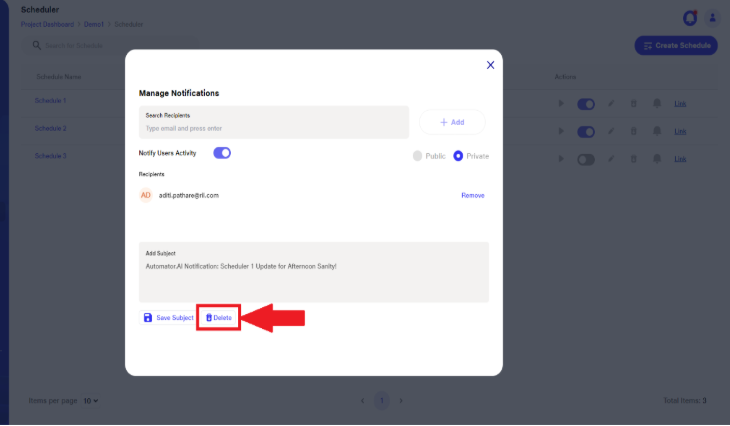
Delete Customized Subject
To remove the customized subject and revert to the default, click the Delete button next to Edit Subject or Save Subject.
This action will restore the default subject line.
Parallel or Serial Test Execution for Web
It empowers users with the flexibility to run test executions either concurrently or sequentially, based on availability and requirements. By enabling mode selection, teams can optimize resource utilization, prevent execution failures caused by insufficient user availability, and maintain smooth, reliable test runs. This adaptability improves efficient scheduling, enhances stability, and ensures consistent test performance across varying execution scenarios.
1) Locating the Execution Mode Option
a) Navigate to the Scheduler section of the project.
b) Click the Create Schedule button, typically located at the top-right corner of the screen.
 c) A schedule creation form will appear on the right-hand side of the screen.
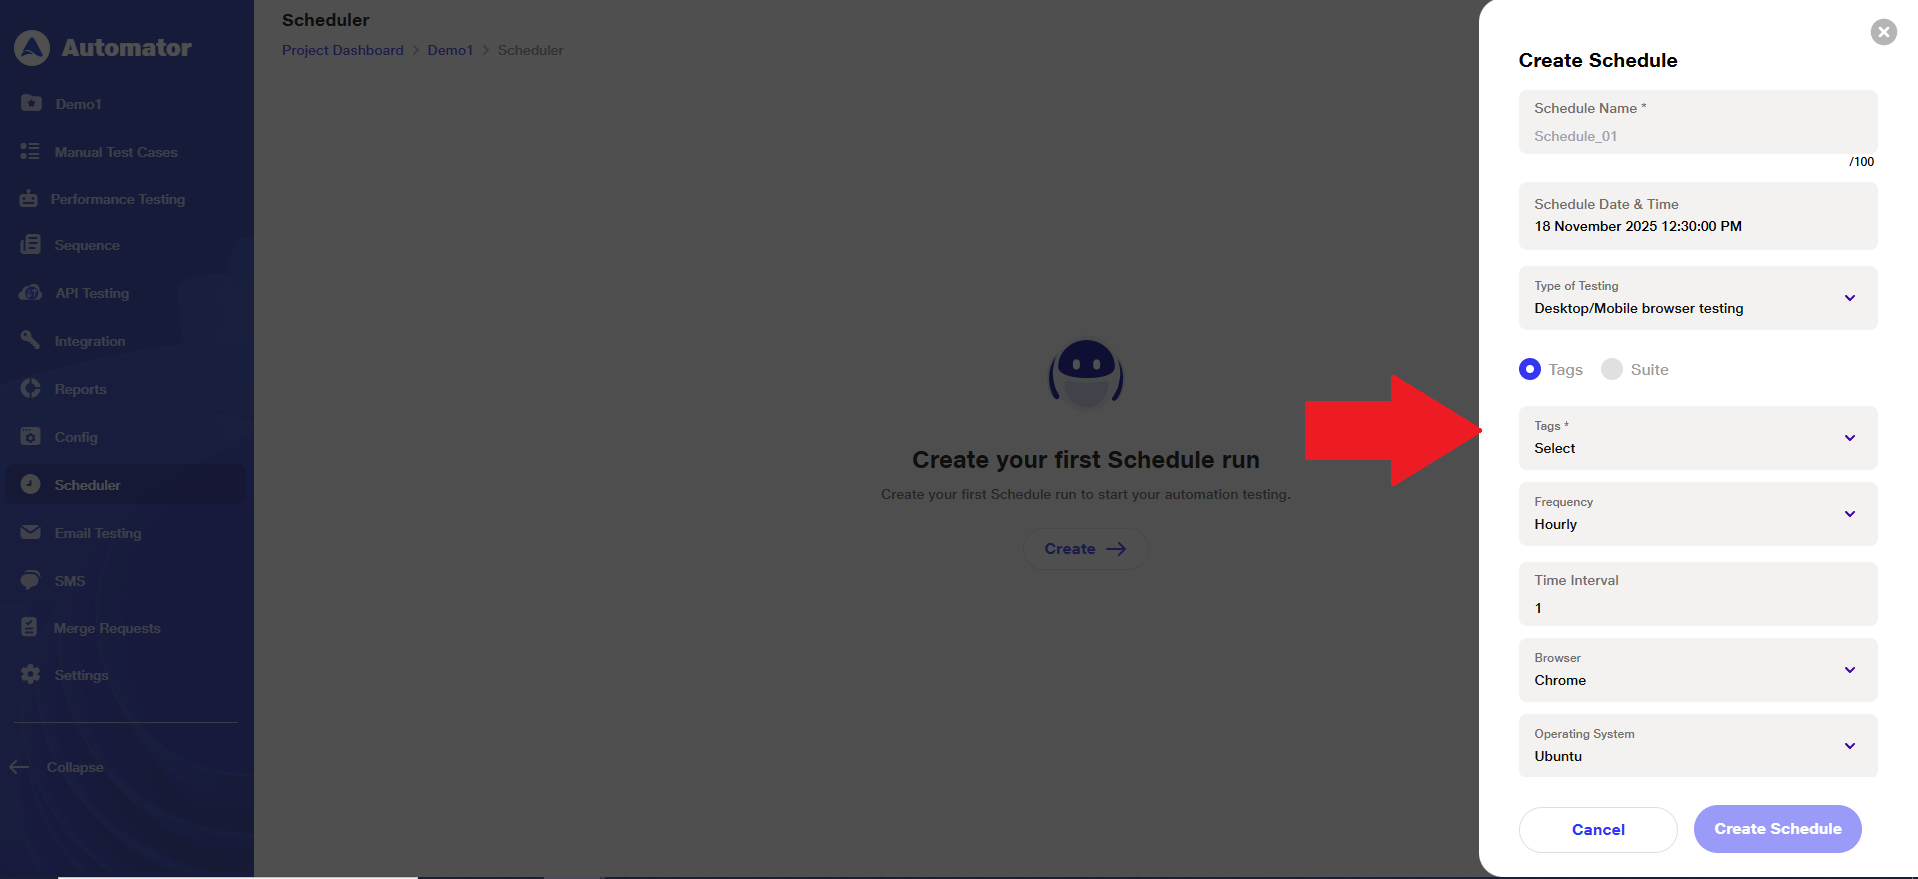 d) Fill in all required schedule details.
e) Locate the new Execution Mode toggle switch at the bottom of the form.
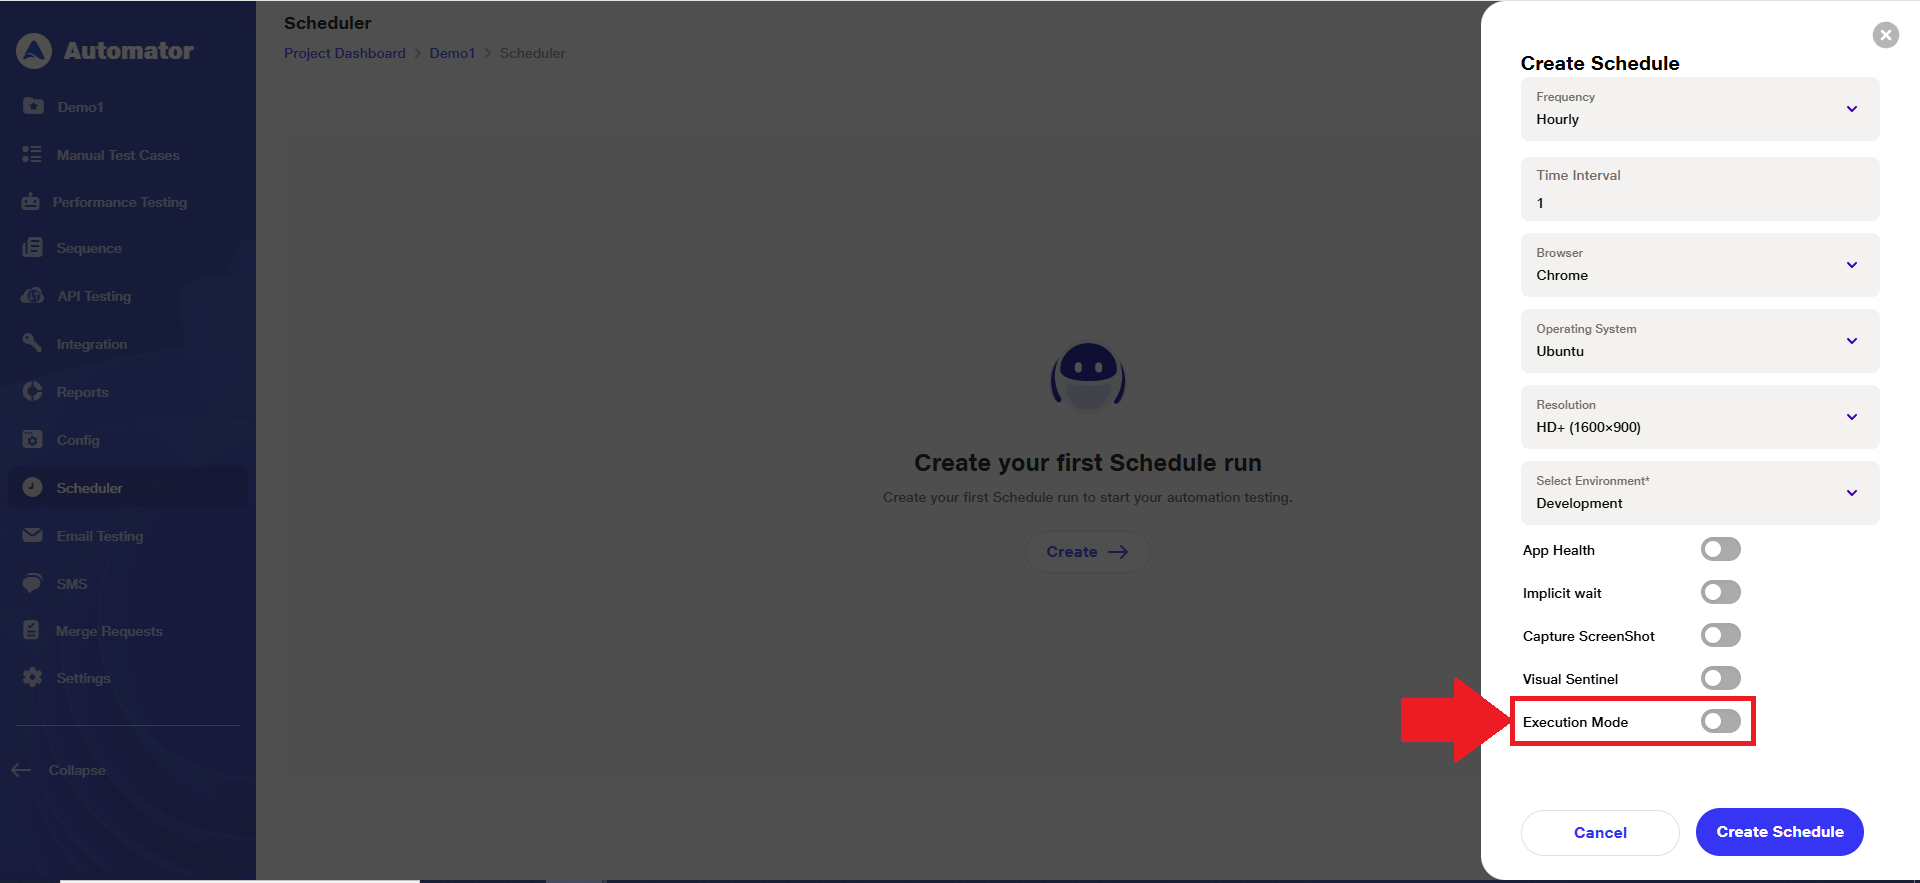 f) Note: By default, the Execution Mode is OFF, meaning all Suites/Tags and Scenarios will run in a default serial mode.
2) Setting the Execution Mode
a) To enable and configure the test execution mode:
b) Turn ON the Execution Mode toggle switch.
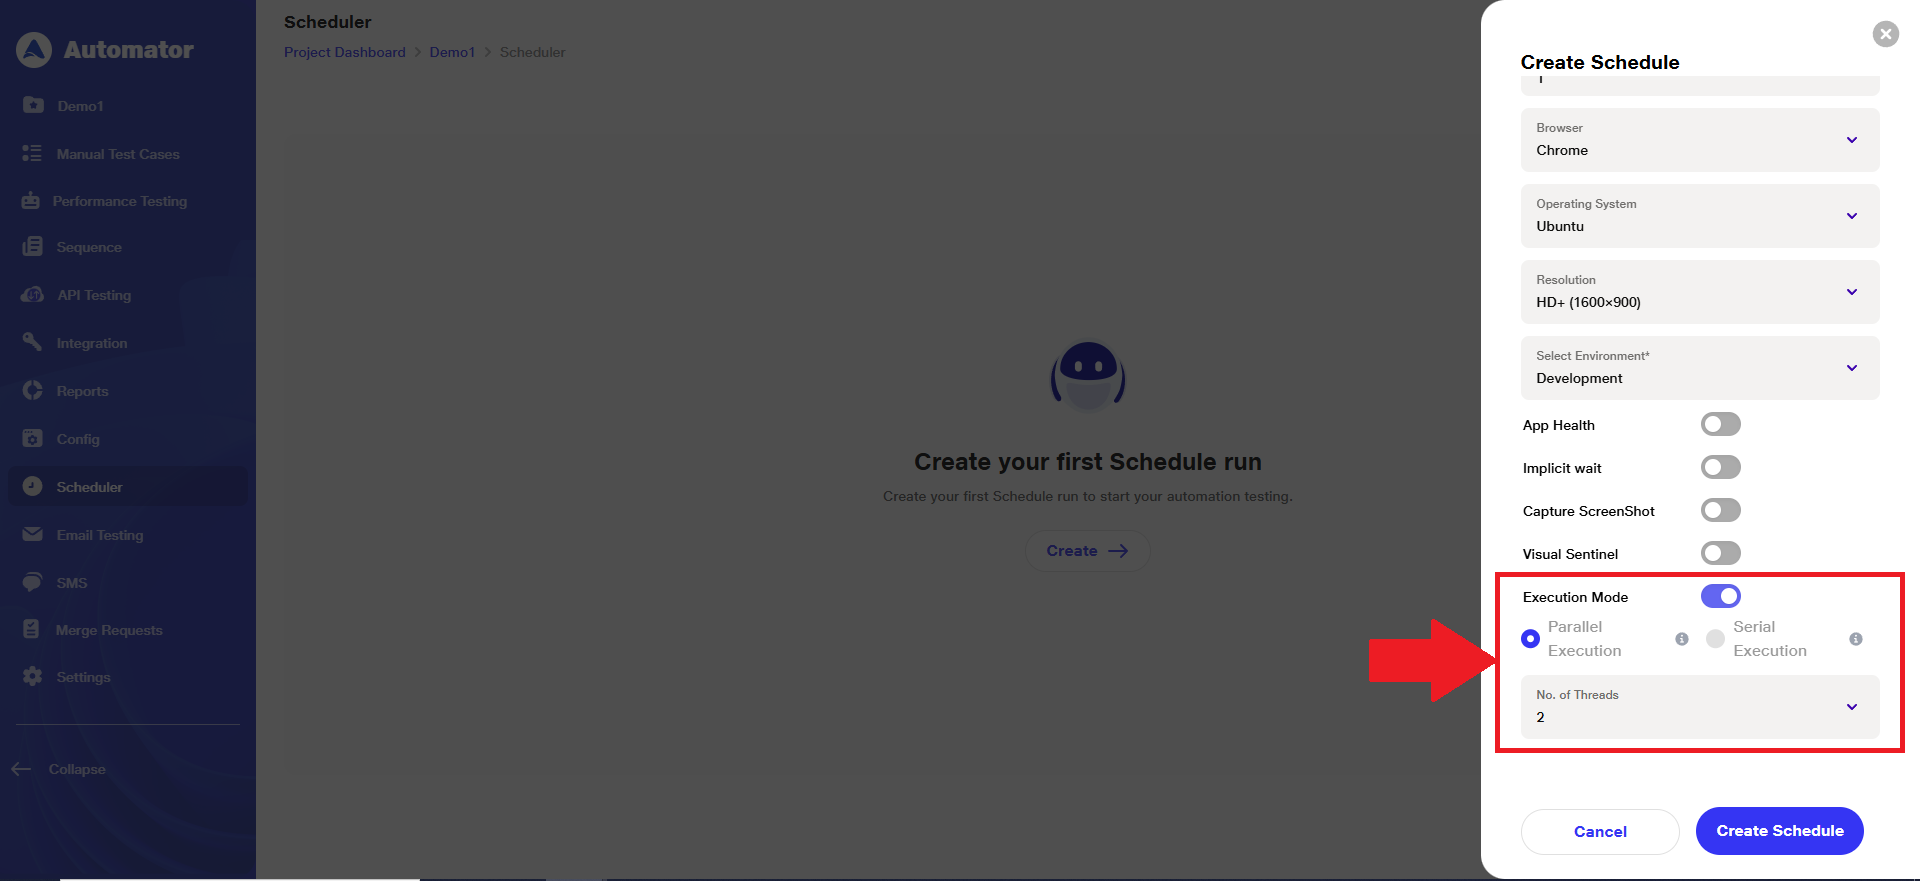 c) Note: By default, Parallel Execution will be selected, and No. of Threads will be set to 2.
d) Select the desired execution mode:
i)Parallel Execution (Default): Suites/Tags run sequentially; scenarios within them run in parallel.
ii) Serial Execution: Click to select Serial Execution. Suites/Tags run in parallel; scenarios within them run sequentially.
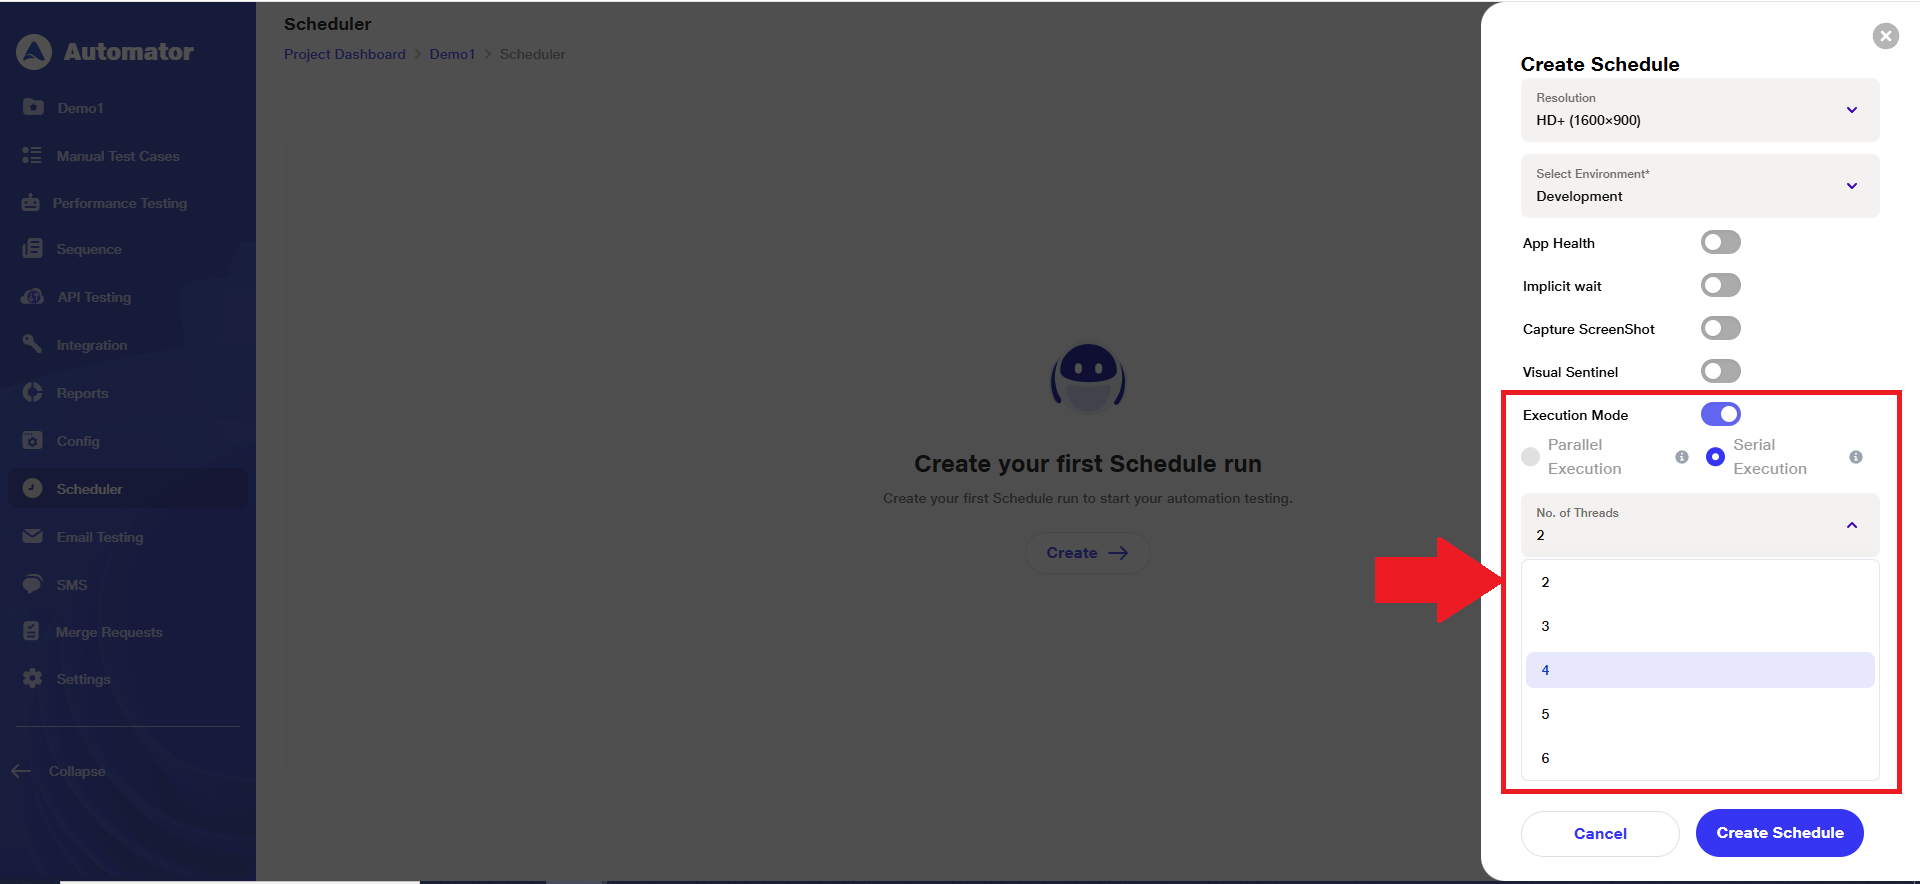 e) Set the No. of Threads count: This field controls the maximum number of parallel processes and is applicable for both modes.
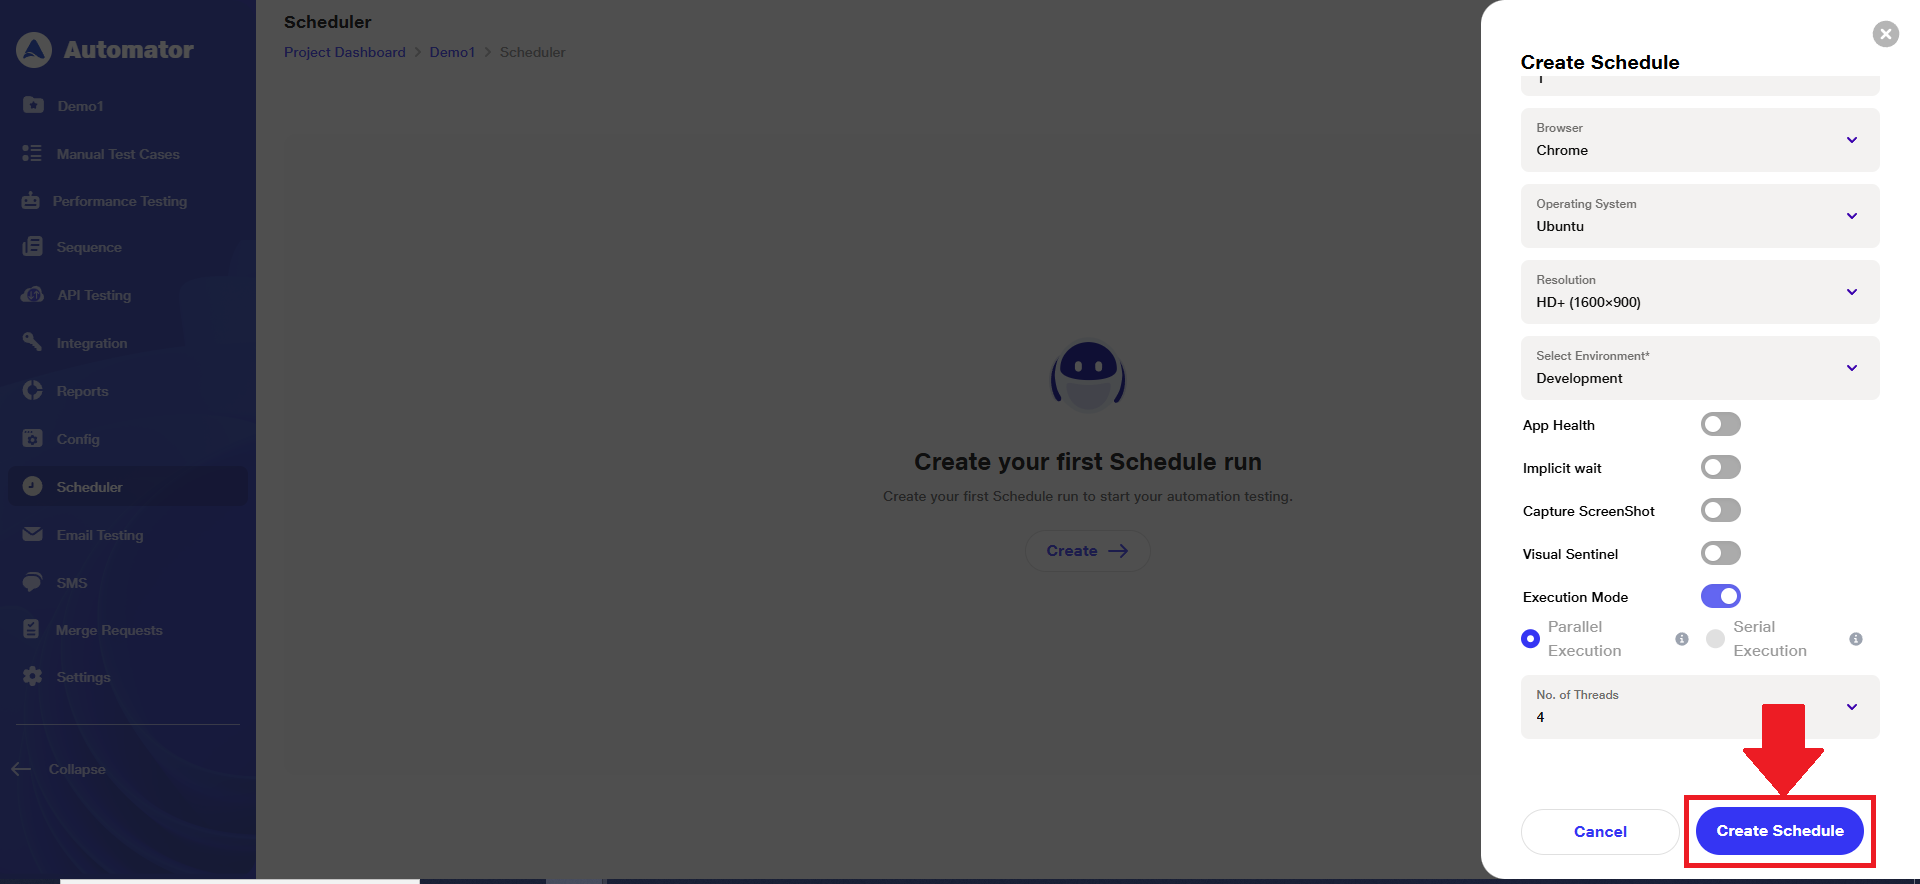
f) Once all details and the desired execution mode are set, click the Create Schedule button.
3) Editing & Disabling Execution Mode
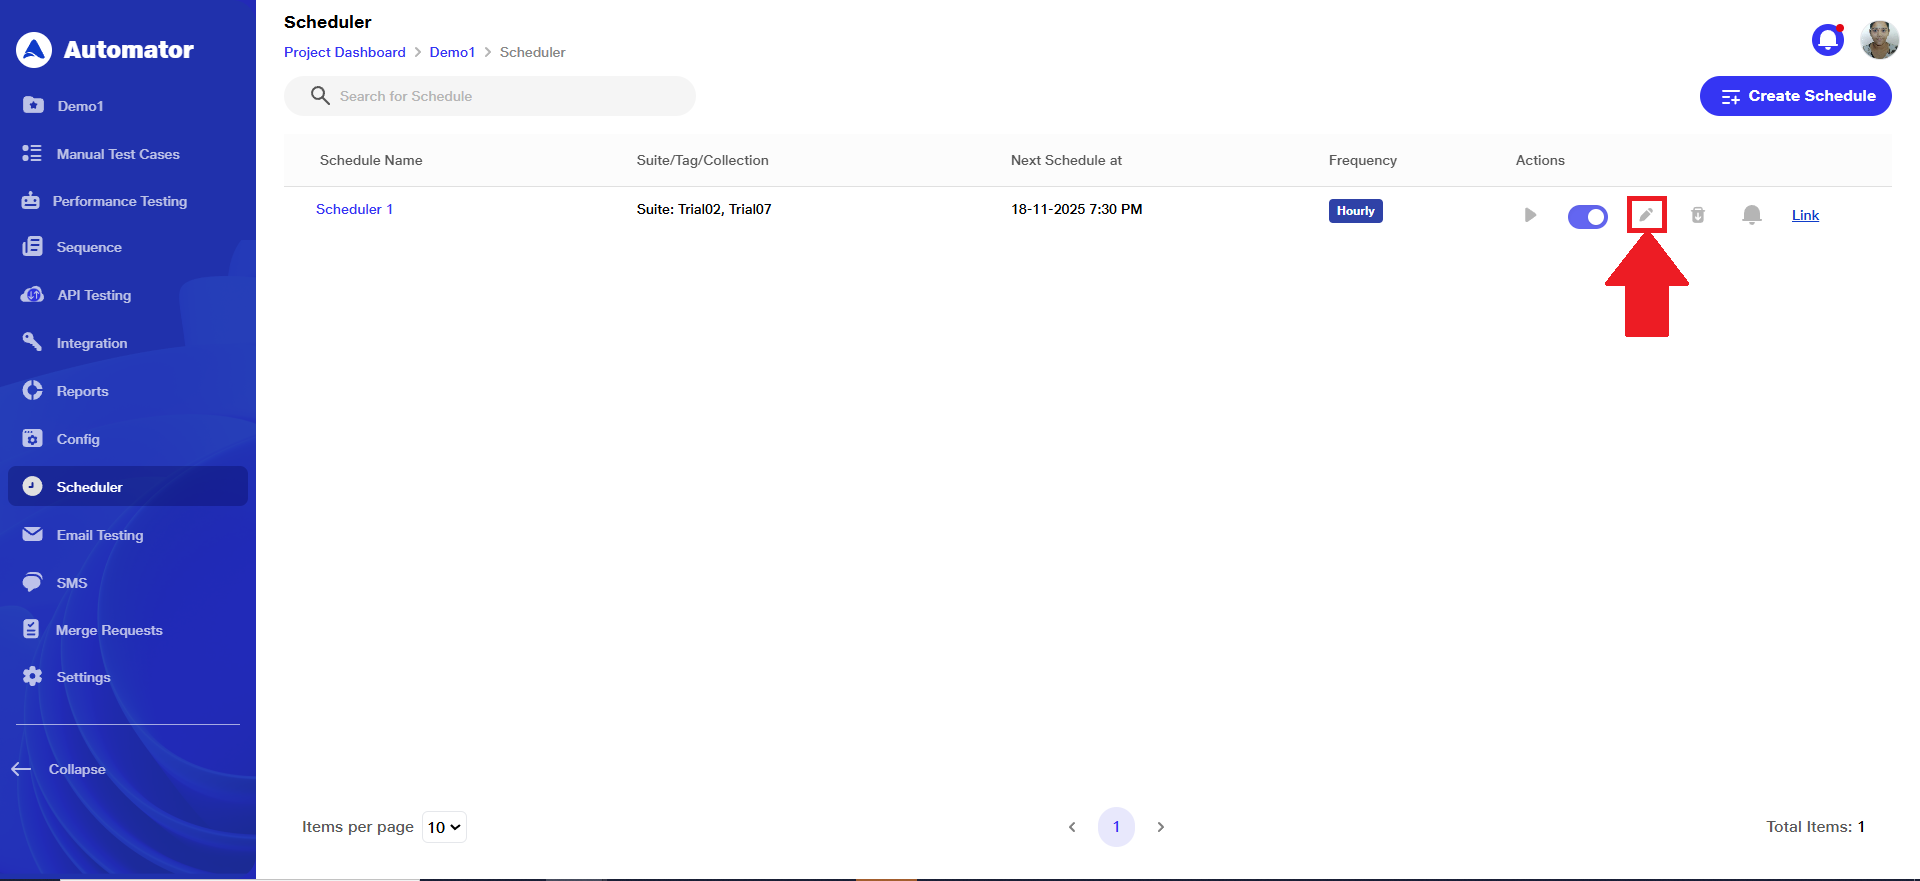
a)To modify the settings, click the Edit button associated with the schedule.
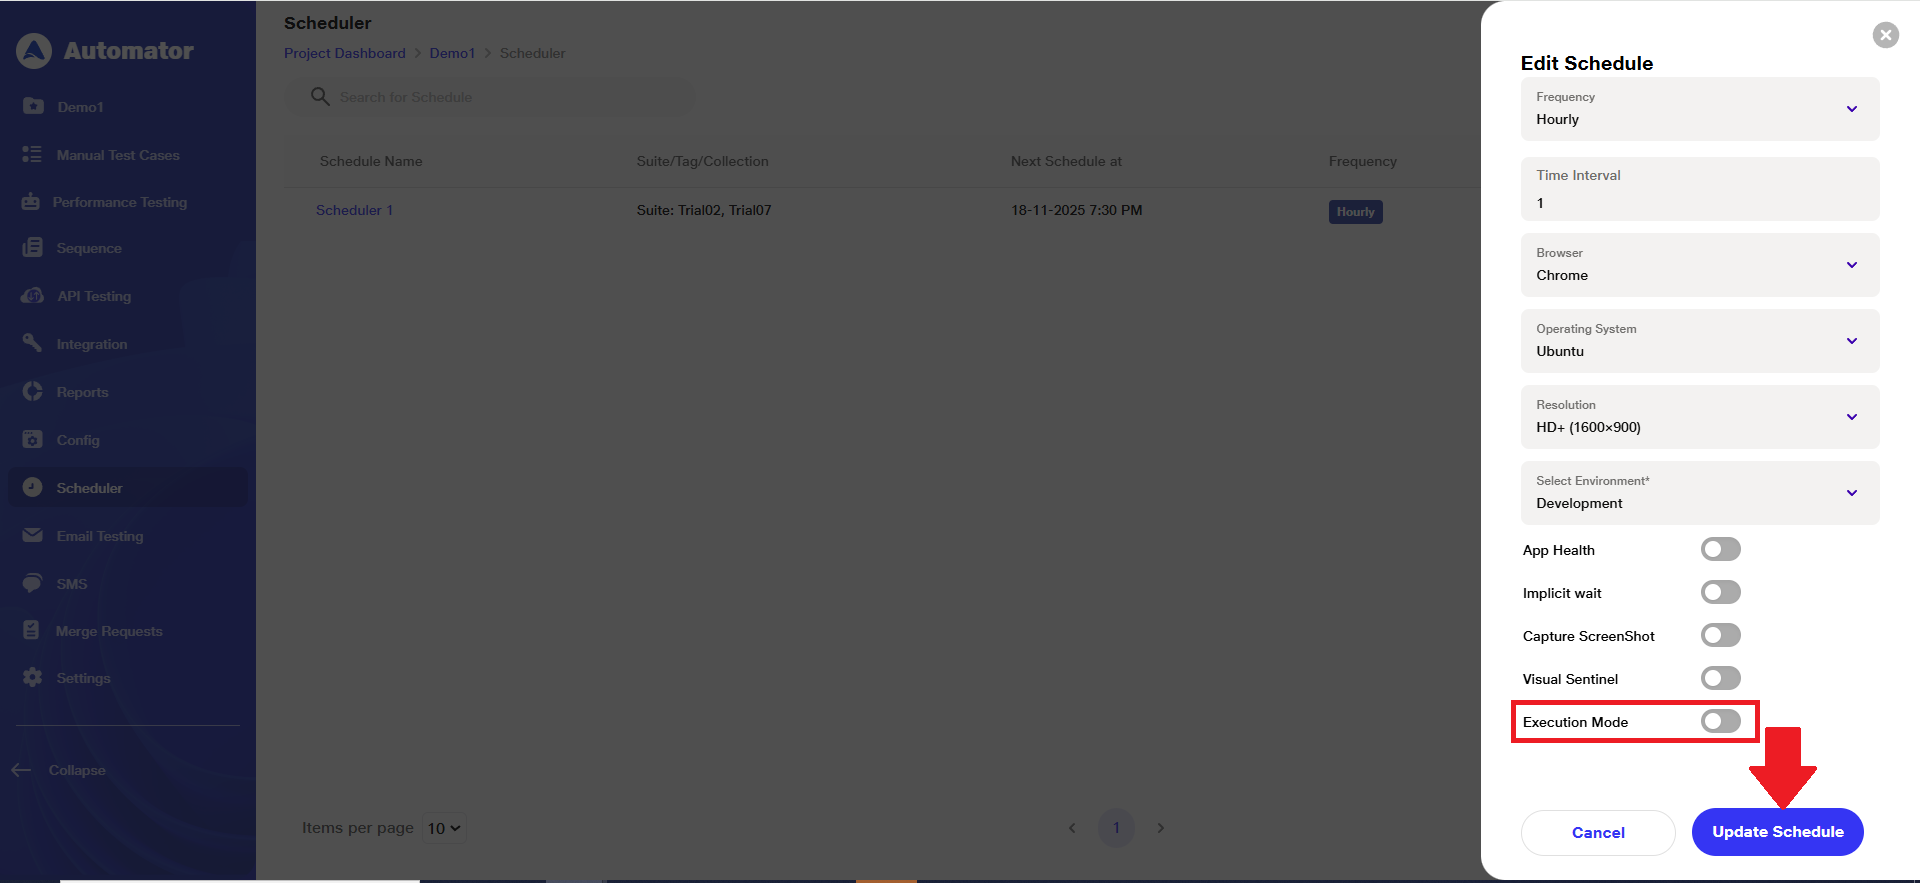
 b) Make the required changes to the Execution Mode and/or No. of Threads.
c) To revert to the default serial execution, Turn OFF the Execution Mode toggle switch.
d) Click the Update Schedule button to save your modifications.
4) Viewing Execution Mode in Reports
a) The selected execution mode settings are recorded and visible in the test results for auditing and reference.
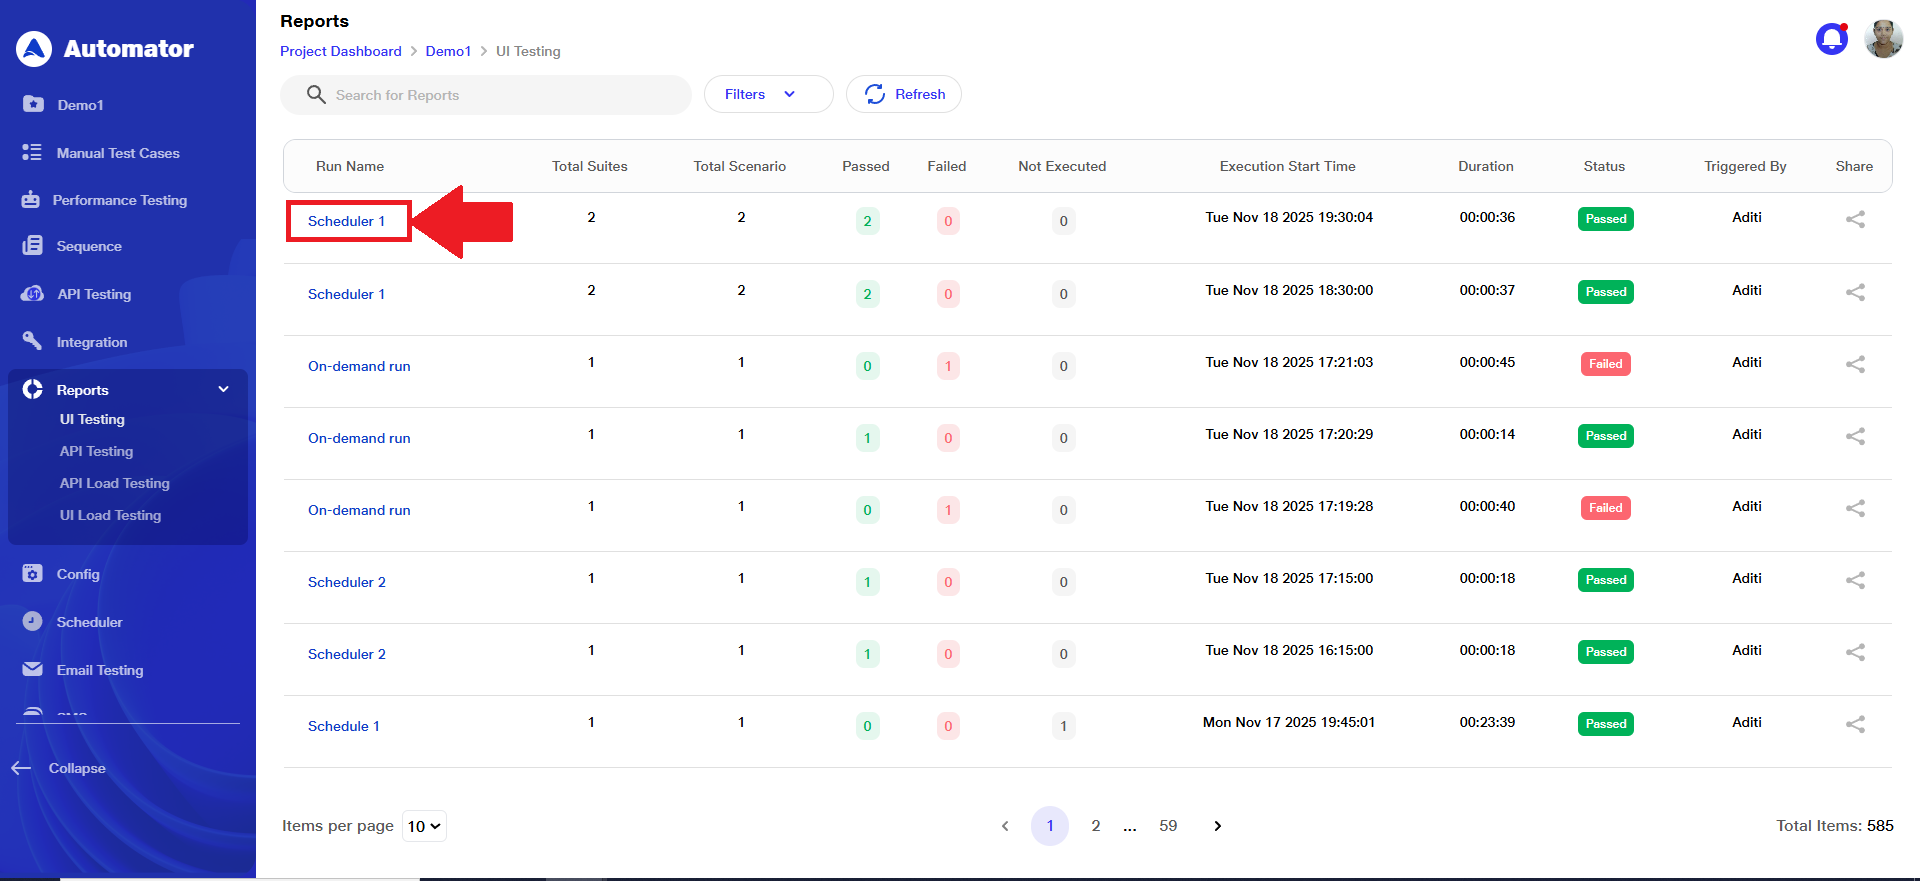
b) Navigate to the Reports section.
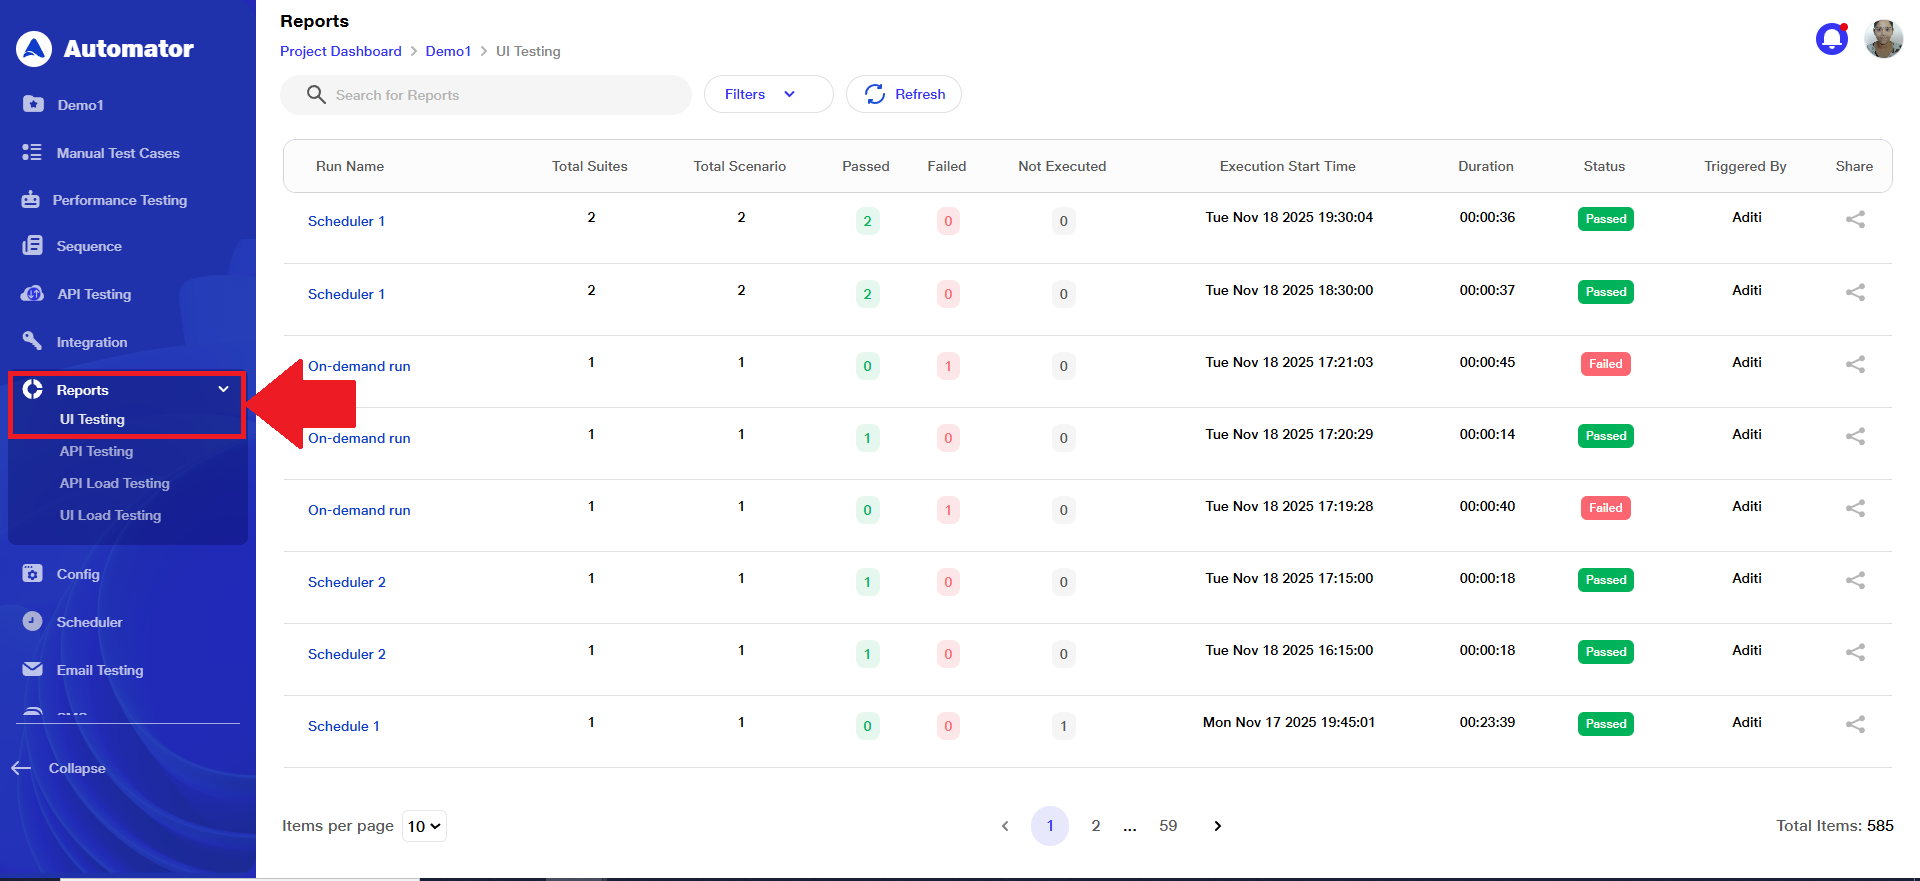 c) Select the relevant test run.
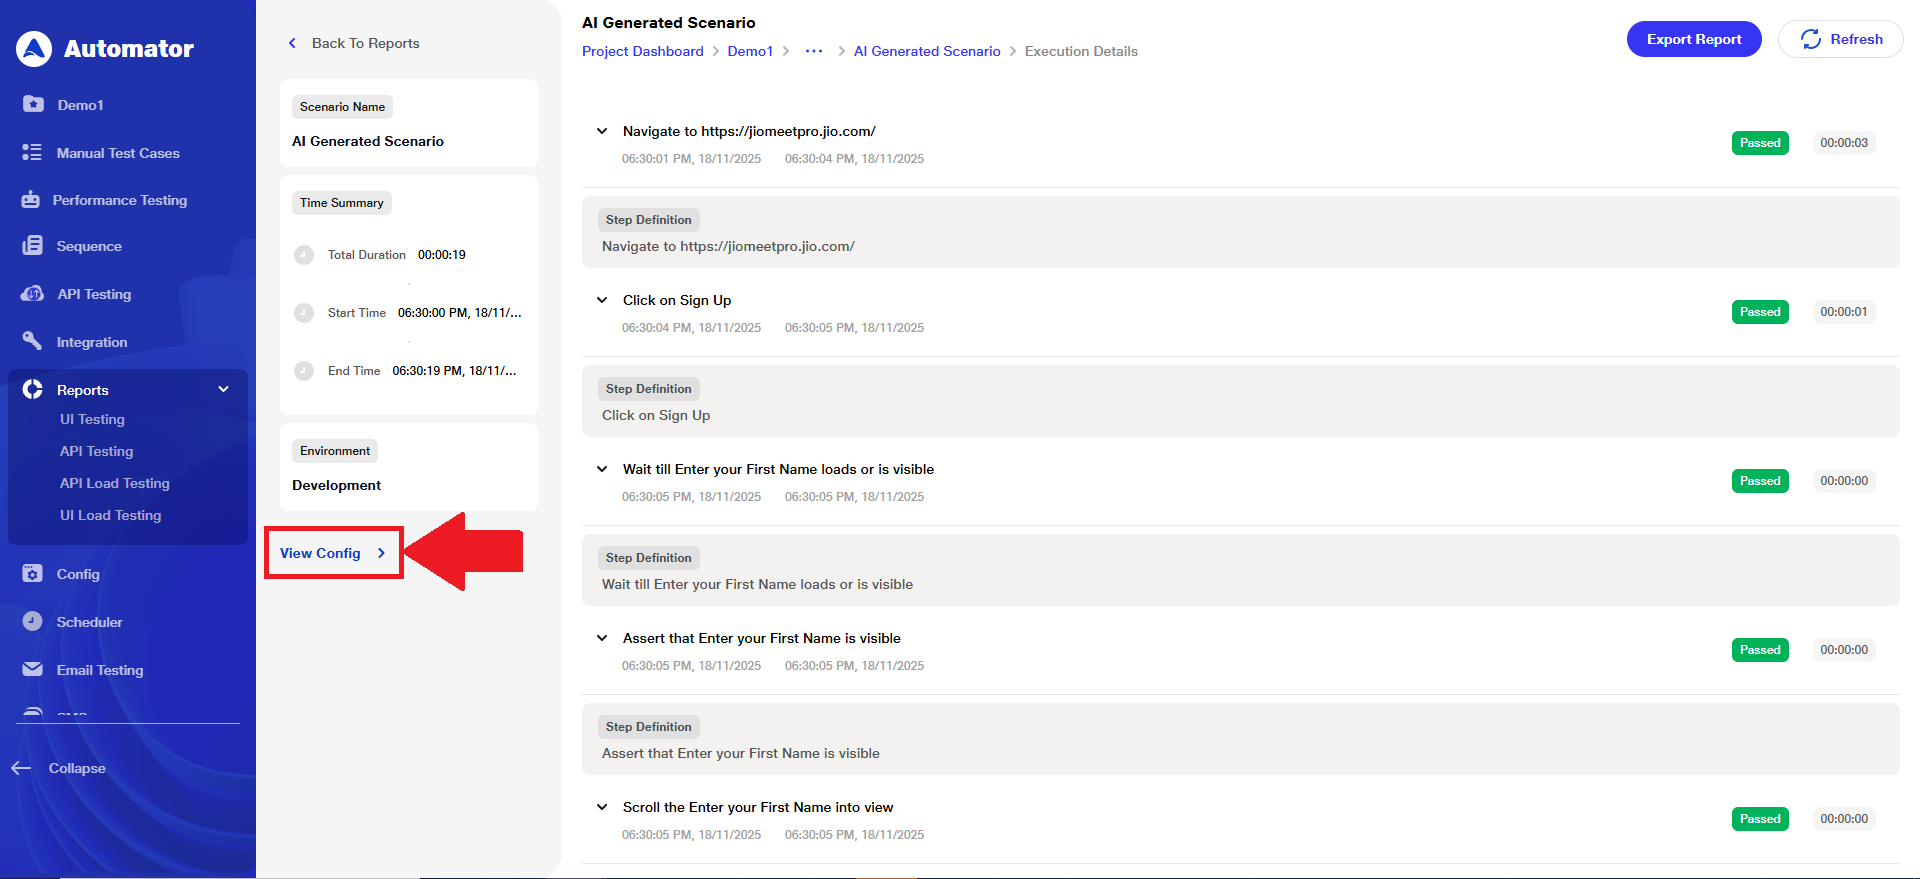
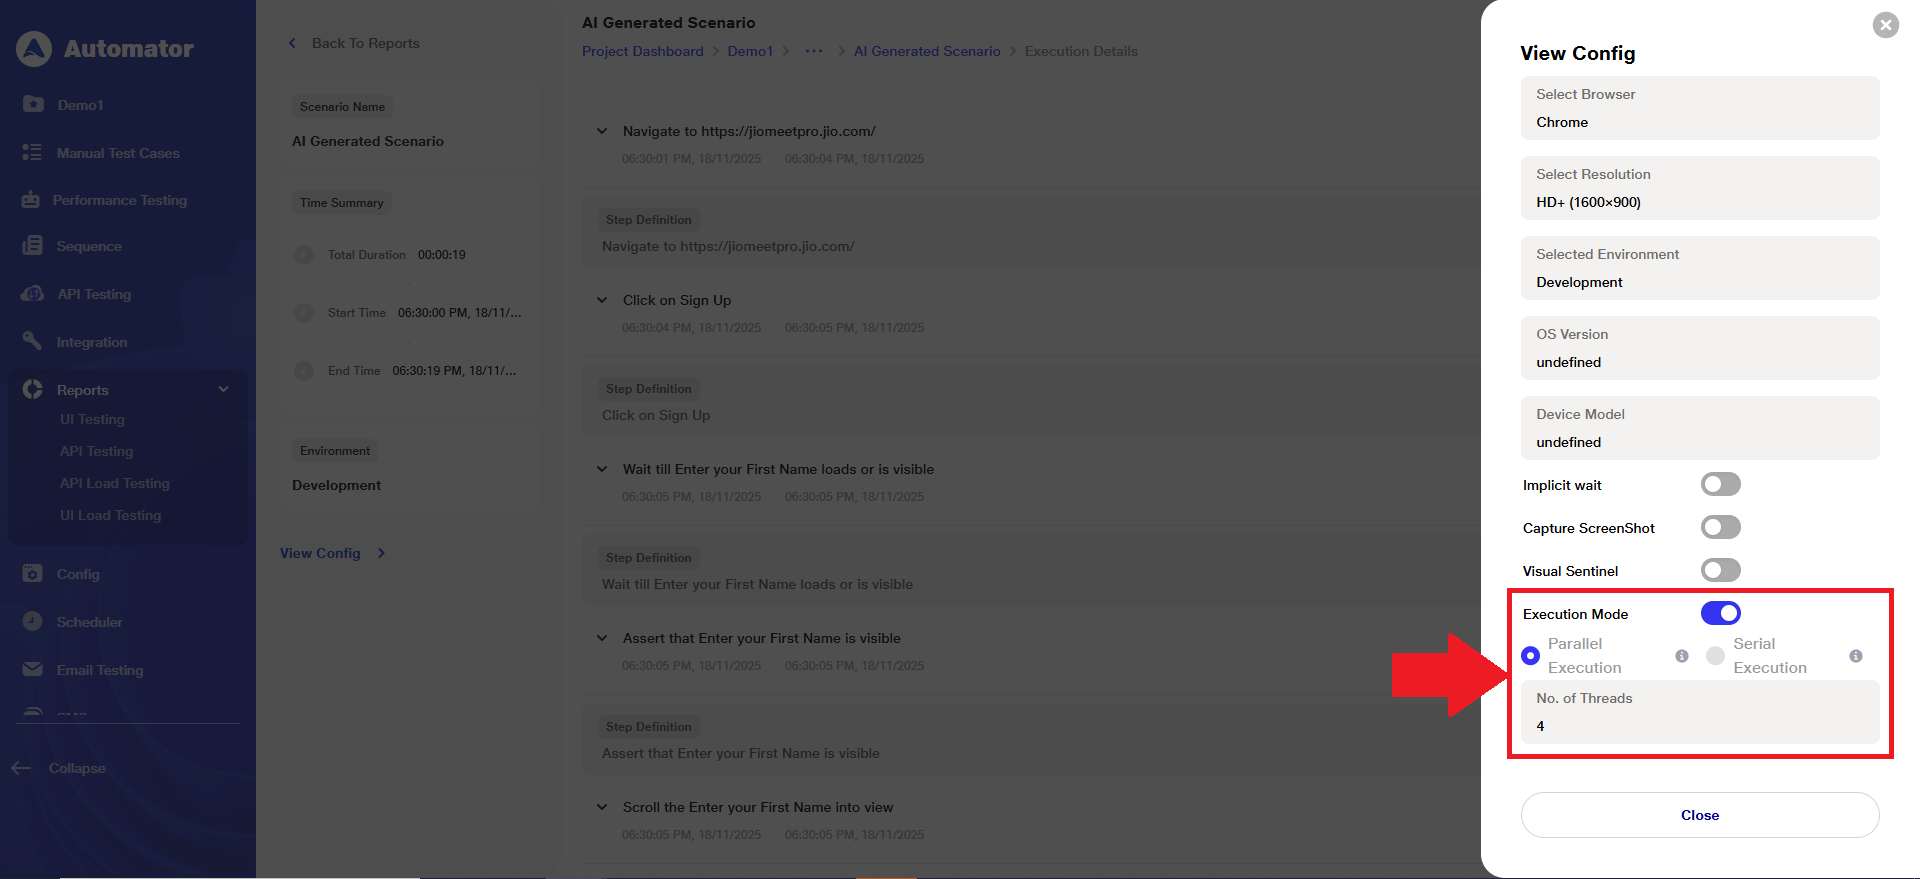
 d) View the selected execution mode and No. of threads under the View Config section of the report
5) Feature Applicability Limitations
a) Please note that the Execution Mode feature (including the options for Parallel Execution, Serial Execution, and the No. of Threads setting) is not applicable to the API Testing and Mobile Testing.
Benefits
1) Flexibility in Execution – Users can choose between parallel or serial mode depending on test requirements and resource availability. They can also configure thread count, providing further control over execution.
2) Optimized Resource Utilization – Efficient use of available threads, user resources and devices prevents idle time and overload.
3)Reduced Execution Failures – By selecting Serial or Parallel execution according to available users, the system avoids overloading resources, which prevents failures due to insufficient availability.
4) Improved Efficiency – Parallel execution of scenarios under Suites/Tags accelerates testing without changing the suite order, reducing overall test time.
5) Enhanced Stability – Default serial execution ensures smooth runs when parallel execution is not desired, or resources are limited.
6) Consistent Test Performance – Maintains smooth and predictable test runs across varying scenarios.
7) Scalability – Ability to toggle execution mode and adjust thread count allows tests to scale across different numbers of users and environments.
Parallel Execution for mobile
Parallel Mobile Test Execution enables rapid validation of mobile applications by running test suites or scenarios concurrently across real and virtual devices. By leveraging parallel execution, teams can significantly reduce testing time, accelerate release cycles, and ensure broader device coverage. This capability enhances efficiency, boosts scalability, and ensures high-quality mobile experiences across diverse platforms and configurations.
1) Location of Parallel Execution
a) Navigate to the Scheduler section of the project.
b) Click the Create Schedule button located at the top-right corner of the screen.
 c) A form containing multiple fields that need to be filled out to proceed with schedule creation will appear on the right-hand side of the screen.
 d) Enter the Schedule Name.
e) Select the Schedule Date & Time.
f) In the Type of Testing dropdown, choose Native and Hybrid mobile testing.
 g) To proceed with frequency details after selecting suite or tags, choose Real Device in the Device Preference section.
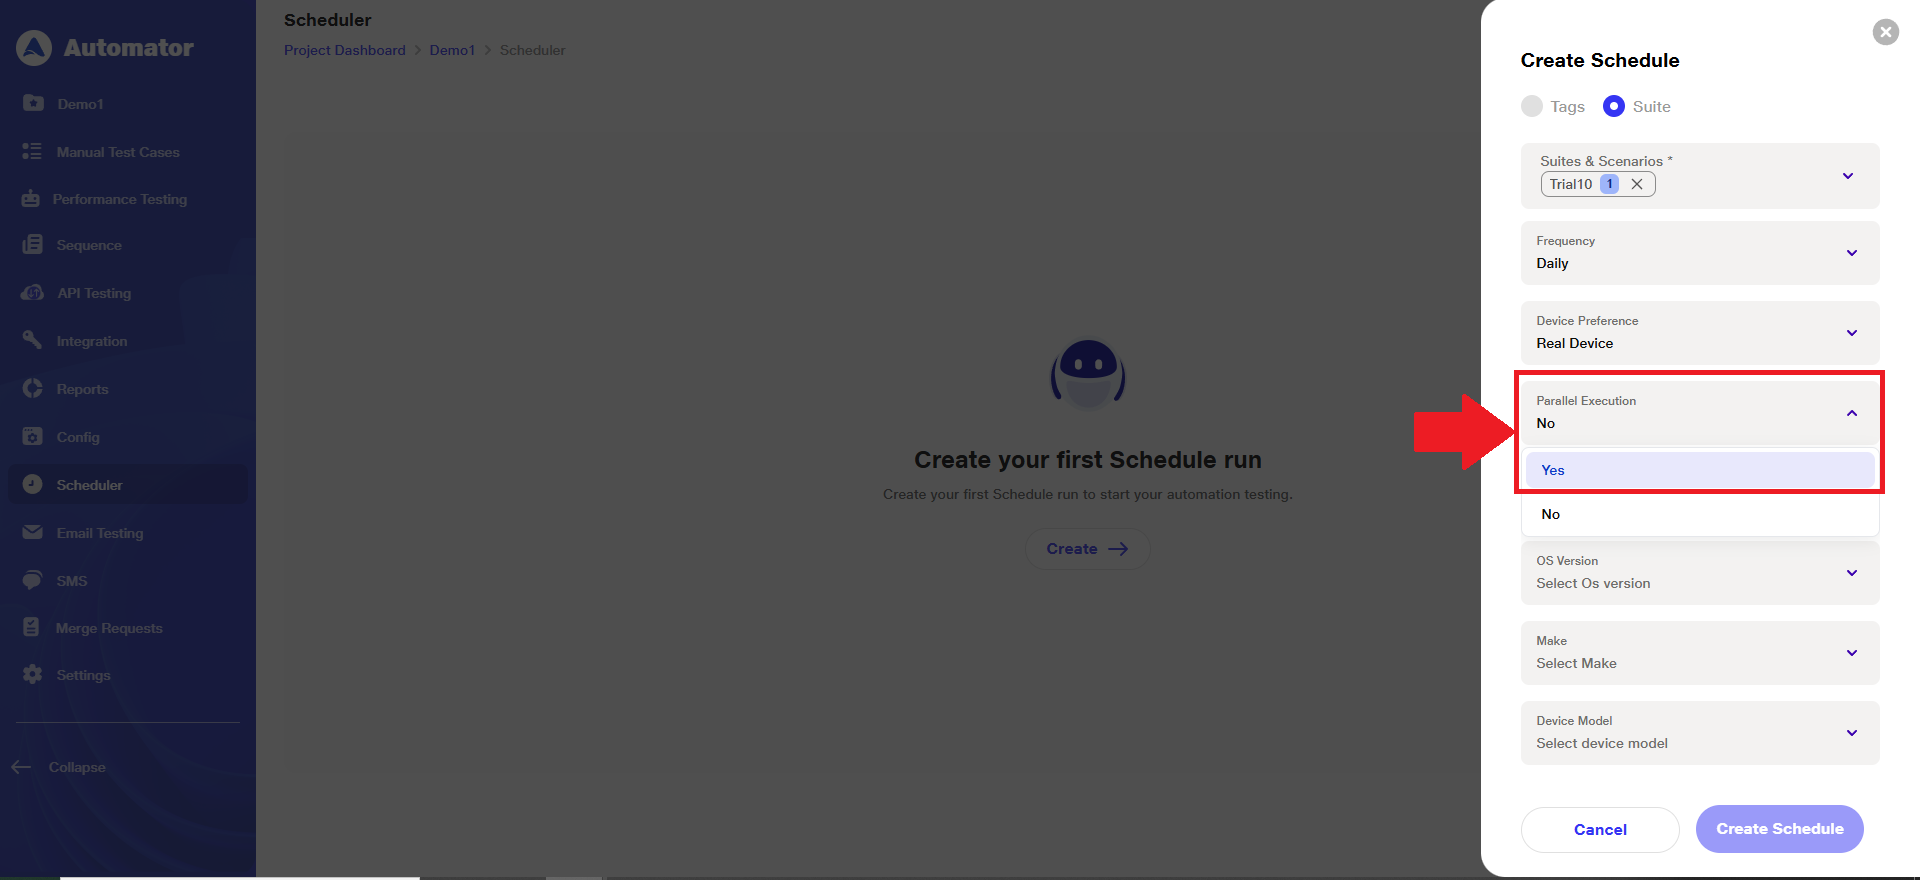
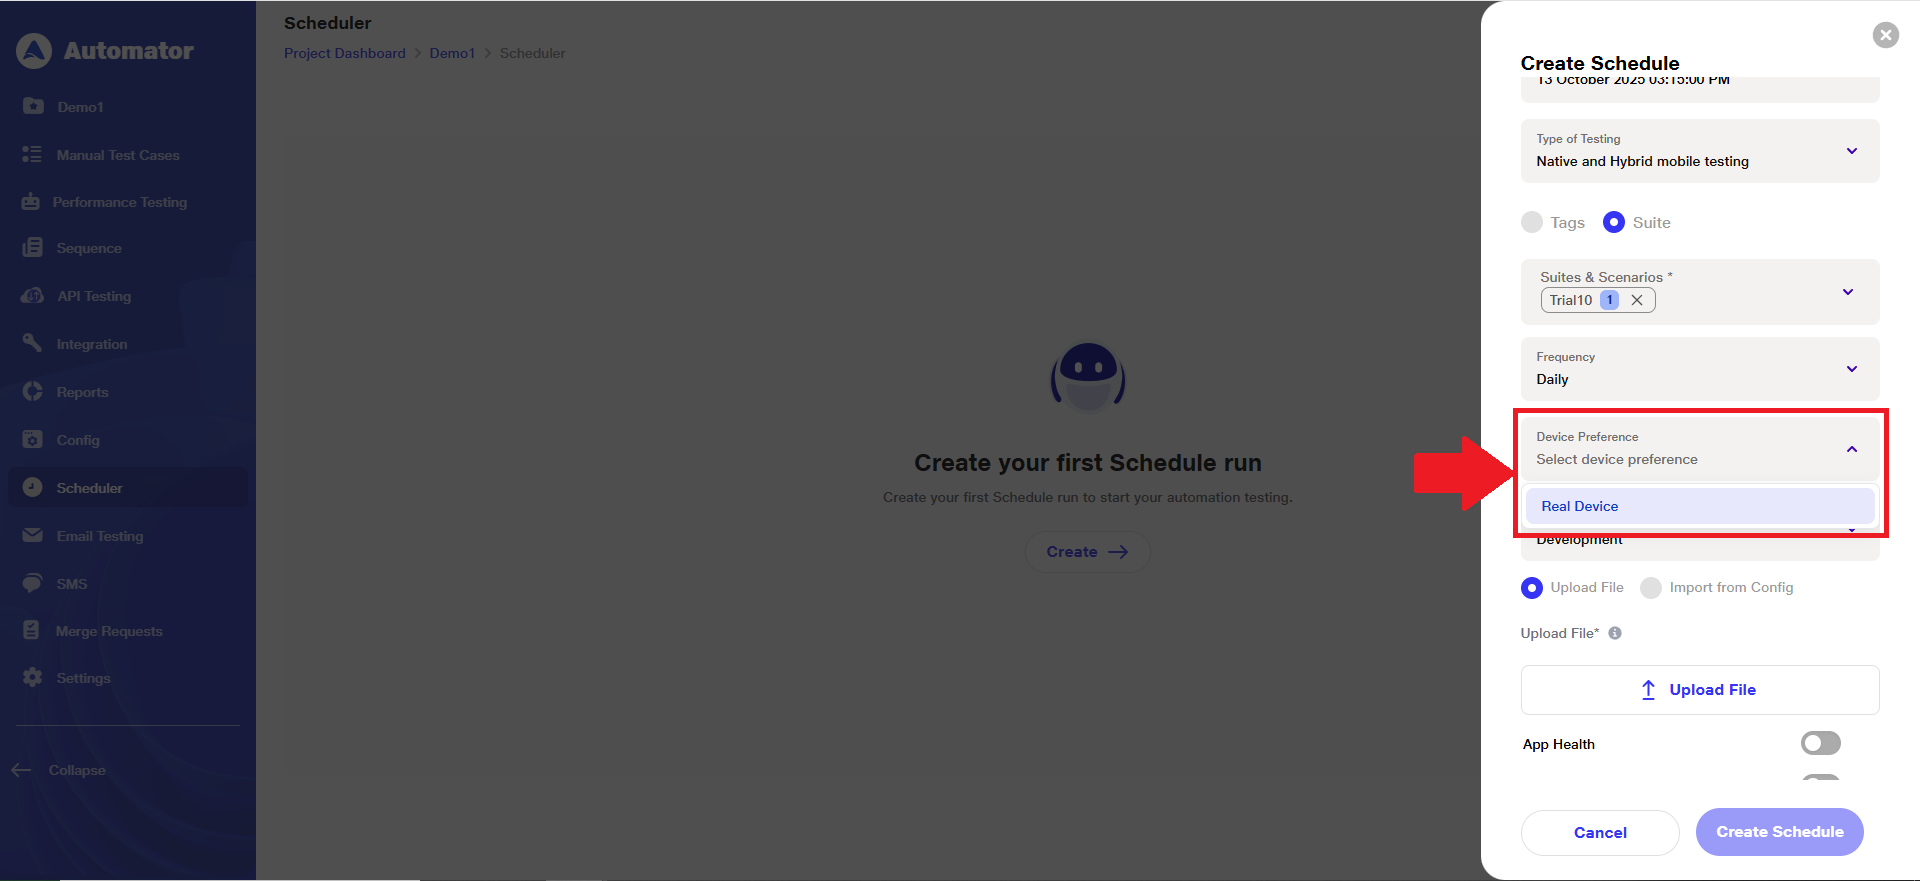 h) After selecting Real Device, the Parallel Execution option will be enabled by default set to No.
i) Change this setting to Yes to enable parallel execution in the respective scheduler.
2) Setting Parallel Execution
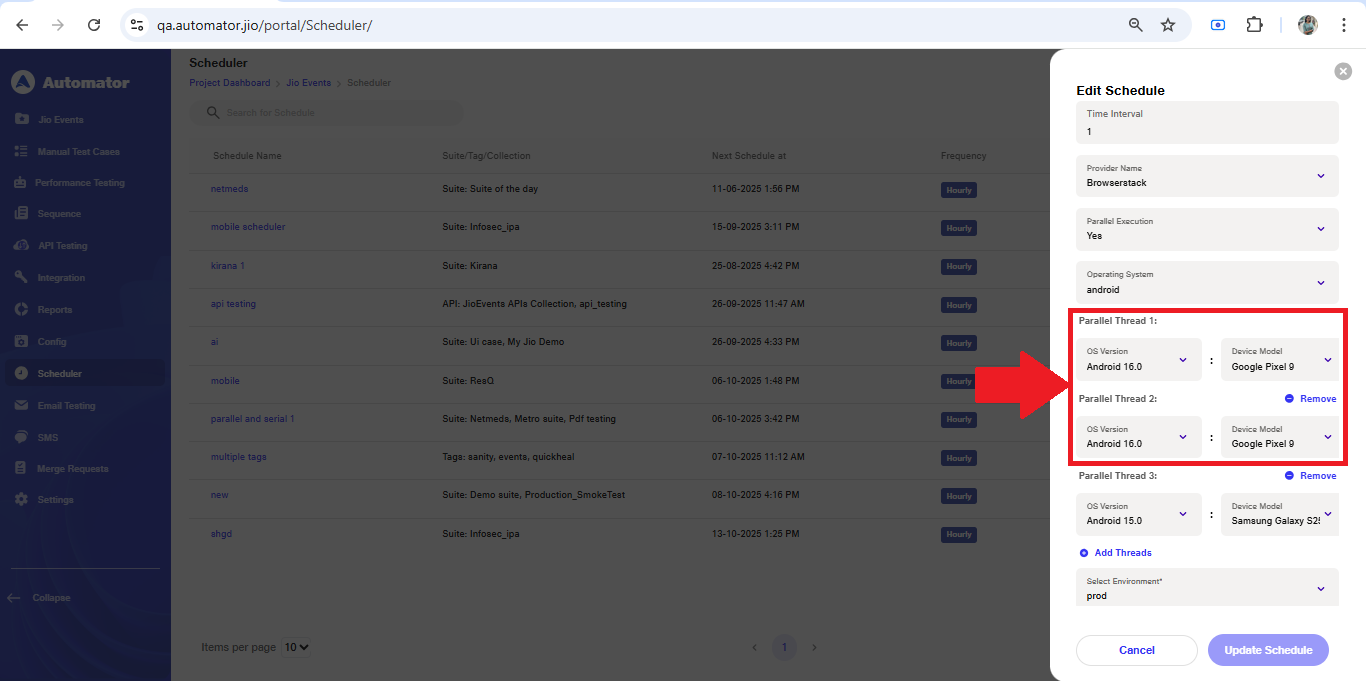
a) Upon selecting Yes for Parallel Execution, the Operating System field will appear with Android selected by default.
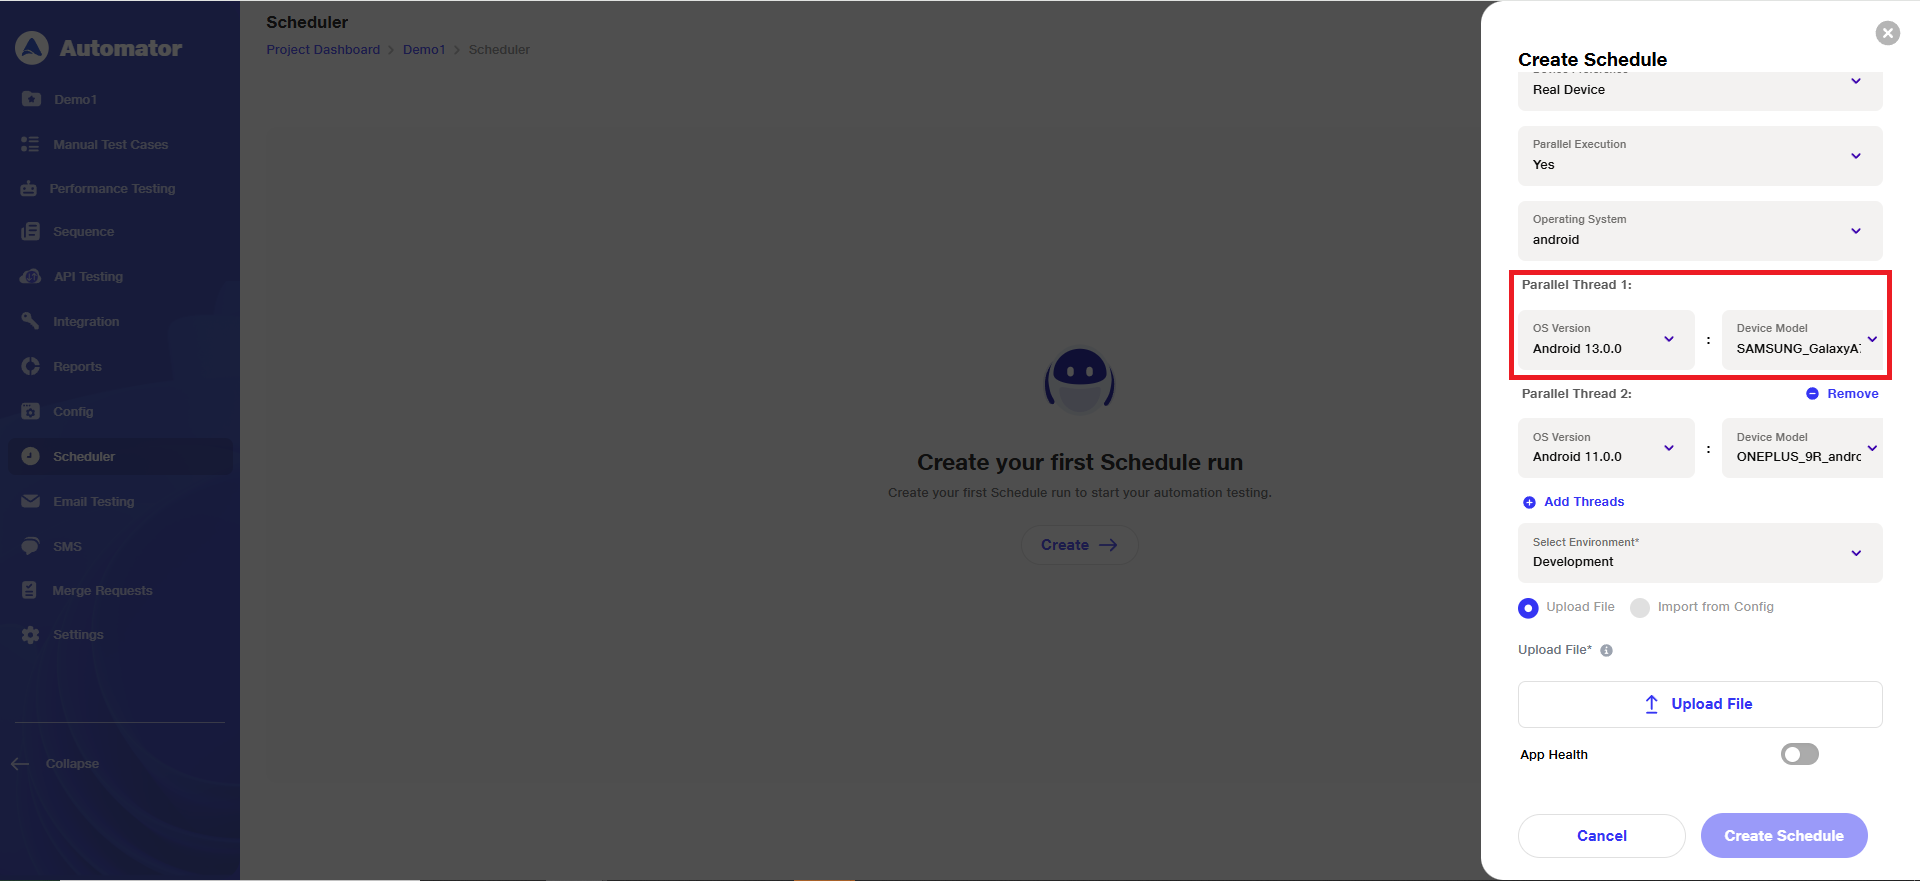
b) The Parallel Thread will be created, under which user has to select the respective OS Version and Device model.
c) In the Parallel Thread section, select the desired OS Version from the available options according to your needs.
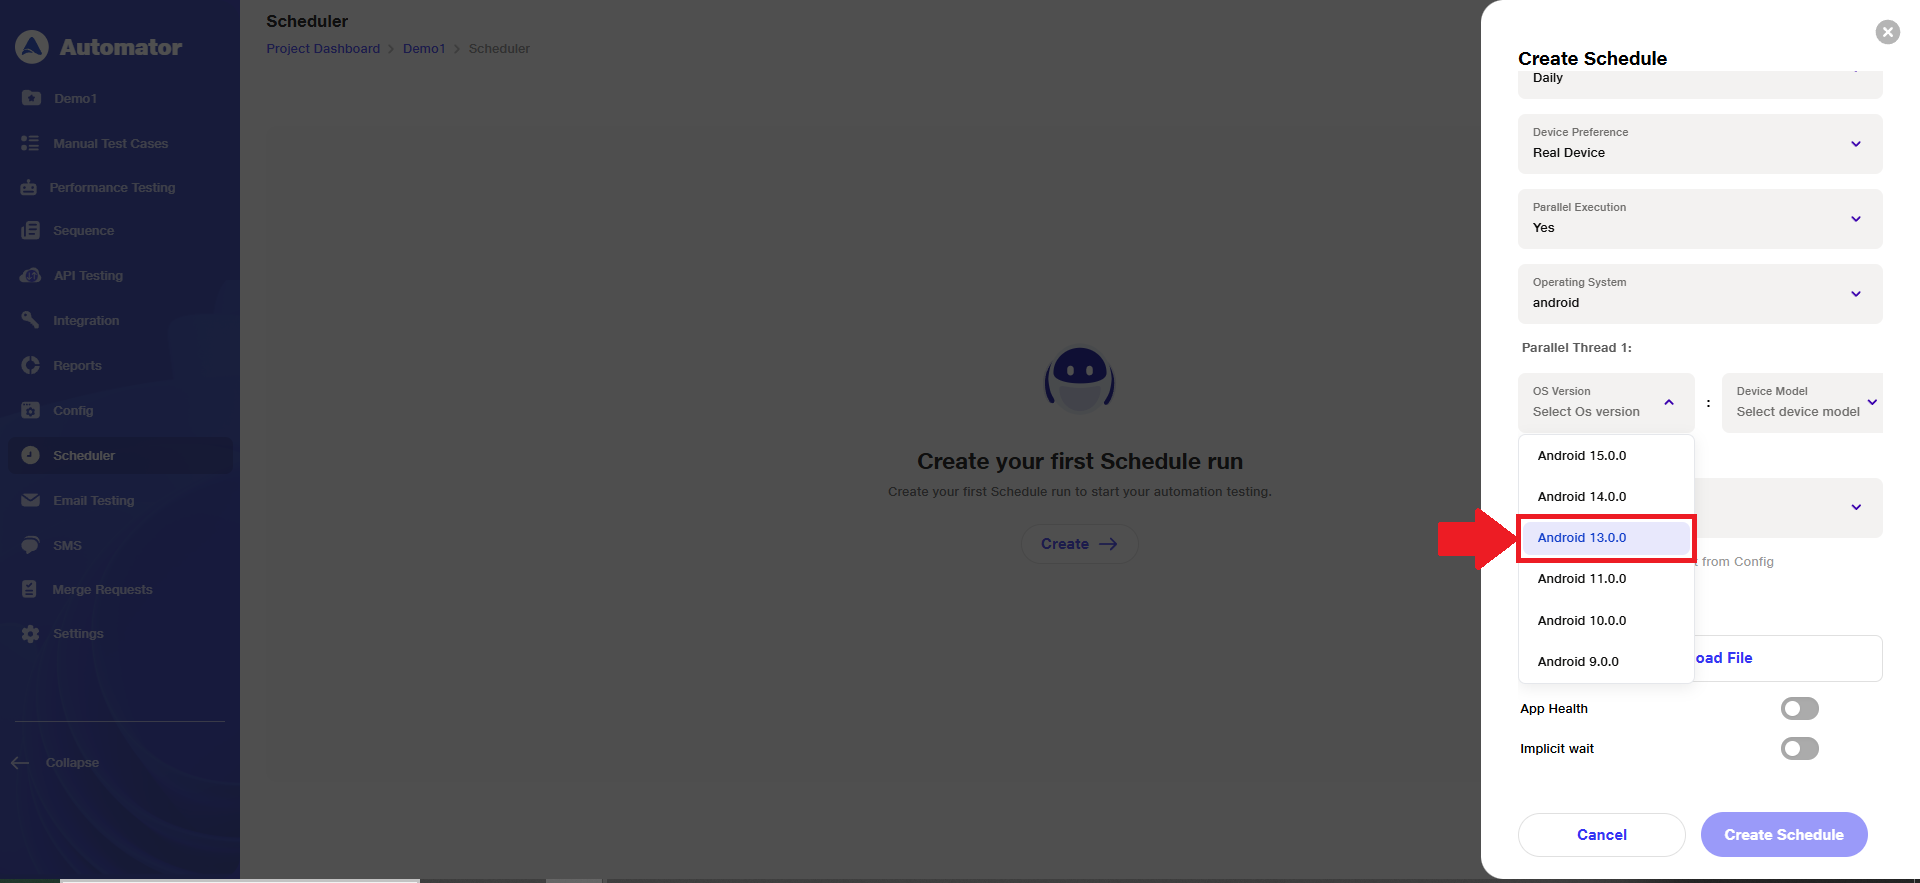 d) Note: User can switch the operating system to iOS based on the testing requirements.
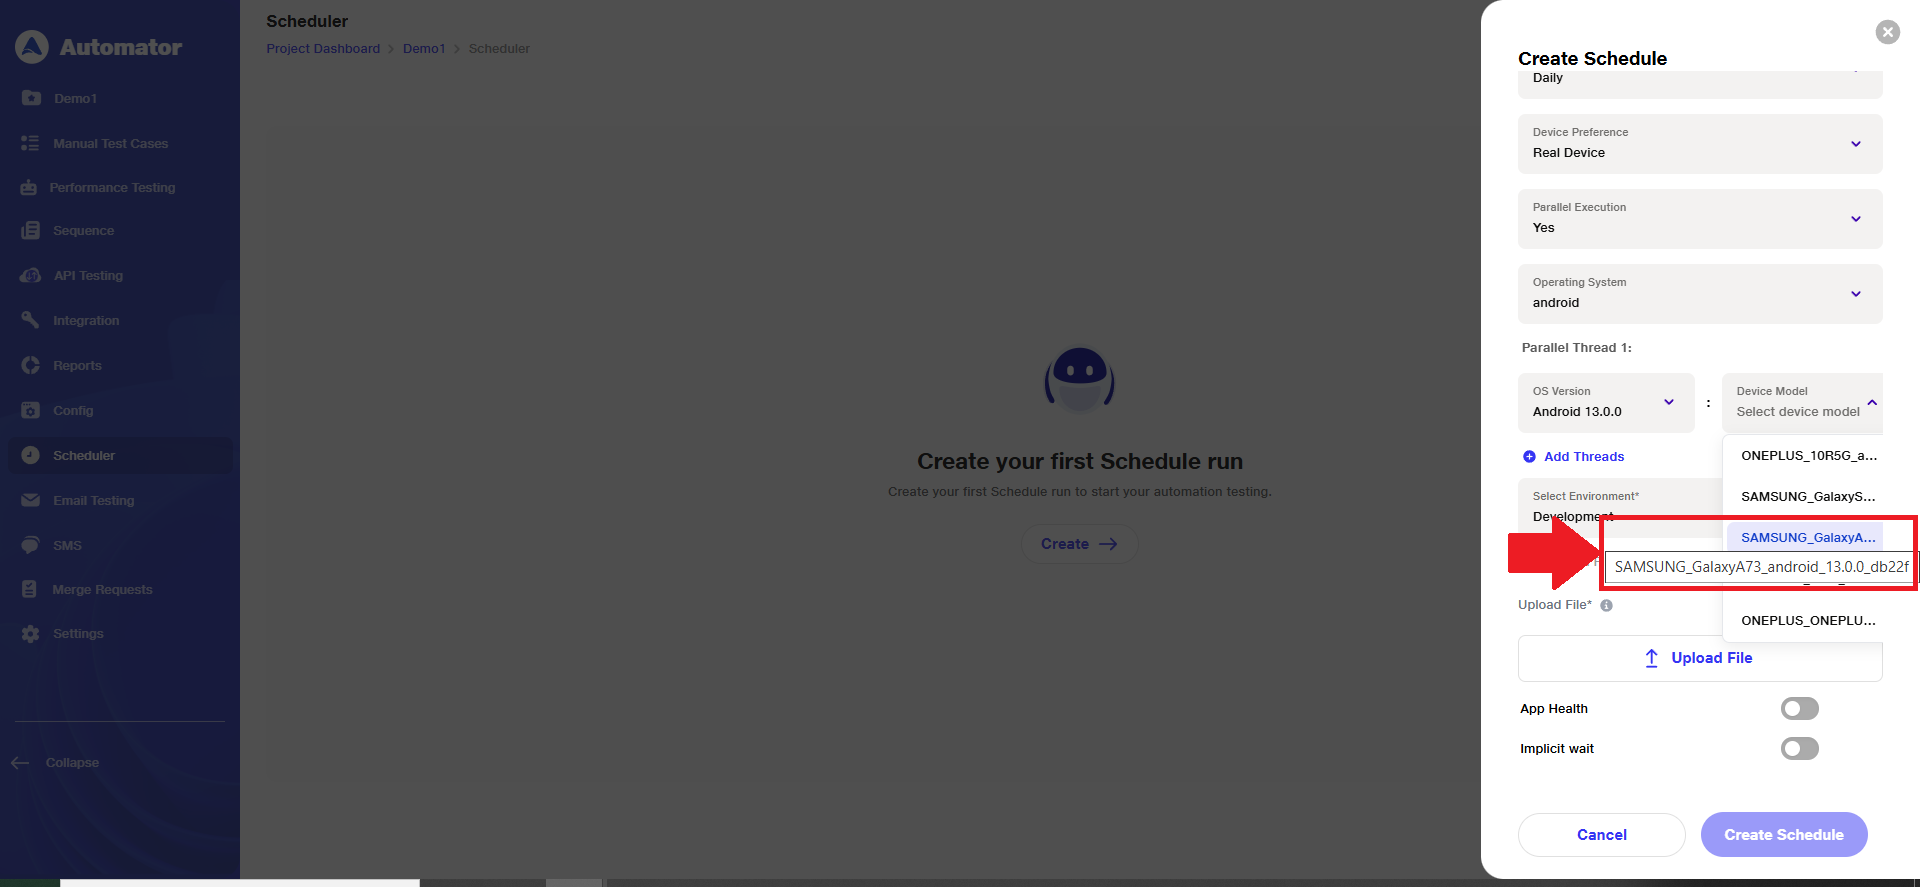
e) Based on the selected OS Version, the corresponding Device Model options will be displayed.
f) Choose the appropriate Device Model from the available list to proceed.
3) Creating More Than One Parallel Thread
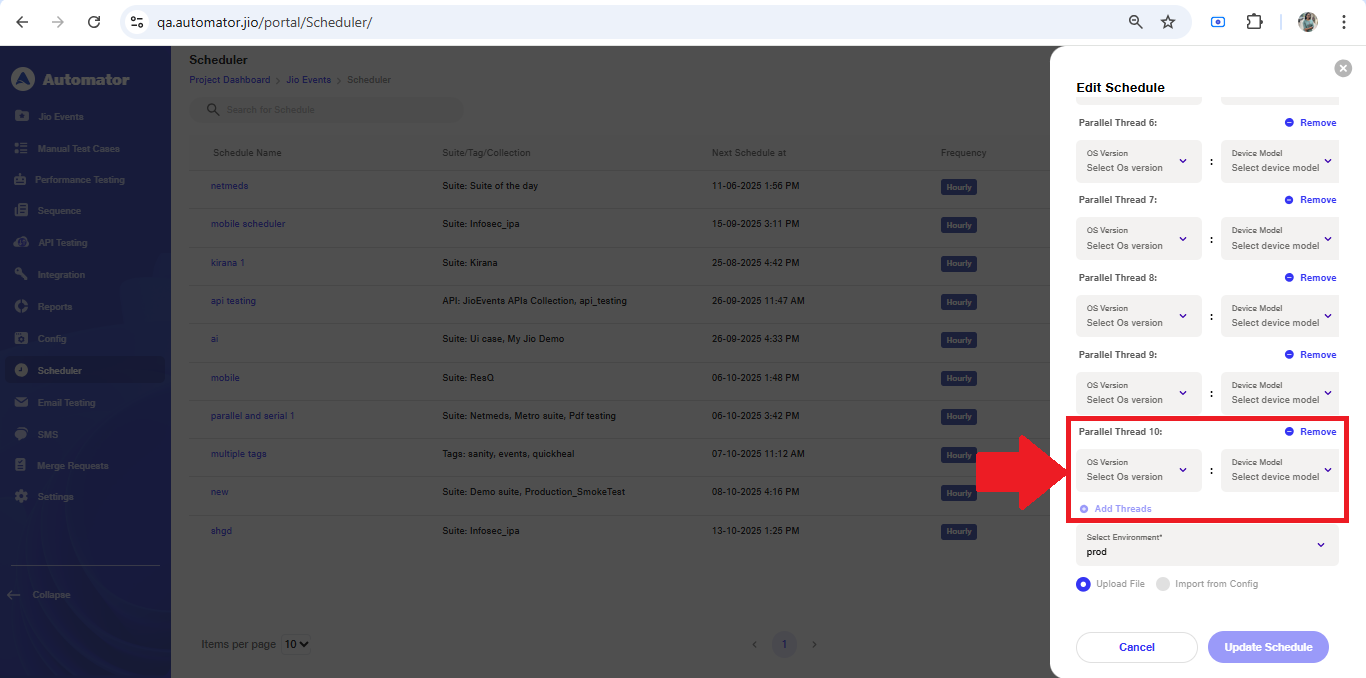
a) Users can click on the Add Threads button to create additional threads, up to a maximum of 3 parallel threads.
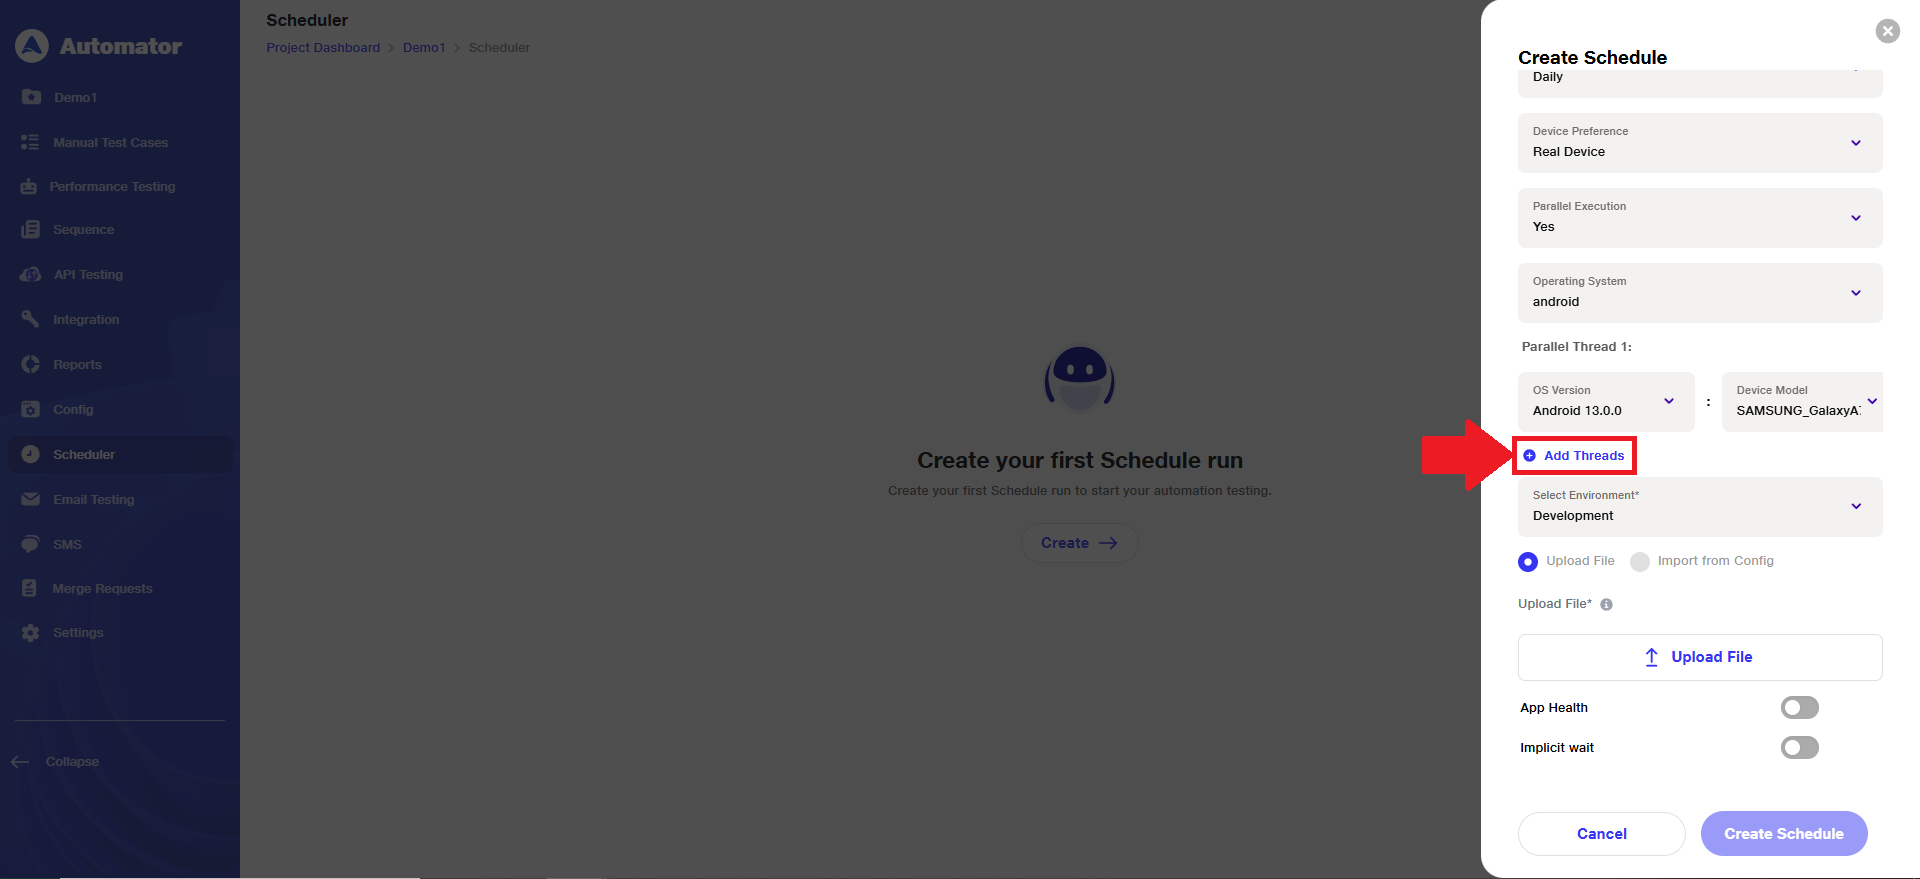 b) Once the limit is reached, the Add Thread option will be hidden automatically.
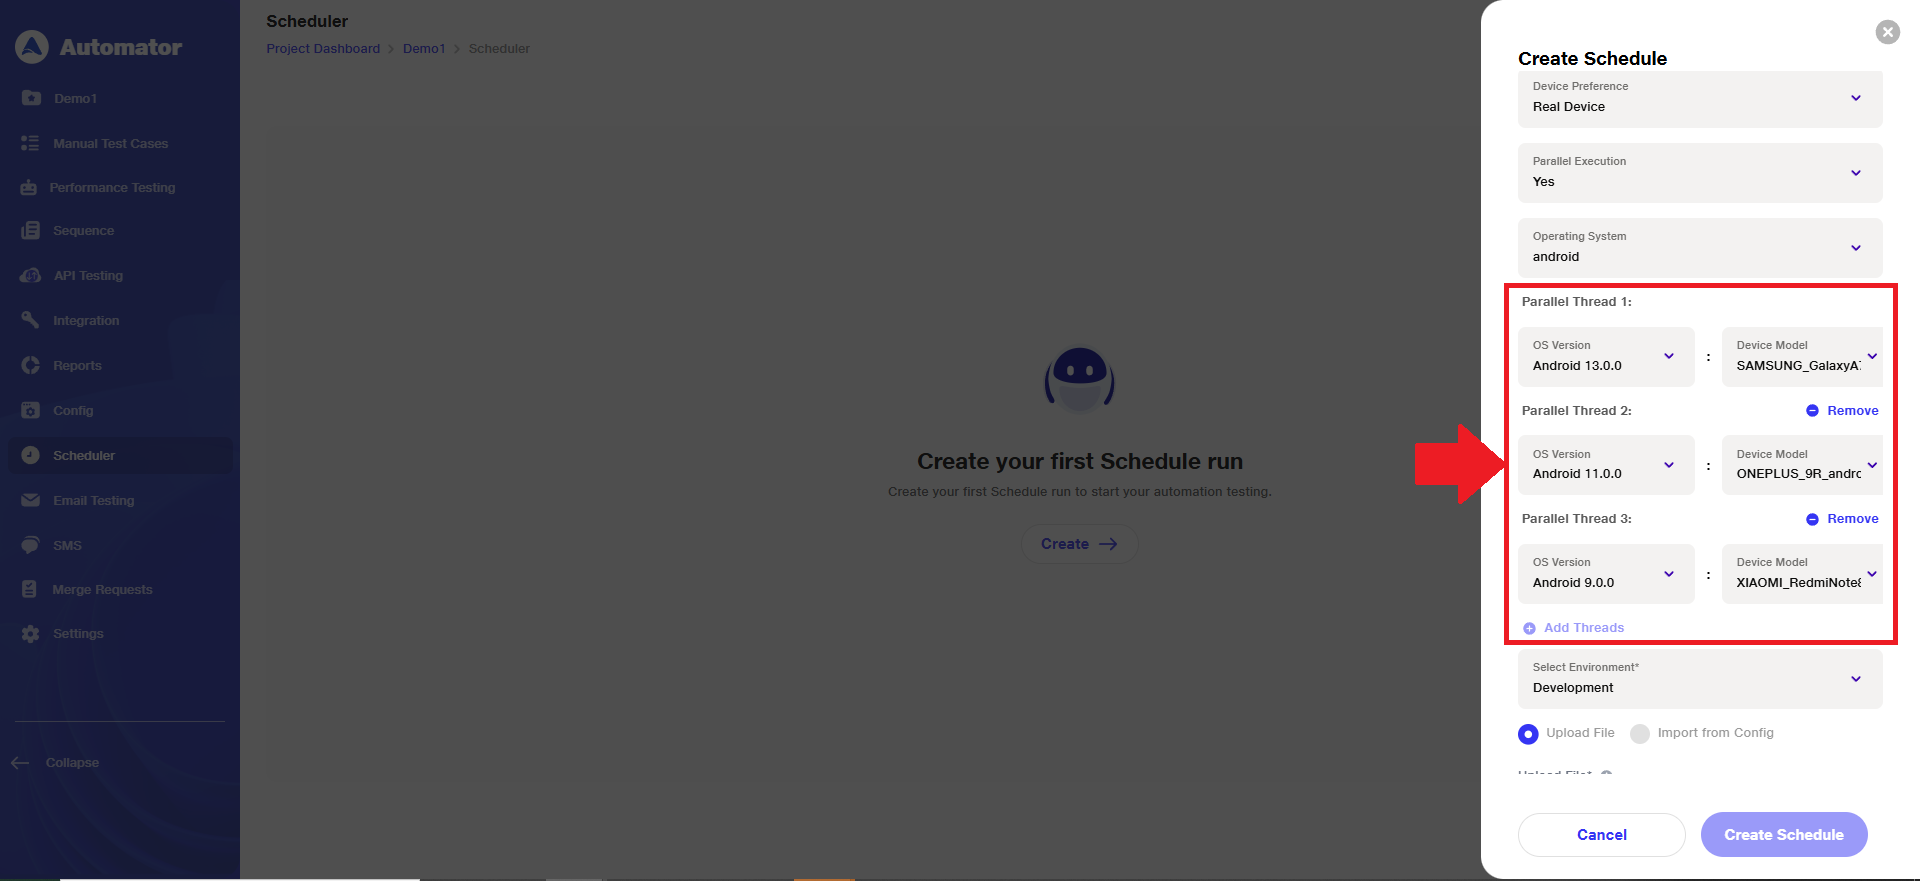 c) Note: The same device cannot be used across multiple threads. If a device is already selected in one thread, it will appear disabled in the device list of other threads.
d) The Add Thread option will reappear if at least one existing thread is removed.
4) Changing Provider to BrowserSatck
a) If the user enables BrowserStack from Settings > Third Party Integration > BrowserStack, a new field called Provider Name will appear in the scheduler creation form.
b) In the Provider Name field, users can select either BrowserStack or JioAutomator, depending on the requirements.
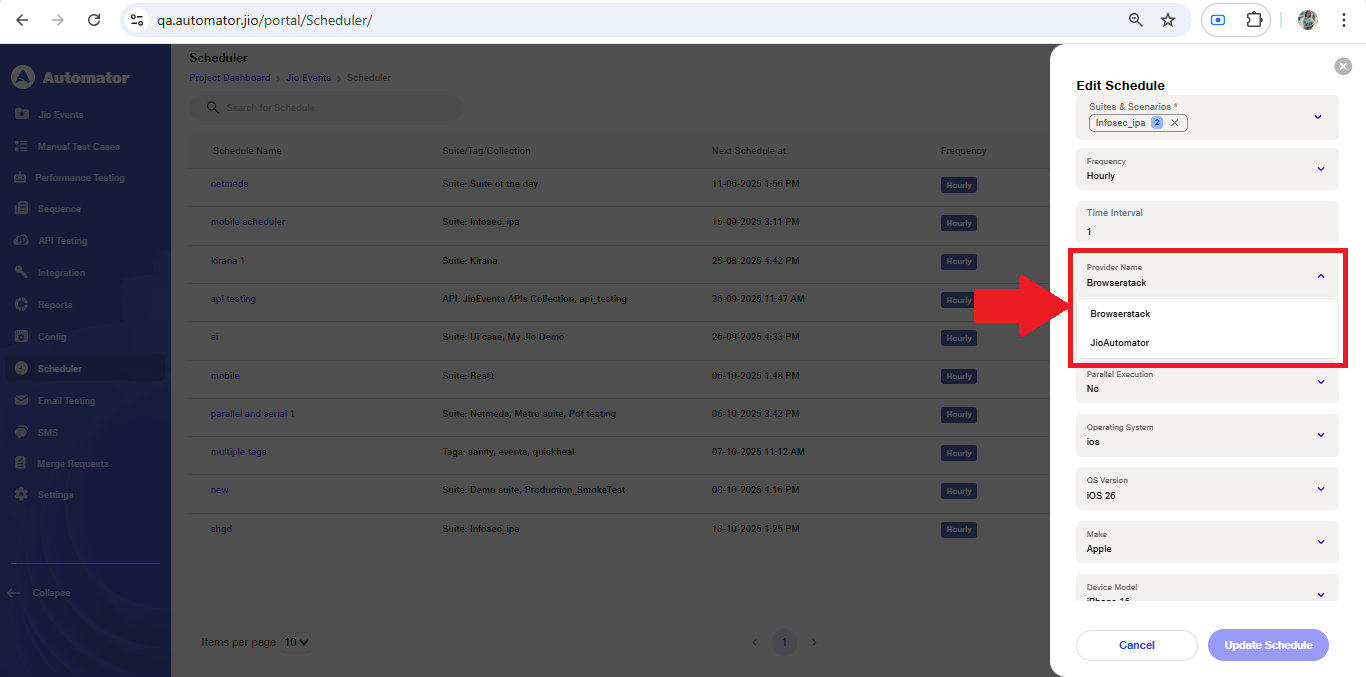 c) When BrowserStack is selected:
i) The same OS Version and Device Model can be used across multiple parallel threads, unlike JioAutomator where device selection is restricted to one thread.
 ii) Users can create up to a maximum of 10 Parallel Threads.
5) Editing & Deleting Parallel Threads
a) Users can edit any parallel thread multiple times as needed.
b) Threads can be deleted using the Remove button.
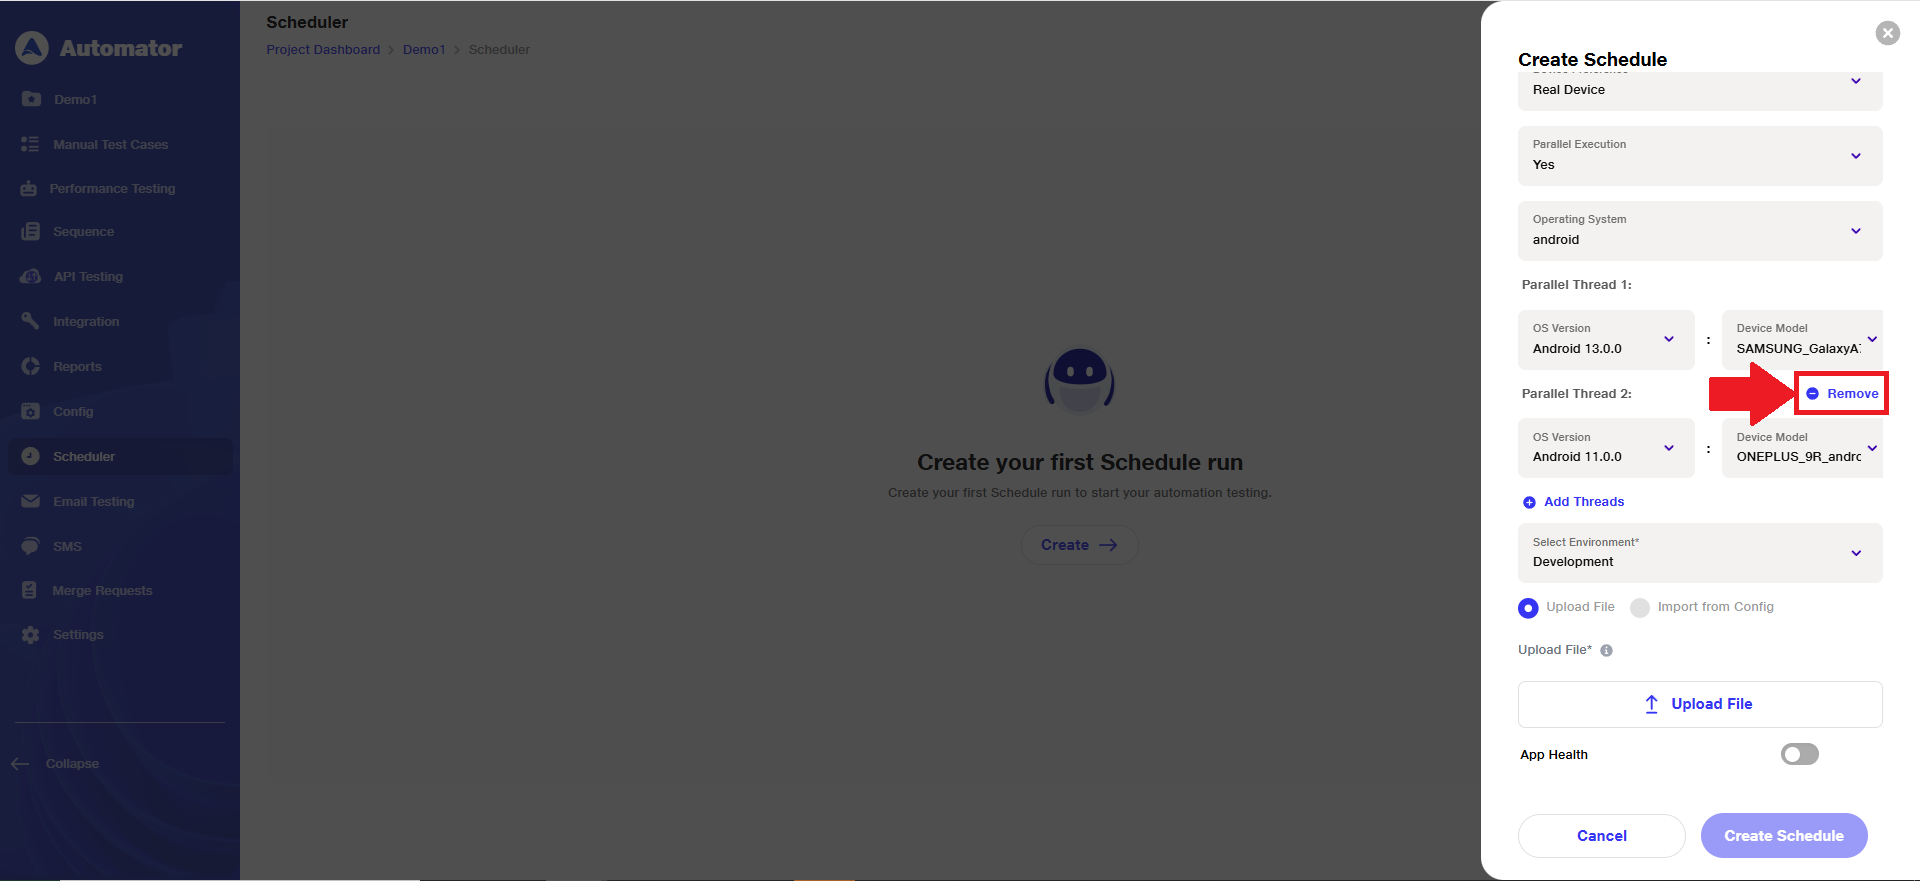 c) However: The Remove option is not available for the first created thread—at least one thread must always exist.
 d) If the user switches to a different Provider Name (e.g., from BrowserStack to JioAutomator or vice versa), all existing threads will be automatically removed, and the thread configuration will reset.
6) Creating Scheduler
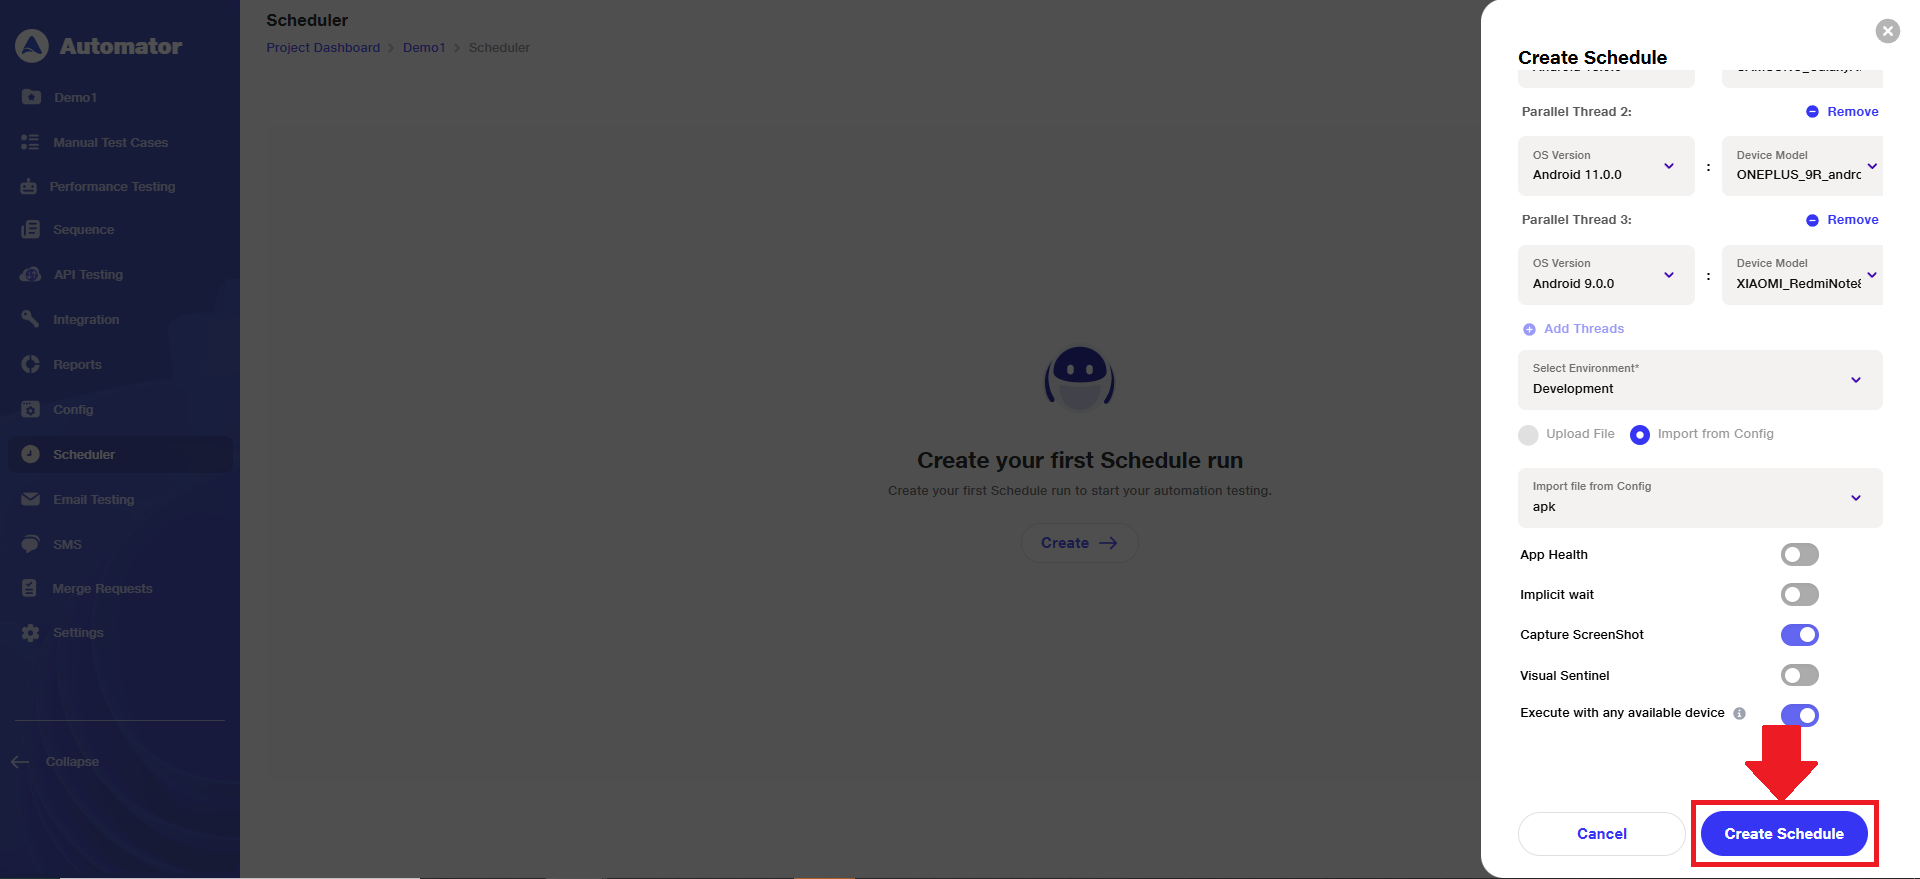
a) After configuring the threads, the user should complete the remaining fields:
i) Select Environment
ii)Upload File / Import From Config
iii) Turn on any required toggles (App Health, Implicit Wait, Capture Screenshot, Visual Sentinel, Execute with any available device) as per the testing needs.
b) Once all necessary details are filled in, click on the Create Schedule button to finalize and create the schedule.
 c) Upon successful creation, a “Schedule Created!” popup notification will appear in the bottom-left corner of the screen.

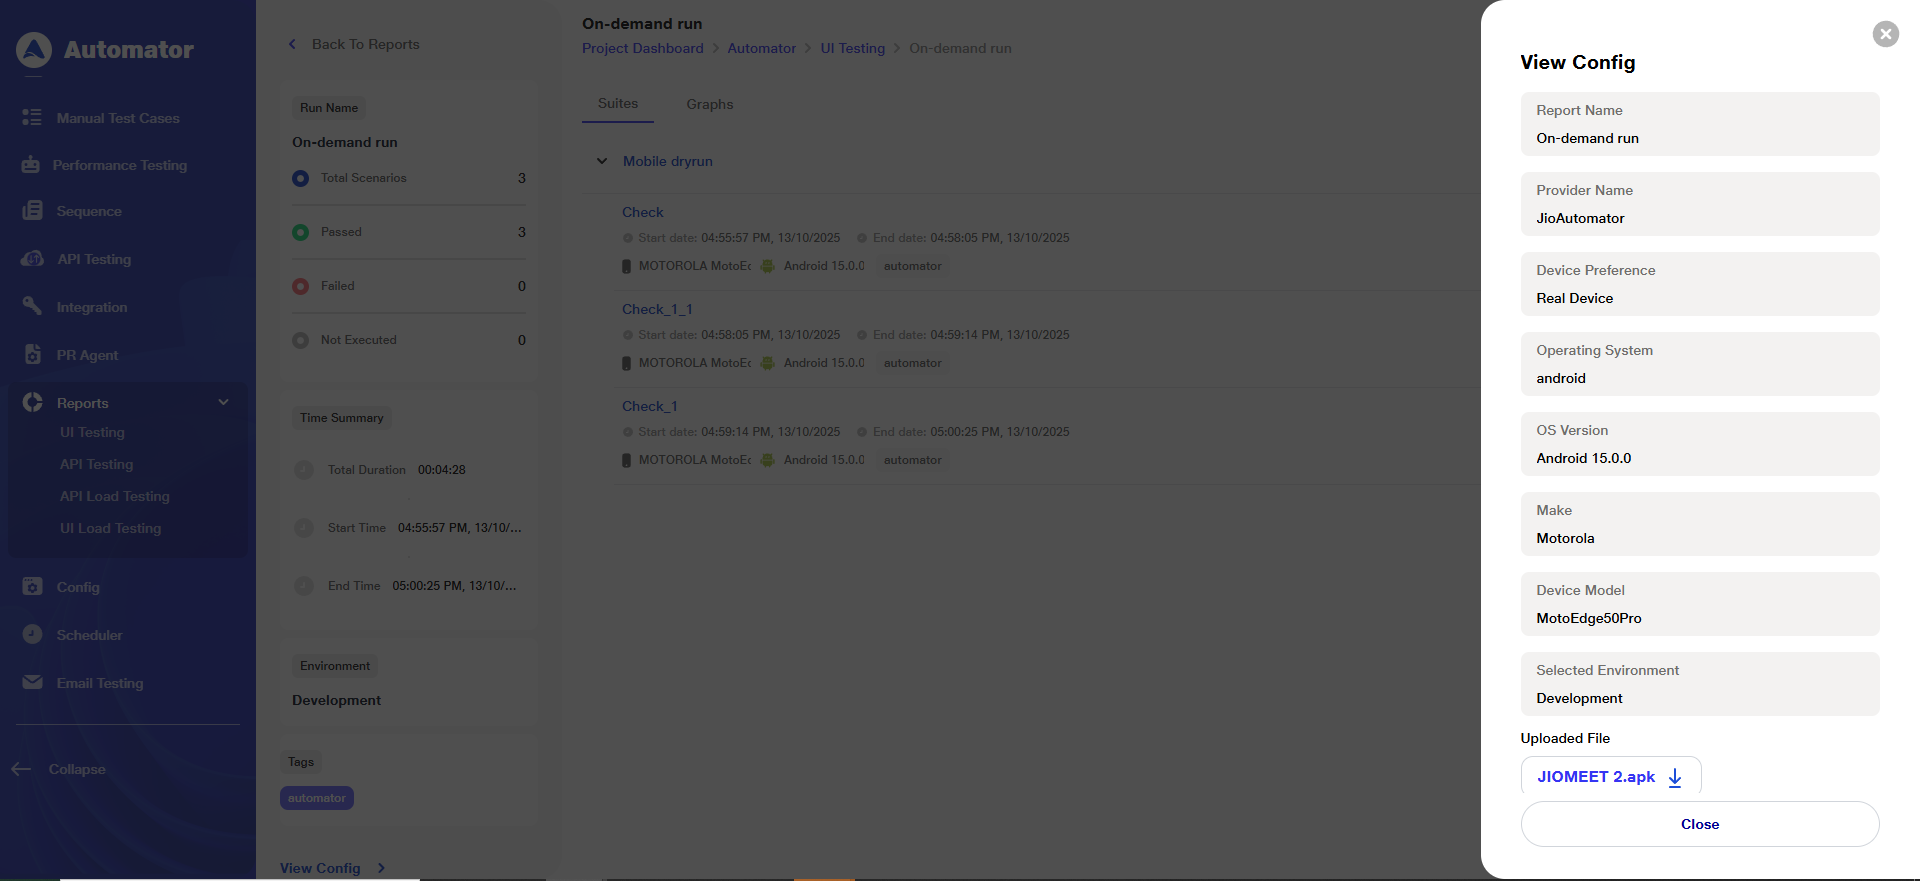
7) iewing Device Details in Reports
a) Under the Reports section, users can view the device details associated with each test scenario.
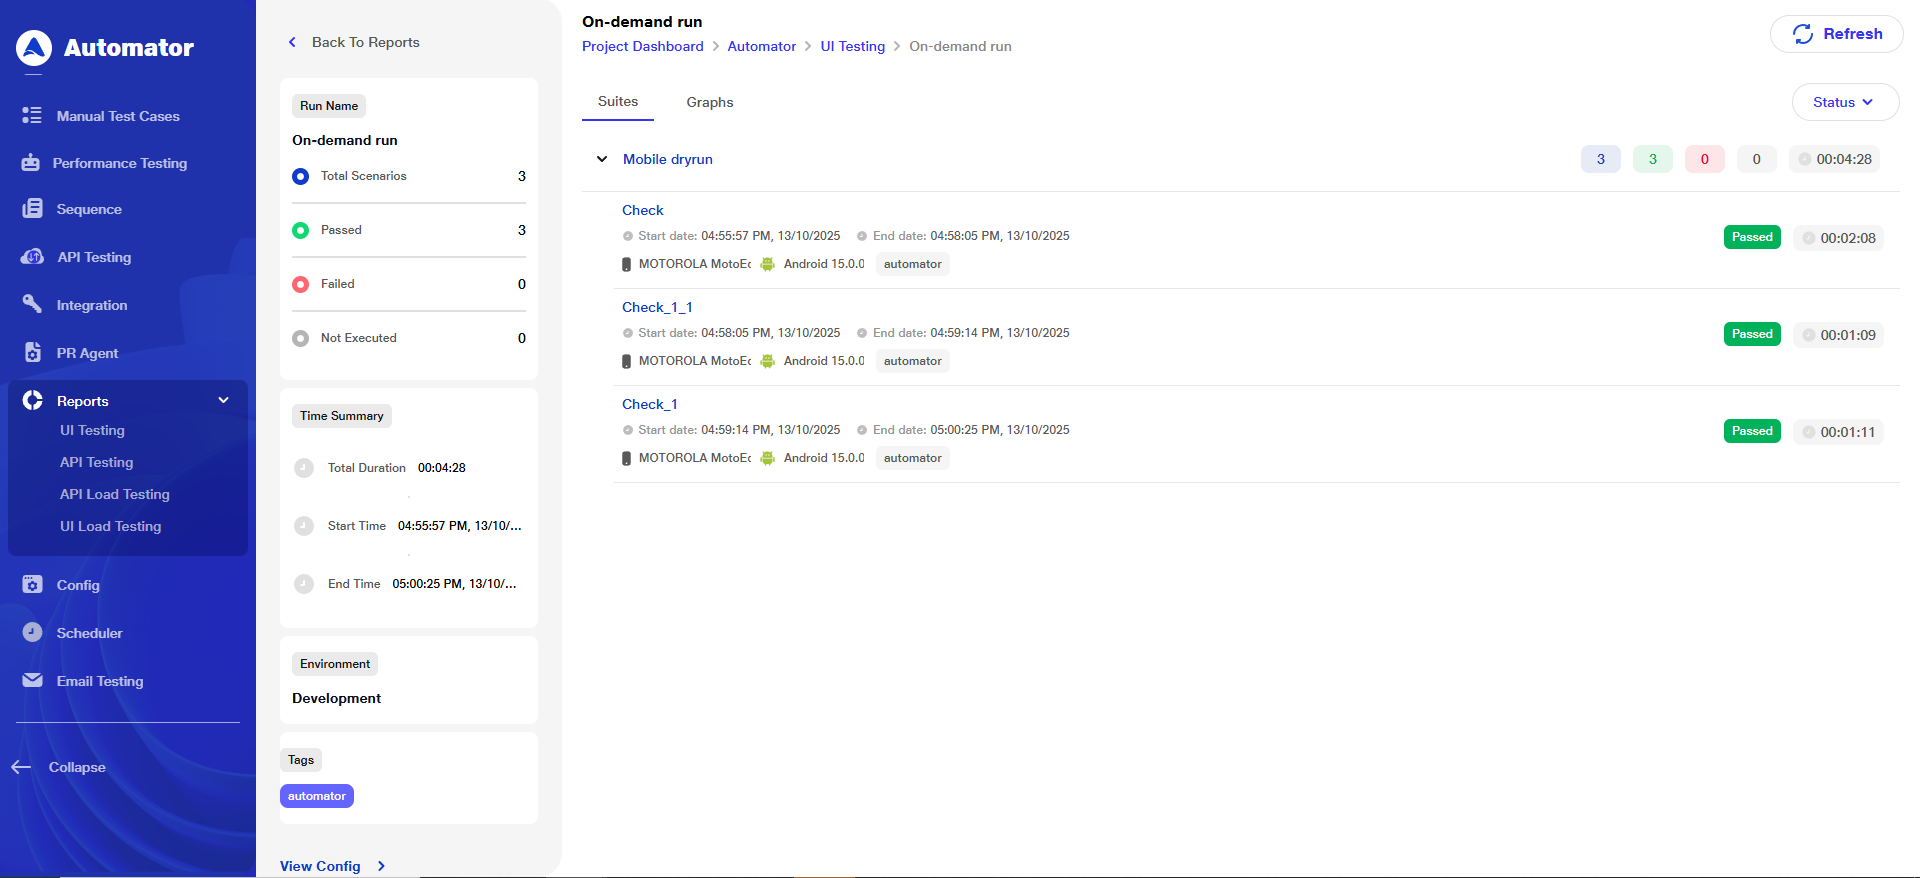 b) Device information is also available under the View Config section for further reference and analysis.
 8) Handling Execution Failure Due to Device Unavailability
a) In case the selected devices are not available at the time of execution, the schedule will fail to execute.
b) As per the current production behavior, the user will receive an email notification informing them about the execution failure.

Benefits
a) Efficiency & Time Savings:
i)Parallel thread execution reduces total test run time significantly.
ii)Default platform and device selections speed up configuration.
iii)Limiting threads based on provider (e.g., 3 for JioAutomator) ensures optimal resource usage.
iv)Auto-removal of threads when switching providers avoids redundant setup.
b) Accuracy, Coverage & Quality:
i)Real device selection ensures tests reflect actual end-user environments.
ii)OS version and device model granularity improves test coverage across device variations.
iii)BrowserStack support for multiple threads enables scale based on available licenses.
iv)Disabled state for already-selected devices prevents duplication and resource conflicts.
c) User Experience & Accessibility:
i)Clean UI with dynamic visibility of "Add Thread" and "Remove" options based on thread count.
ii)Default selections (e.g., Android OS) help users configure faster with fewer clicks.
iii)Inline editing of threads allows quick adjustments without reconfiguration.
iv) Persistent view of all selected threads improves clarity and reduces error.
d) Validation & Real-Time Feedback:
i)Device-level details shown per scenario in reports aid quick post-execution analysis.
ii)Email alerts for unavailable devices ensure timely awareness of execution failures.
iii)Updated reports and view config display all execution parameters for transparency.
iv)Validation logic enforces thread uniqueness (JioAutomator) for better execution reliability.