Getting Started
Overview
This guide outlines the fundamental concepts and usage instructions for Jio Automator. You can easily navigate through different sections using the left-hand side menu or leverage the search function at the top for specific topics.
What is Automator.AI?
Automator.AI, the world's most sophisticated and user-friendly end-to-end automation platform tailored for web applications. This powerhouse not only elevates your software quality but also slashes the manual effort typically needed for web application testing.
Picture creating tests with simple language, concentrating on what end users go through instead of grappling with intricate page structures. With Automator.AI's Live Authoring feature, you get instant feedback, giving test creators the confidence to build tests that work exactly as intended.
Tackling a common hurdle in test automation, Automator.AI shines when it comes to test maintenance. Thanks to its smart element identification and Auto-Fix feature, your tests stay on track even if there are changes to page object model identifiers.
Running tests is effortless with Automator.Ai's scalable execution grid. Whether you're clicking a button, scheduling tests, or triggering them from your development pipeline, there's no need for complex infrastructure setup. It's ready to roll from the moment you sign up and smoothly adapts to different operating systems, devices, and browsers.
Automator.AI doesn't stop at execution. It goes beyond with Root Cause Analysis, offering detailed insights into your application's quality. For each test step, you get screenshots and console logs.
Automator.AI empowers organizations to manage extensive collections of reusable elements, accelerating large-scale testing. It seamlessly integrates with data and APIs, expanding test coverage and depth. Complex execution strategies can be scheduled, and multiple execution environments managed, making it a cornerstone for scalable and impactful test automation.
And it's not a one-size-fits-all solution. Automator.AI is customizable. You can enhance its capabilities by adding Selenium Scripts, Javascript, Sequence, connecting to its API, building a custom Automator.AI App, and seamlessly integrating it into your development pipeline. It's a powerful tool that adapts to your needs.
Core Concepts
Project:
Think of a "Project" as your testing master plan, a comprehensive effort tailored for a specific domain or individual applications. Each project acts like a neat bracket, giving structure to your tasks. With its dedicated dashboard and access control, managing tasks becomes more efficient, making it a breeze to oversee distinct projects.
Test Suites:
A "Test Suite" is like a focused testing zone within a project, defining a particular testing goal. This could involve testing specific parts of an application, like new workflows, updates, or recently added features. All these elements come together to form cohesive test suites, making your testing efforts more organized and goal oriented.
Test Scenarios:
The power to create diverse test scenarios, testing various URLs simultaneously, is a valuable feature. This dynamic approach allows you to assess multiple scenarios at once within any environment. No more repetitive tasks—this feature streamlines your testing process, making it more efficient and less time-consuming.
In Automator, Test steps are like a guided journey through the entire user experience within the application. These test Steps are crafted using natural language, providing an exceptionally user-friendly test creation process.
Test Steps:
These steps embody specific actions that a user can take to interact with the application. This encompasses tasks like moving to a particular page, clicking on buttons or links, and entering information into input fields.
Furthermore, these steps may also encompass validations, such as confirming the presence of elements or ensuring that specific conditions are met.
Test Steps
In Automator, test steps are articulated in natural language and can be enriched using a simple English syntax.
When it comes to test steps targeting page elements, selectors are utilized to locate the element that Automator needs to interact with.
Currently, the available selectors include Absolute Xpath, Relative Xpath, ID, CSS, and Visible Text.
Automator leverages artificial intelligence to translate test steps into instructions that communicate with web elements.
Automator Natural Language Statements -
In this segment, we will assemble an array of statements, offering examples of various phrases that the AI can interpret
Available Statements (Intents) -
-
Navigate - Go to a specific URL.
-
Perform a click on a particular element.
-
Input text into a designated field.
-
Select an option from a dropdown menu.
-
WaitFor - Pause execution either for a specific element or a fixed duration.
-
Wait - Set a specific wait time explicitly.
-
Execute mouse hover actions on elements.
-
Store a value into a Context variable.
-
Switch between different tabs.
-
Scroll to a specific position, element, or offset.
-
Upload a file into a designated field for file input.
-
Insert JavaScript code on the page.
-
Incorporate Selenium Script Code for interacting with web elements.
-
Execute an API call.
-
Utilize keyboard actions like up, down, enter, backspace, etc.
-
Incorporate support for inbuilt files as functions for file uploads.
-
Leverage Automator Functions such as assert, greater than, less than, equal to, etc.
-
Implement assertions for validations, including assertText, assertNotText, assertEquals, assertNotEquals.
-
Perform radio actions on elements.
-
GetTitle - Retrieve the page title and store it in a context variable.
Navigate-
To access a URL, you can use the following synonymous commands: Visit, go, navigate, open.
Examples:
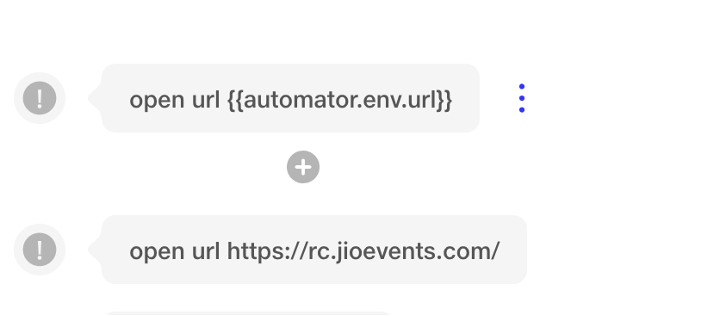
- Open the website https://www.google.com.
- Open the URL
{{automator.env.url}}. - Go to https://www.google.com.
- Visit iitism.ac.in.
Click -
To interact with an element through clicking, you can use the synonymous of clicks as tap, hit, etc
Examples:
- Click on the Sign in button
- Tap Search
- Hit privacy policy
- click on //input[contains(@class, 'p-inputtext')]
- click on //tr//td//span[contains(text(), '
{{automator.context.updatedDay}}')]
Automator Identifies the Entity (Interactive element) on the screen in the above statement and clicks on the button. You can use variables (Context data - {{automator.context.updatedDay}}) to target elements dynamically.
Input -
To input values into input fields or text areas, utilize the commands type, enter, or write. Follow these commands with the value you wish to input and specify the target element.
Examples:
- write k4nwdh88@qiott.com in email address
- type 123 in password
- input
{{automator.context.version}}in email id
Select -
To choose a value from a dropdown list, you can use the synonymous of Select as pick, opt, etc
Examples -
- select banana from the fruits category
- opt Jio from companies
Wait For -
To add a delay or wait for an element to be visible on a page, use the wait commands. You can express intervals in seconds and minutes and the system will automatically convert them to the standard unit of seconds.
Examples -
- Wait for 10 seconds for Sign in
- Wait for 20 seconds until the login appears
Wait
To add delay Explicitly, use the below wait statements
Examples -
- Wait for 5 seconds
- Wait 1 minute
Mouse Hover
To perform mouse hover action on targeting element, Use the below statements
Examples -
- Mouse hover on Sign in
- Execute a mouse hover on Blogs
Store
To save the details or content of an element, or a specific value, into a Context variable, utilize the store Intent. Remember, a variable can be used as {{automator.context.VariableName}} and cannot include Spaces for Variables
How to store the Element in Context -
Right click on the Live preview screen where the element needs to store the value. Click on store value -> pop up will open, initialise the variable
Examples -
store https://jioevents.com/attendee/sm-1a0ff231-fbc8-47b9-bebe-08285777c902/join/_Ll9En4AQGcdb0196536ed1696870610030 in attendeeLink
Use Stored Context variable as
open url {{automator.context. attendeeLink}}
Switch
To switch between open tabs in the browser, employ the switch command followed by a numerical index. Alternatively, identify tabs using indexes or opt for 'next' or 'previous'.
Examples -
- Switch to the next tab.
- Switch to the tab 0.
Scroll
To Scroll through the page, positioning it at a specific element, coordinates, or page location, and to scroll relative to the current position, employ the scroll Statement.
Automator Provides ScrollFull, ScrollToElement, ScrollX/ScrollY
Examples -
- ScrollFull - Scroll the page to the bottom of the webpage
- ScrollToElement - Scroll the page until the help button comes into view
- ScrollX/ScrollY - Scroll the page down by 20
Radio
To Choose a radio button of an element, Use the below statements
Examples -
- Choose Male option
Assertions
A comprehensive set of assertions is available to validate that items or values on a page align with expectations. The following details various assertions:
Assert Exists -
This Statement serves to validate the existence of an element on a page.
Examples -
- validate that create new account exist
- Assert that Sign in Successfully exists
Assert Does not Exists -
This Statement serves to validate the absence of an element on a page.
Examples -
- validate that create new account doesn’t exist
- Assert that Sign in Successfully does not exist
Assert Text -
This Statement Serves that an element on a page has a given value.
Examples -
- Assert text automator equals to Automator
- Assert text
{{automator.context.textVariable}}equals to Texts
Assert Not Text -
This Statement Serves that an element on a page does not have a given value.
Examples -
- Assert text automator not equals to Automator
- Assert text
{{automator.context.textVariable}}not equals to Texts
GET TITLE
This statement serves the current page title and store the title into a context variable
Example -
- Obtain the title of the webpage and store it as currentPageTitle
Uploading A File Using Input -
Automator facilitates file uploads through the "Input" command. The file can be stored in the environments section.
When referencing the file, use the value as {{automator.env.fileName}}.
Example -
Input {{automator.env.fileName}} in Choose file
Selenium Script Call
Automator enables the invocation of Selenium scripts by incorporating arguments and interacting with web elements using JavaScript (document.querySelector).
Currently, the supported selectors include Visible Text, ID and Xpath.
Example -
Script: arguments[0].click() Type: Xpath Locator: //*[@id='automator']
Javascript
Automator facilitates the execution of JavaScript code for obtaining dynamic values. For instance, if a user needs to generate a random name, you can use JavaScript to create the name dynamically and store it using the Automator set function. Subsequently, the stored data can be retrieved and utilized in the automation script through the Automator get function.
Example -
function generateRandomName() {

    const firstNames = ["Alice", "Bob", "Charlie", "David", "Eva"];
    const lastNames = ["Smith", "Johnson", "Williams", "Jones", "Brown"];

    const randomFirstName = firstNames[Math.floor(Math.random() * firstNames.length)];
    const randomLastName = lastNames[Math.floor(Math.random() * lastNames.length)];

    return `${randomFirstName} ${randomLastName}`;
}
const randomName = generateRandomName();

automator.context.set("randomName", randomName);
Call Api
The API call statement facilitates making API requests within a scenario execution. It allows you to seamlessly integrate API calls alongside UI execution by leveraging features like Input mapping, Output mapping, pre-request, and post-request actions. For additional details, refer to the API testing documentation.
Examples -
Without Input values -
callAPI JCN.smalAPIForJCN using ()
With Input values -
callAPI JCN.backAPI using dataInCallBackAPI {{automator.context.data}}
callAPI JCN.createOfferInstoreAPI using jcnToken gghs645yu2i76rcdd
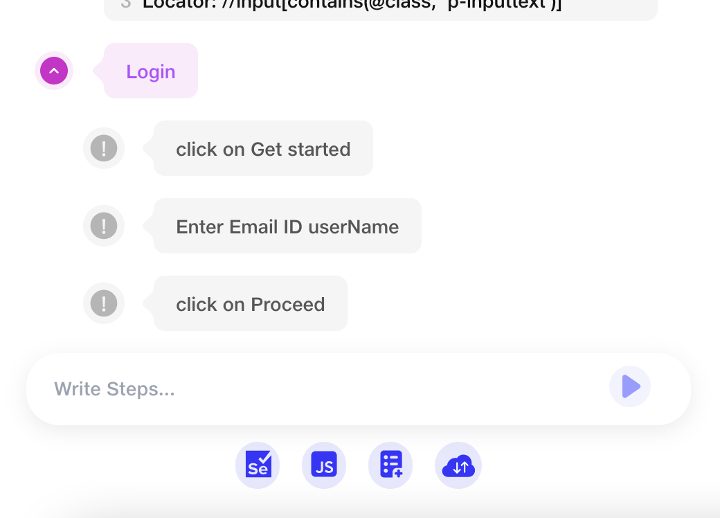
Sequence
If you have a set of steps in your Scenario that are repeated at various points in your project, you can create a sequence. A sequence is essentially a reusable set of actions that you define once and can then insert wherever needed in your project. This helps in avoiding redundancy and makes your automation script more modular and easier to maintain.
Here's a step-by-step elaboration:
- Identify Repeated Steps - Identify the steps or actions in your Scenario that are repeated in different parts of your project.
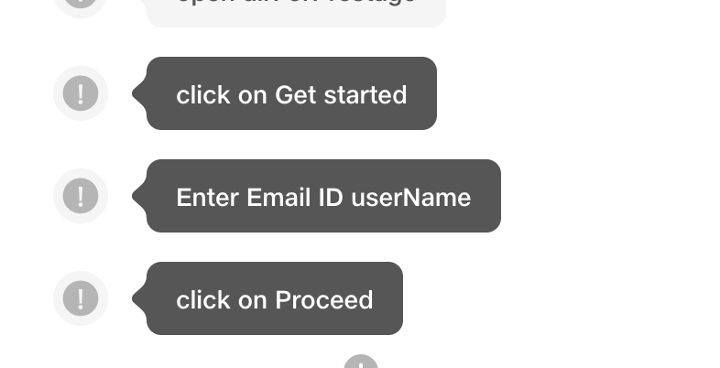
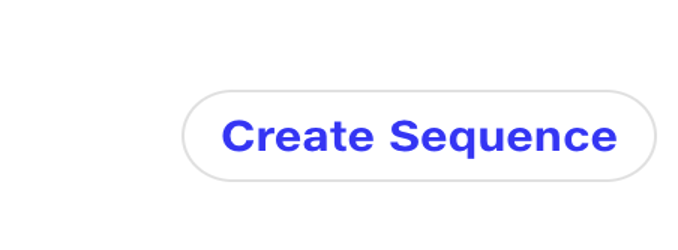
- Create a Sequence - Group the identified steps into a sequence. A sequence is a container for these steps that you can name it
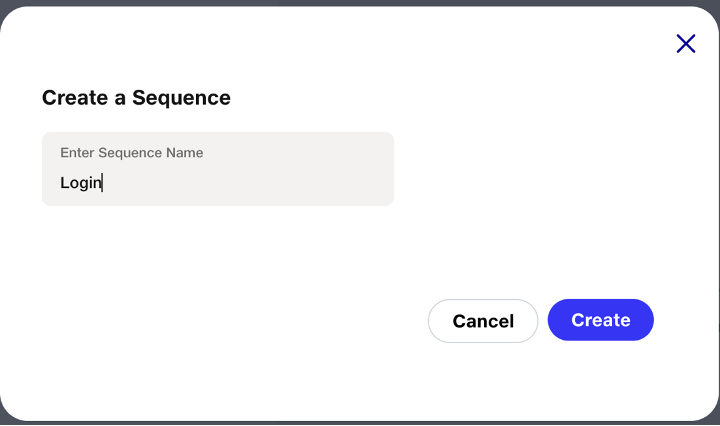
- Save the Sequence - Save the sequence, giving it a descriptive name. This way, you can easily understand its purpose when you refer to it later.
-
Insert Sequence Anywhere in the project - Once saved, you can insert this sequence anywhere in your project using a reference and Clicking on Add Sequence button. This means that you don't need to rewrite the same set of steps each time. you can simply reference the sequence.
Example:
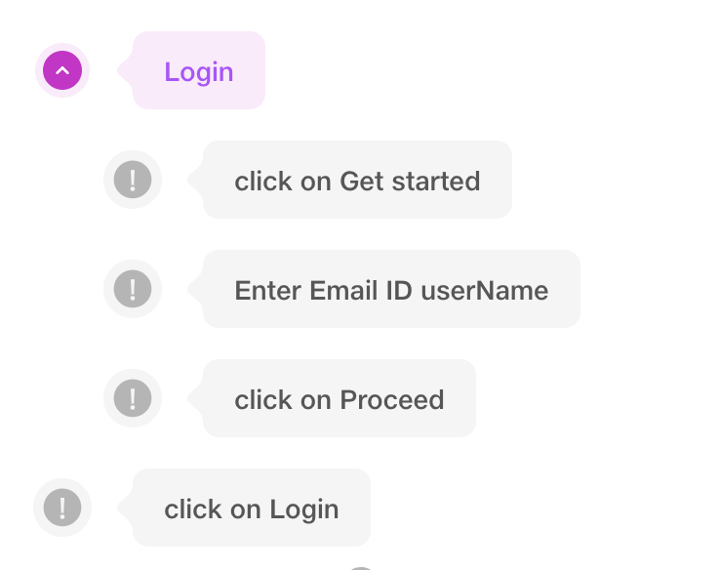
Sequence: "Login Sequence"
Steps:
- Enter Username
- Enter Password
- Click Login

In Your Scenario:
Insert Login Sequence
-
Update Sequence Easily - If there are changes or updates to the steps within the sequence, you only need to modify the sequence itself. The changes will automatically reflect wherever the sequence is inserted.
To incorporate a sequence within your steps, click on "Add Sequence." This action seamlessly inserts the sequence between existing steps. If you prefer adding the sequence to a new scenario, click on the "Add Sequence" option located beneath the

"Enter test step" section. This flexibility allows users to tailor the sequence placement according to their specific needs.
Following sequence creation, users can easily customize their Scenarios by adding, editing, or deleting steps within the sequence. This flexibility allows for fine-tuning specific actions as needed. Furthermore, once sequences are generated, users can conveniently view and manage them in the Sequence Collection. This centralized location provides a comprehensive overview of all created sequences, streamlining organization and accessibility.
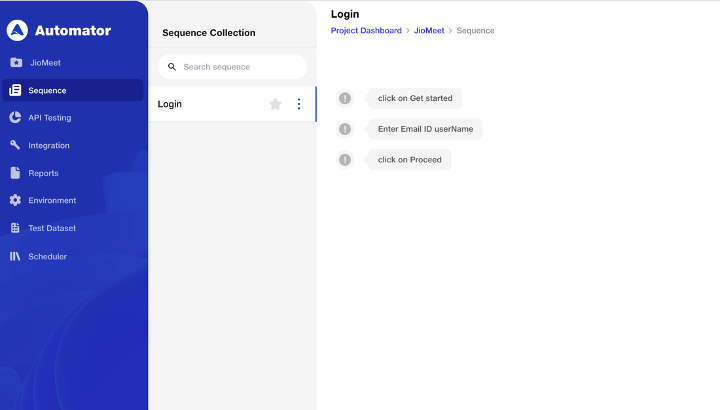
In summary, sequences enhance the reusability and maintainability of your Project by allowing you to define and manage common sets of steps in a centralized manner. This is particularly useful when dealing with repeated actions across different parts of your automation script.
In-Between Steps
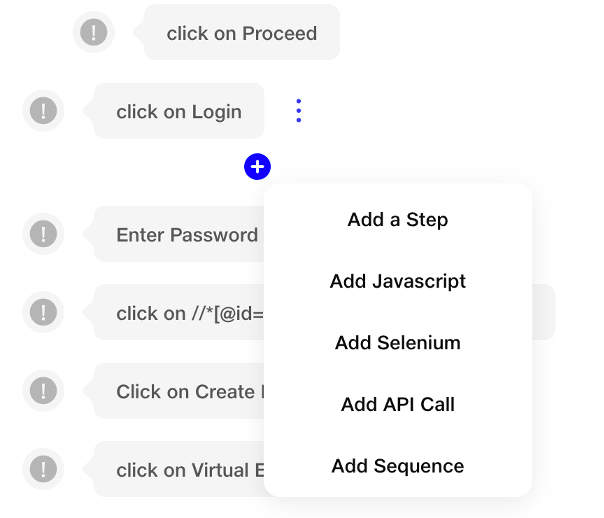
Automator simplifies the process of inserting a new test step, Selenium script, JavaScript, API call, or sequence between existing steps.
Just Hover on the existing test step, where you want to add a new in between step and use the "+" button to effortlessly add a new test step. This is particularly useful for accommodating future feature additions or incorporating additional checks for existing functionality.
Parameterization Handling in Sequence Flows
Improve the existing behavior and user experience related to parameterized values in sequences, especially in scenarios involving overriding values, reusability, and CallAPI functionality.
Description:
This feature aims to enhance how parameterized values are handled in existing workflow sequences, especially when sequences are reused or overridden. It will address specific user experience issues, bugs, and enhancements related to parameter management and sequence behavior consistency.
1) Adding a Parameterized Sequence to a Scenario
a) Users can create a sequence by selecting one or more steps from an existing scenario and clicking the Create Sequence button in the top-right corner. After naming the sequence, a Sequence Created popup confirms success.
b) A parameterized sequence includes parametrized values in the steps like {{automator.global.username}} or {{automator.context.variable}}, which can be replaced at runtime with specific values.
c) To add a parameterized sequence to a scenario, click Add Sequence and select from the dropdown. The Advance Settings option will appear below the added sequence.
d) Clicking it opens a table with Sr. No., Test Step Name, Default Value, and Override Value. Users can enter override values and click Add to save them. A "Sequence has been successfully added!" popup confirms completion.
2) Enhanced Parameterization for Sequences:
a) In a scenario, on name of parameterized sequence a three-dot (kebab) menu with options:
i) Parametrization
ii) Settings
iii)Delete
b) Clicking Parametrization opens a table of all parameterized values in the sequence, with editable Override Values.
c) Table Columns include Sr. No., Test Step Name, Default Value, and Override Value, just like when first adding a parameterized sequence.
d) Once updated, the Sequence has been successfully updated! popup confirms the changes.
3) Editing Parameterized Step Values in a Sequence
a) Each step in a sequence shows a Settings option on hover. For parameterized steps, clicking Settings opens a right-side panel with an editable Input Value field.
b) Making a change enables the Update Step button. Clicking it saves the update and shows a "Step has been updated successfully!" Confirmation.
c) The updated input value should reflect only the selected step, without altering the original sequence or any other instances.
4) Adding a Parameterized CallAPI Sequence to a Scenario:
a) When adding a CallAPI parameterized sequence using Add Sequence, an Advance Settings option appears below the selection.
b) Clicking it opens a table with columns: Sr. No., Test Step Name, Default Value, and Override Value. Users can define overrides and click Add. A "Sequence has been successfully added!" popup confirms success.
5) Editing CallAPI Parameterized Step Values in a Sequence:
a) In a parameterized CallAPI sequence, an edit button appears over a CallAPI step.
b) Clicking Edit opens the CallAPI panel. Clearing the current value disables the Update button. Users can then search and select a new API. Clicking Update shows the confirmation popup that CallAPI has been updated successfully! in the bottom left.
c) To ensure expected behavior, the updated CallAPI must apply only to the edited step, without affecting other steps using the same parameter. Additionally, when re-adding the same sequence, the Parameterization Table must reflect the correct, explicitly overridden value—not the most recent or cached CallAPI selection.
Keyboard Functions
Automator facilitates keyboard functions through predefined commands. You can use the following expressions:
{{automator.keyboard.enter}}{{automator.keyboard.escape}}{{automator.keyboard.arrow_up}}{{automator.keyboard.arrow_down}}{{automator.keyboard.arrow_left}}{{automator.keyboard.arrow_right}}{{automator.keyboard.backspace}}
For instance, you can simulate a backspace key press by incorporating {{automator.keyboard.backspace}} into your test step. This allows for easy integration of keyboard actions within your automation workflows.
Inbuilt Functions For Uploading Files
Automator provides access to a set of predefined files through specific commands. The available files include: - 100kb.jpg 100kb.png 10k.png 135kb.gif 1kb.png 1mb.jpg 1mb.png 200kb.jpg 200kb.png 20kb.svg 2mb.mp4 30kb.svg 350kb.gif 40kb.gif 500kb.jpg 50kb.jpg 5mb.mp4
You can incorporate these files using expressions such as:
{{automator.sampleFile.100kb-jpg}}
{{automator.sampleFile.200kb-jpg}}
For instance, in your test step, you can use the expression, to specify the file to be used in the upload process. This feature streamlines the integration of sample files into your automation workflow.
Example -
Input {{automator.sampleFile.100kb-jpg}} in Upload
Automator Functions
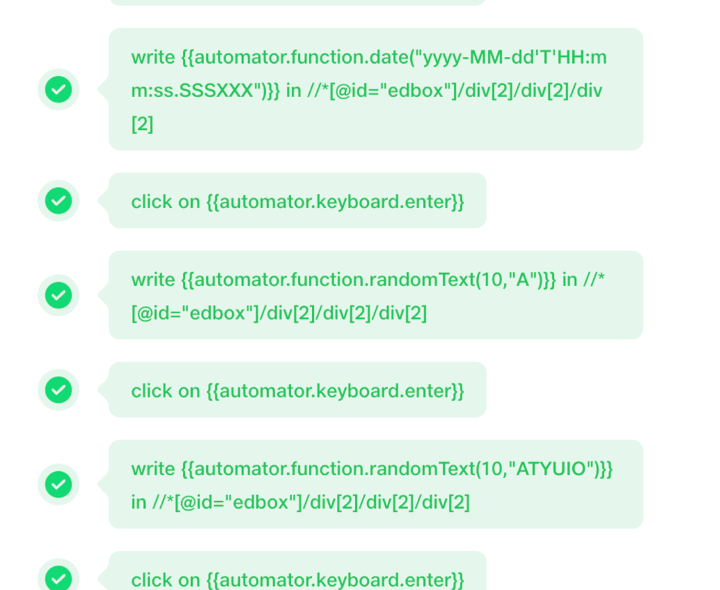
Automator offers predefined functions for assertions, generating random texts and numbers, retrieving the current date, and obtaining formatted dates.
-
automator.assert.equal(String a, String b) - Checks if strings 'a' and 'b' are equal.
-
automator.assert.graterThan(int a, int b) - Returns true if 'a' is greater than 'b', false otherwise.
-
automator.assert.lessThan(int a, int b) - Returns true if 'a' is less than 'b', false otherwise.
-
automator.function.randomText(int length, String charcodes) - Generates random text of specified length using given character codes.
-
automator.function.randomText(int length) - Generates random text of specified length.
-
automator.function.randomNumber(int min, int max) - Generates a random number within the specified range.
-
automator.function.randomNumber() - Generates a random number.
-
automator.function.date() - Provides the current date.
-
automator.function.date(String date) - Provides the date formatted as per the given format.
Example -
Execution
Execution in Automator aligns with expectations, involving the execution of a predefined set of test scenarios against the target application.
During this execution, one or more Suites are initiated. Users have the flexibility to trigger executions on an individual basis for each Suites or strategically plan the execution of a designated set of Suites, utilizing multiple criteria for efficiency and comprehensive test coverage.
Scenarios Creation & Execution Feature Overview
Scenario testing automates the simultaneous execution of multiple test cases across diverse URLs and environments, enabling comprehensive validation of functionality, performance, and compatibility. This minimizes manual effort, reduces redundancy, and accelerates the testing cycle while ensuring consistent and reliable results.
1) Opening Scenario Page
a) Open or create the desired project where you want to create scenarios.
b) Inside the project, choose or create a suite in which you want to add scenarios.
c) Within each suite, users can create multiple scenarios to cover various test cases.
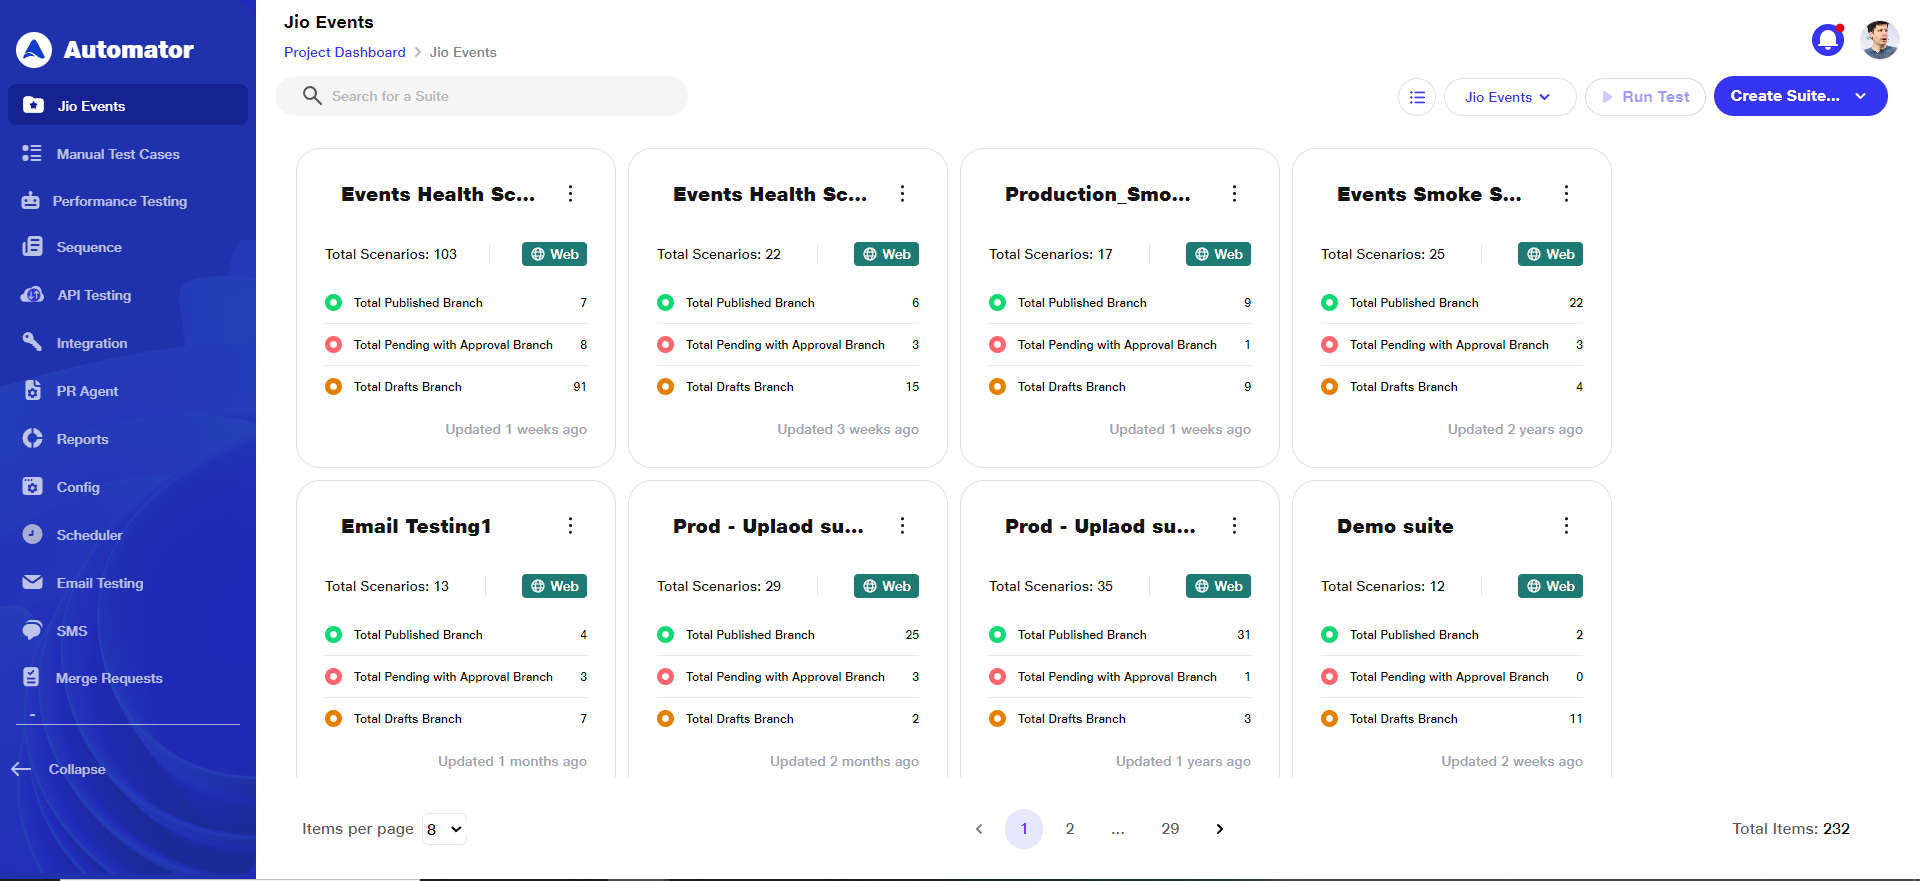 d) As shown in the image above, each suite displays the total number of published branches, pending approval of branches, and draft branches it contains, helping you track their status effectively.
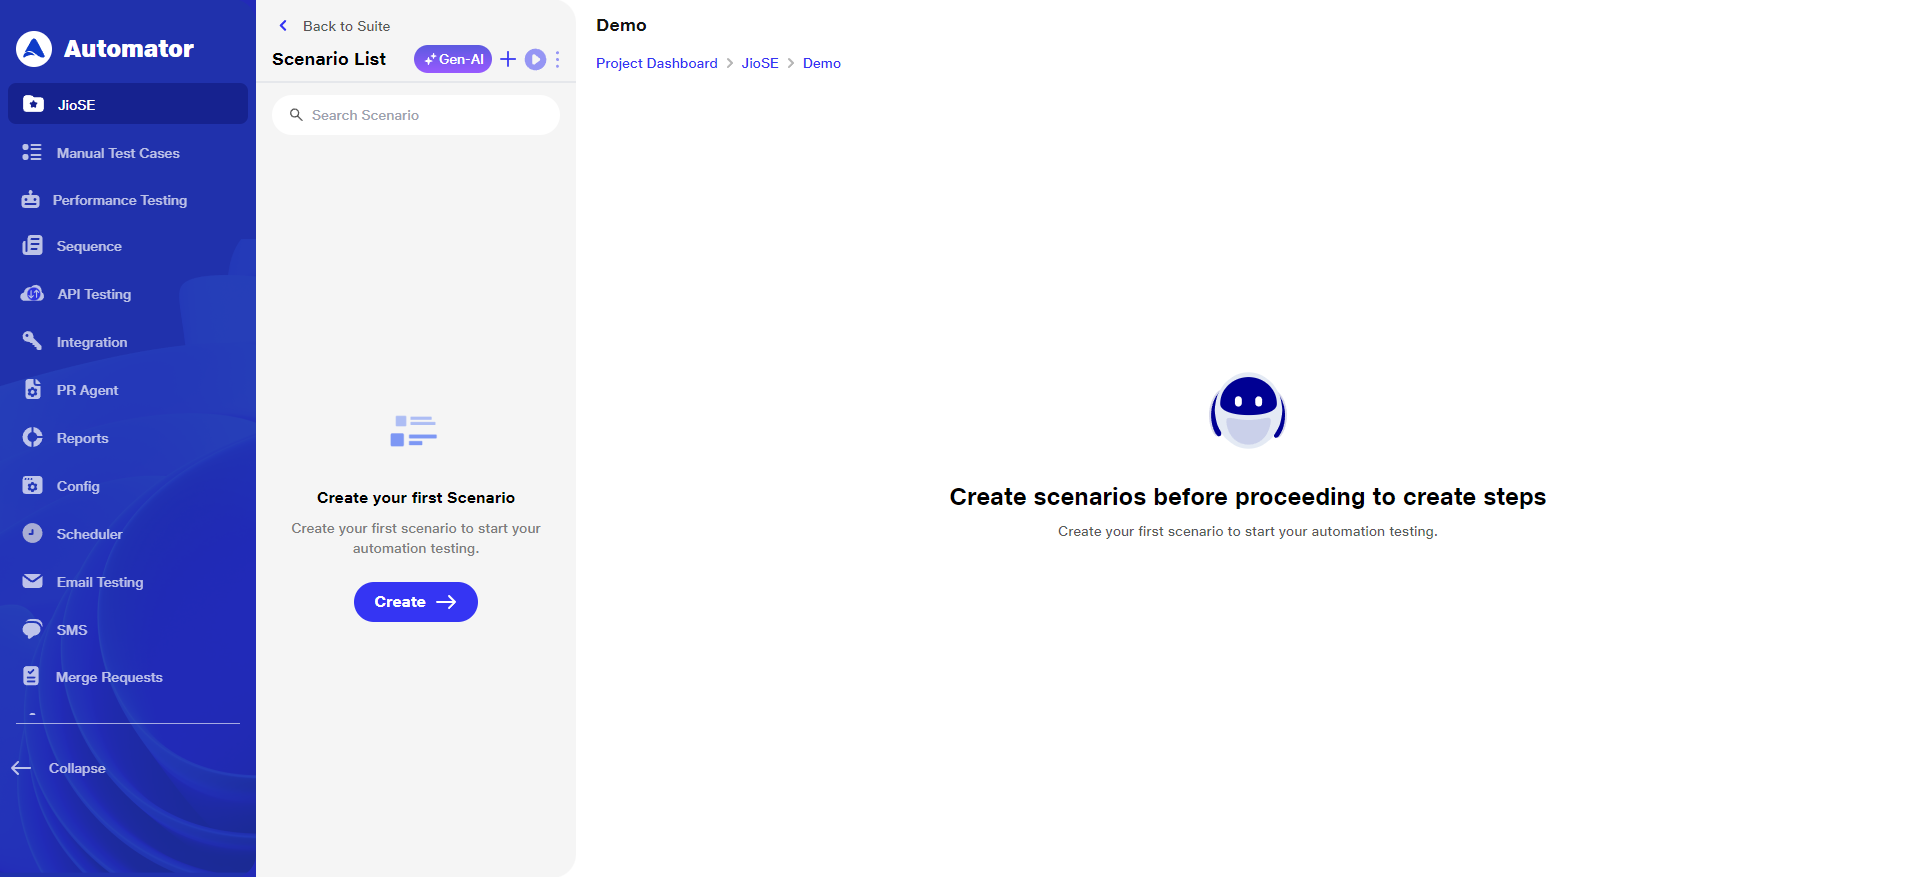
e) At the start, each suit contains zero scenarios.
f) Open the respective suite where you need to perform the task.
2) Creating Scenarios
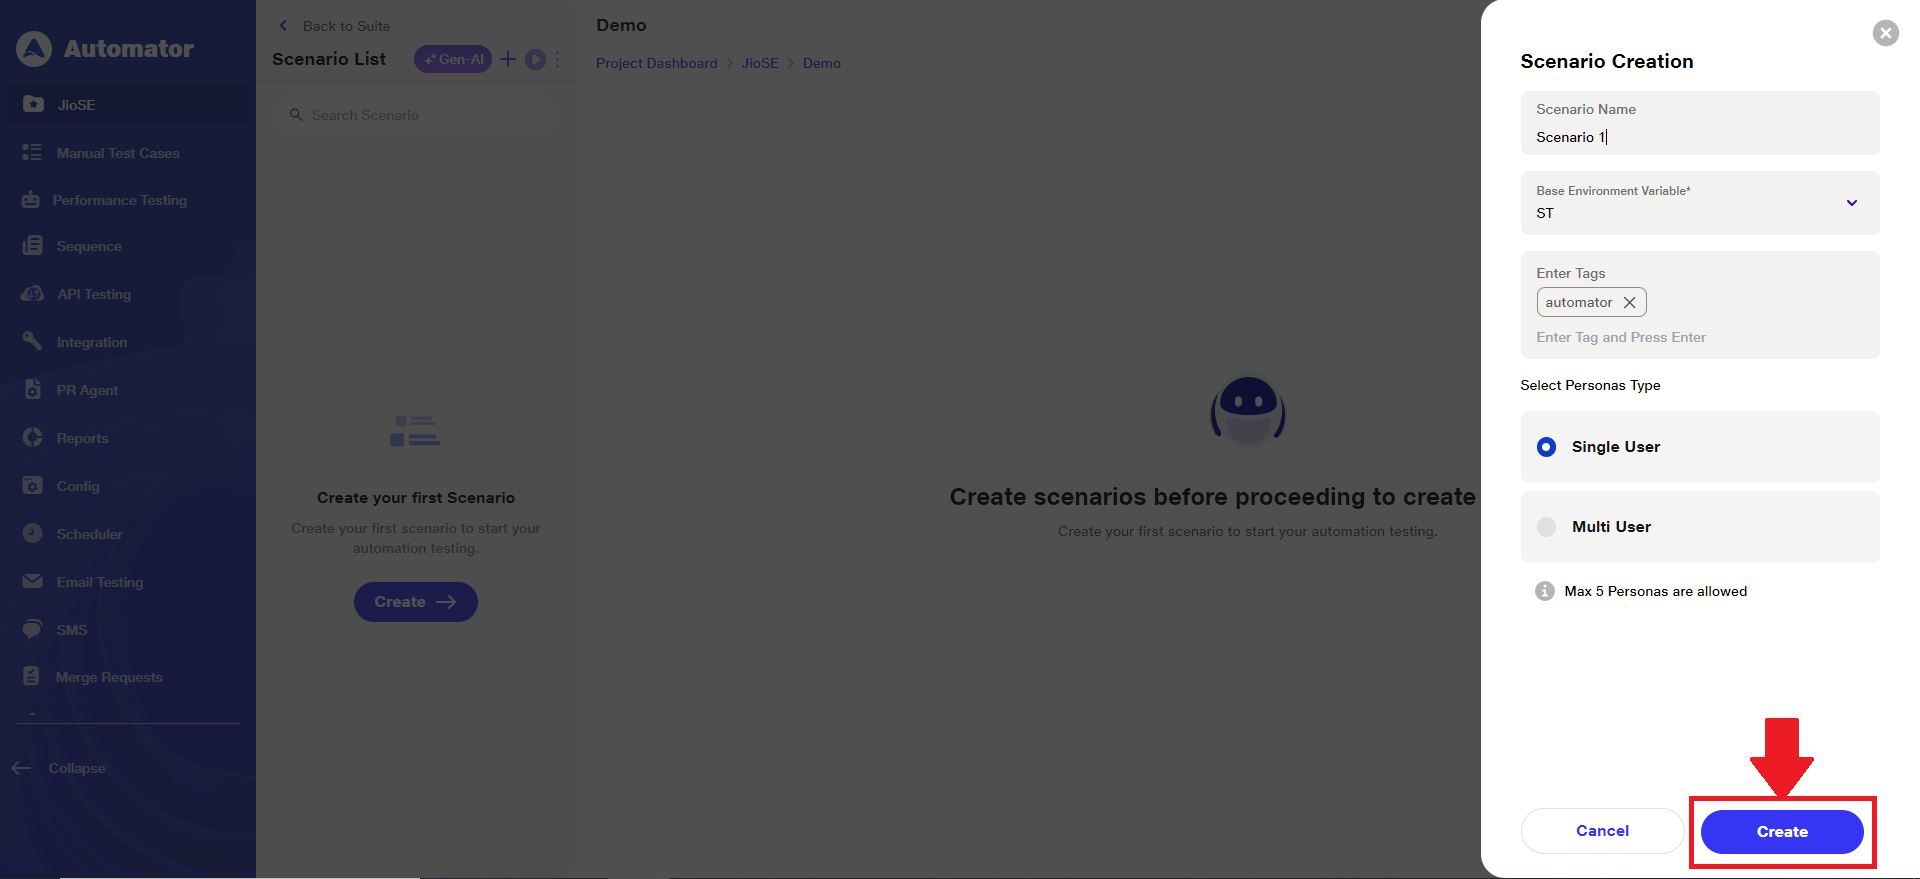
a) Users can click the Create button or the + icon at the top to begin adding scenarios and start the testing process.
b) The Scenario Creation tab includes the following fields:
i) Scenario Name
ii) Base Environment Variable
iii) Enter Tags
iv)Select Personas Type
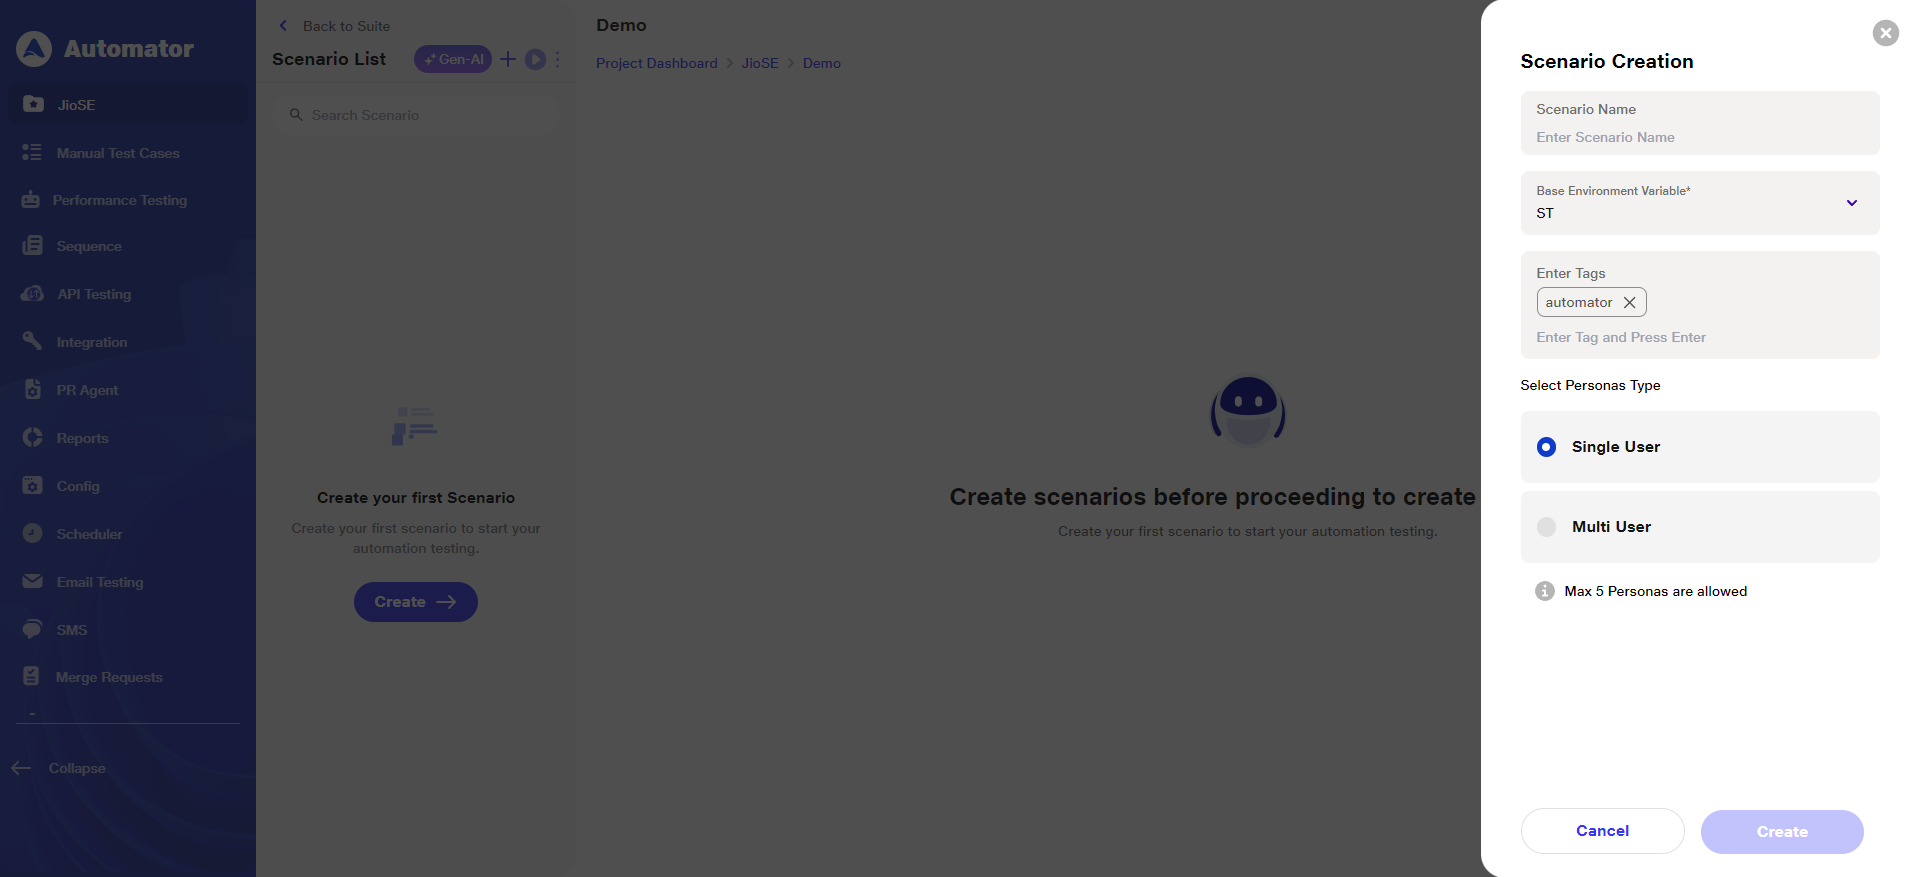 c) Different Base Environment Variables can be created through the Config page. Once configured, these environments will appear in the dropdown list when opening the Base Environment Variable option during scenario creation.
d) Select Persona Type allows the user to choose whether the testing scenario is intended for a Single User or Multi User setup. This option is particularly useful depending on the product type. For example, a calculator can be tested with a single user, while a meeting application requires at least two users (e.g., a speaker and an audience member) for realistic testing.
e) After entering all the required details, the user can click the Create button to create the scenario.
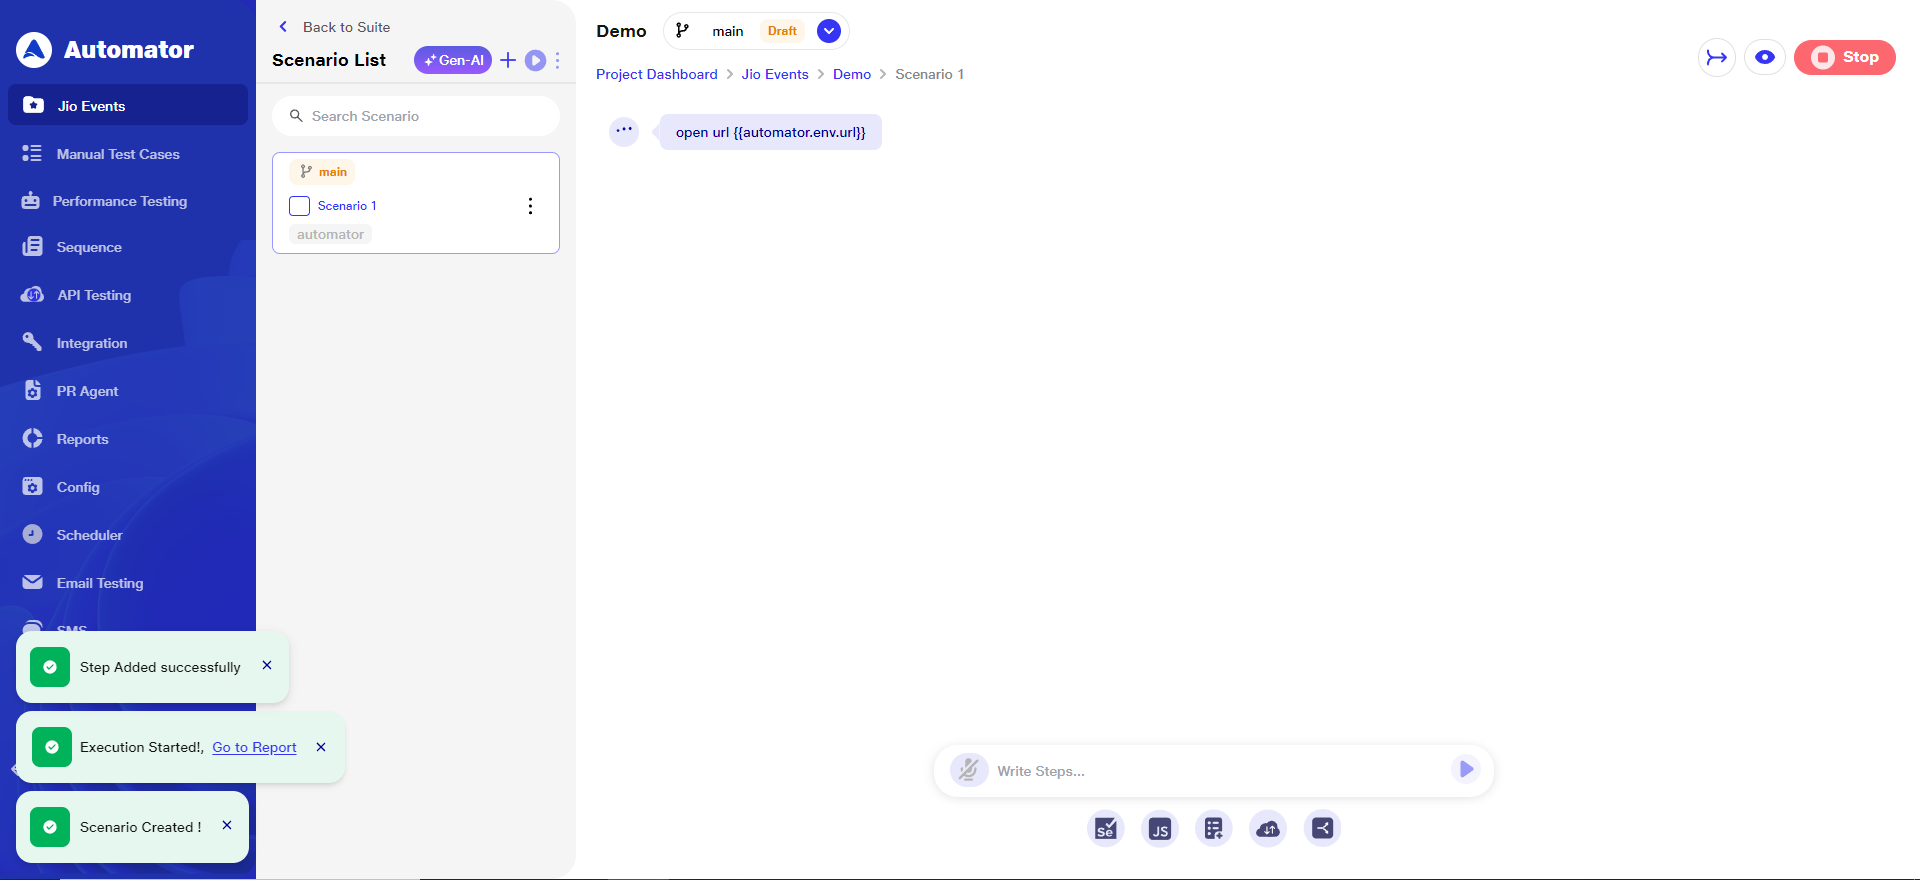
 f) Upon confirming scenario creation, a toast message — Scenario Created ! will appear in the bottom-left corner. Additionally, two more toast messages appear:
i)Step Added Successfully – Indicates that the specified base environment variable is being added as the first step of the scenario.
ii)Execution Started! Go to Report – Indicates that the default first step has been automatically executed. The Go to Report link directs the user to the Report section to view execution details.
 g) Once the initial step execution is completed, an Execution Completed! toast message will appear in the bottom-left corner.
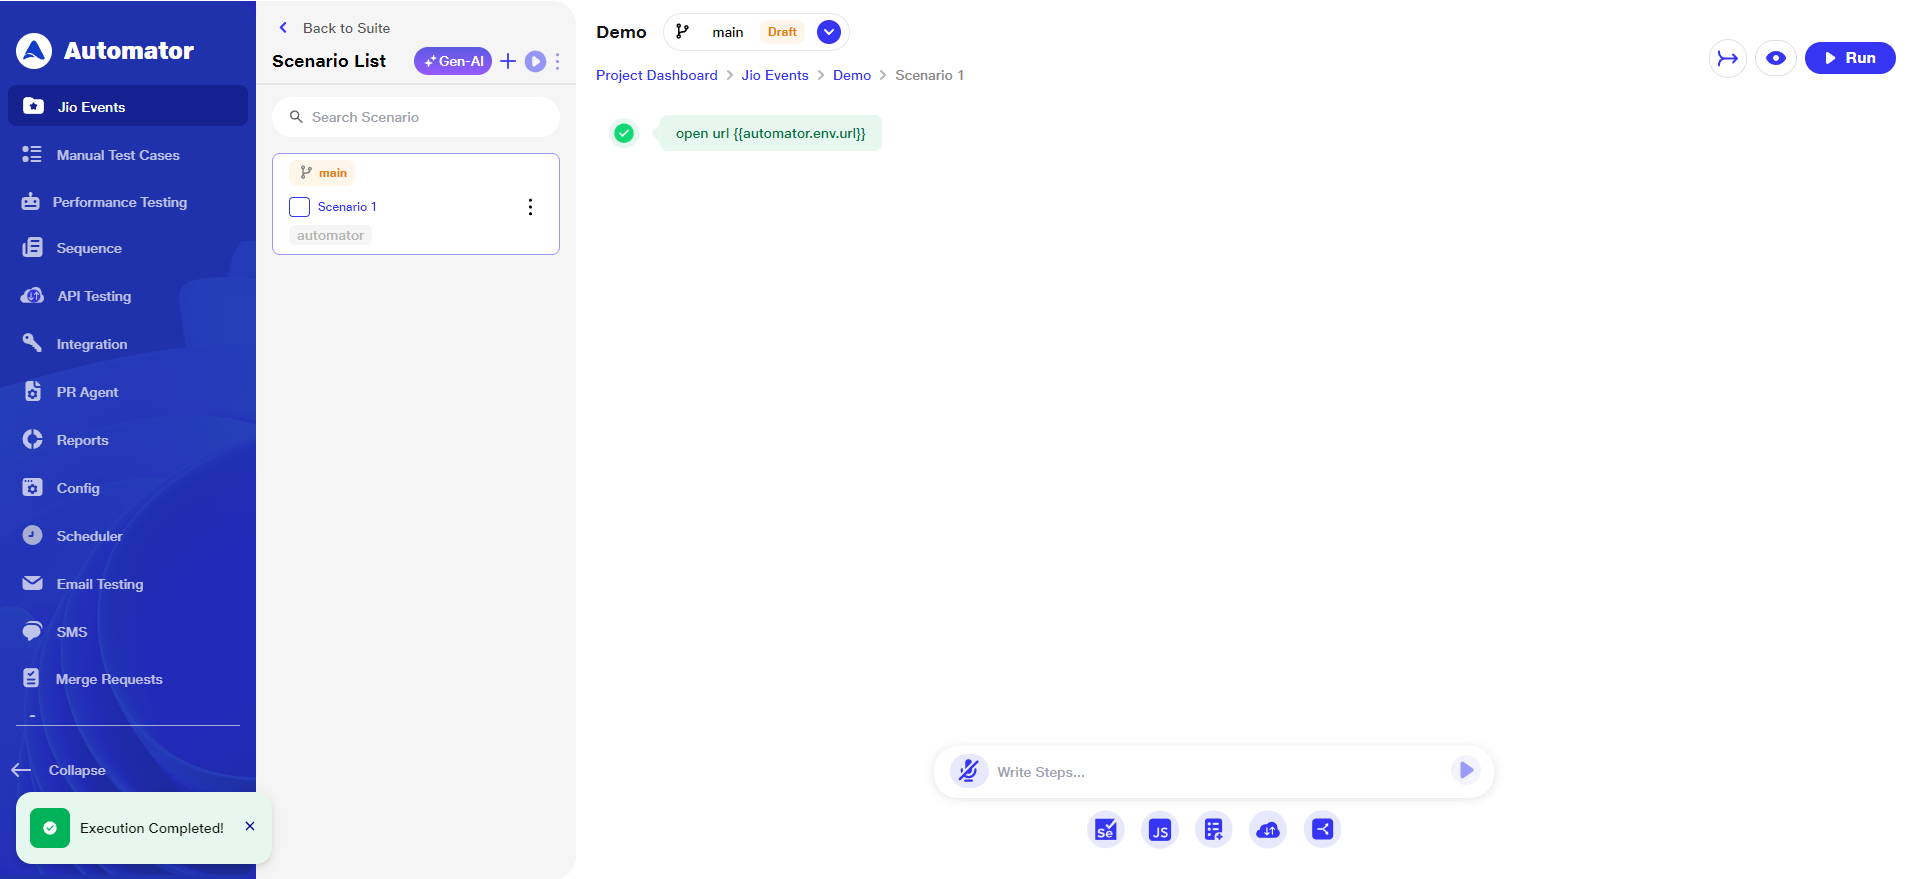 h) As shown in the image above, Scenario 1 is listed in the Scenario List section. Clicking on it allows the user to open and view the scenario steps, which is especially helpful when multiple scenarios are available.
3) Scenario Editor Interface Overview
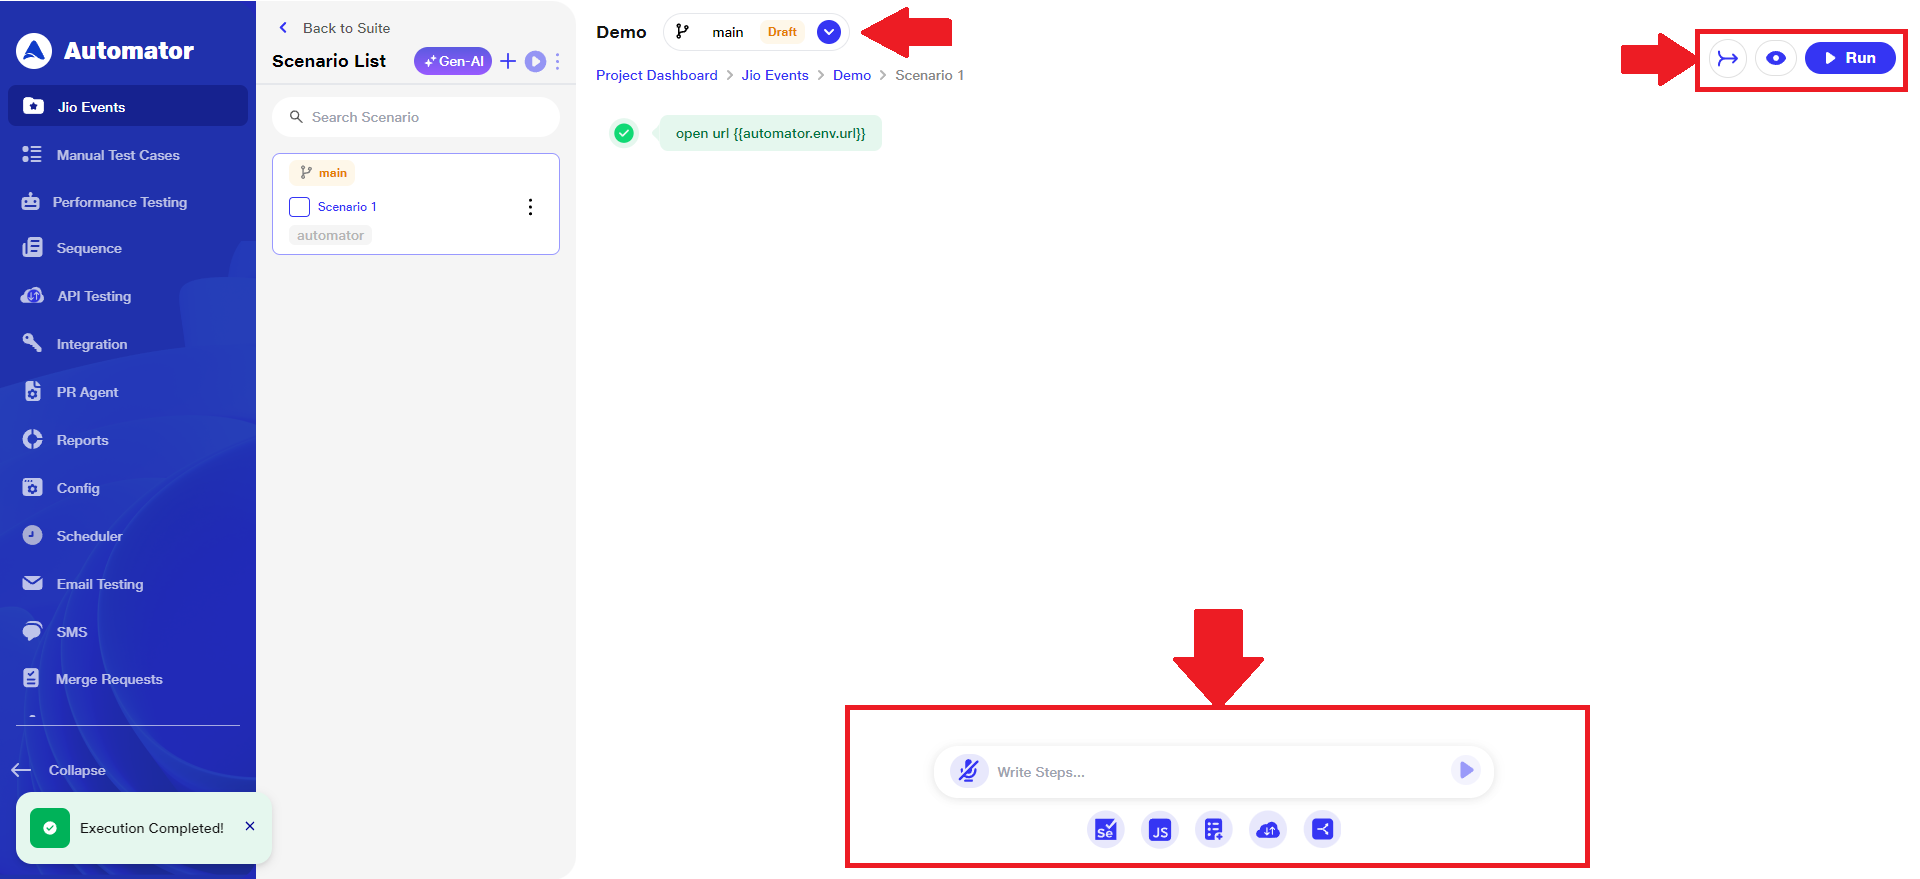 a) The top left corner displays the current status of the scenario. The possible states are:
i) Draft: Indicates the scenario is still in progress and not yet submitted for review or execution.
ii) Pending Approval: Indicates the scenario has been submitted for review (i.e., via a pull request) and is awaiting approval from the designated reviewer.
iii) Publish : Indicates the scenario has been finalized and made available for execution or further action.
b) The top right corner of the scenario editor interface provides three key options for managing and testing scenarios:
i) Raise Pull Request : Allows users to raise a pull request for the respective scenario steps before publishing, ensuring the changes are reviewed by the assigned reviewer.
ii) Switch to Visual Testing : Enables users to conduct visual testing alongside scenario creation, providing a real-time view of how components behave during execution.
 iii) Run : Executes the entire scenario, allowing users to validate the logic and flow before raising a pull request or proceeding with further testing.
c) The bottom center of the scenario editor interface contains the following elements:
i)Microphone Icon: Allows users to record voice input that can be converted into scenario steps.
ii)Step Input Textbox: Enables users to manually type scenario steps.
iii)Send Button: Submits the typed or transcribed step to be added to the scenario.
d) Below the input area, users have access to advanced step-adding options:
i) Add Selenium Script: Insert a Selenium script for browser automation.
ii)Add JavaScript Code: Adds custom JavaScript to handle advanced logic or UI interactions.
iii)Add Sequence: Add a predefined or reusable sequence of steps.
iv) Add callAPI: Insert an API call step to interact with backend or third-party services.
v) Add Conditional Loop Steps: Add conditional logic or looping behavior within the scenario flow.
4) Scenario Options
a) After a scenario is created, a three-dot menu (also known as the Kebab Menu) appears on the right side of the scenario name when you hover over it.
b) Each scenario includes the following action options: Run, Edit, Duplicate, Create Branch, and Delete.
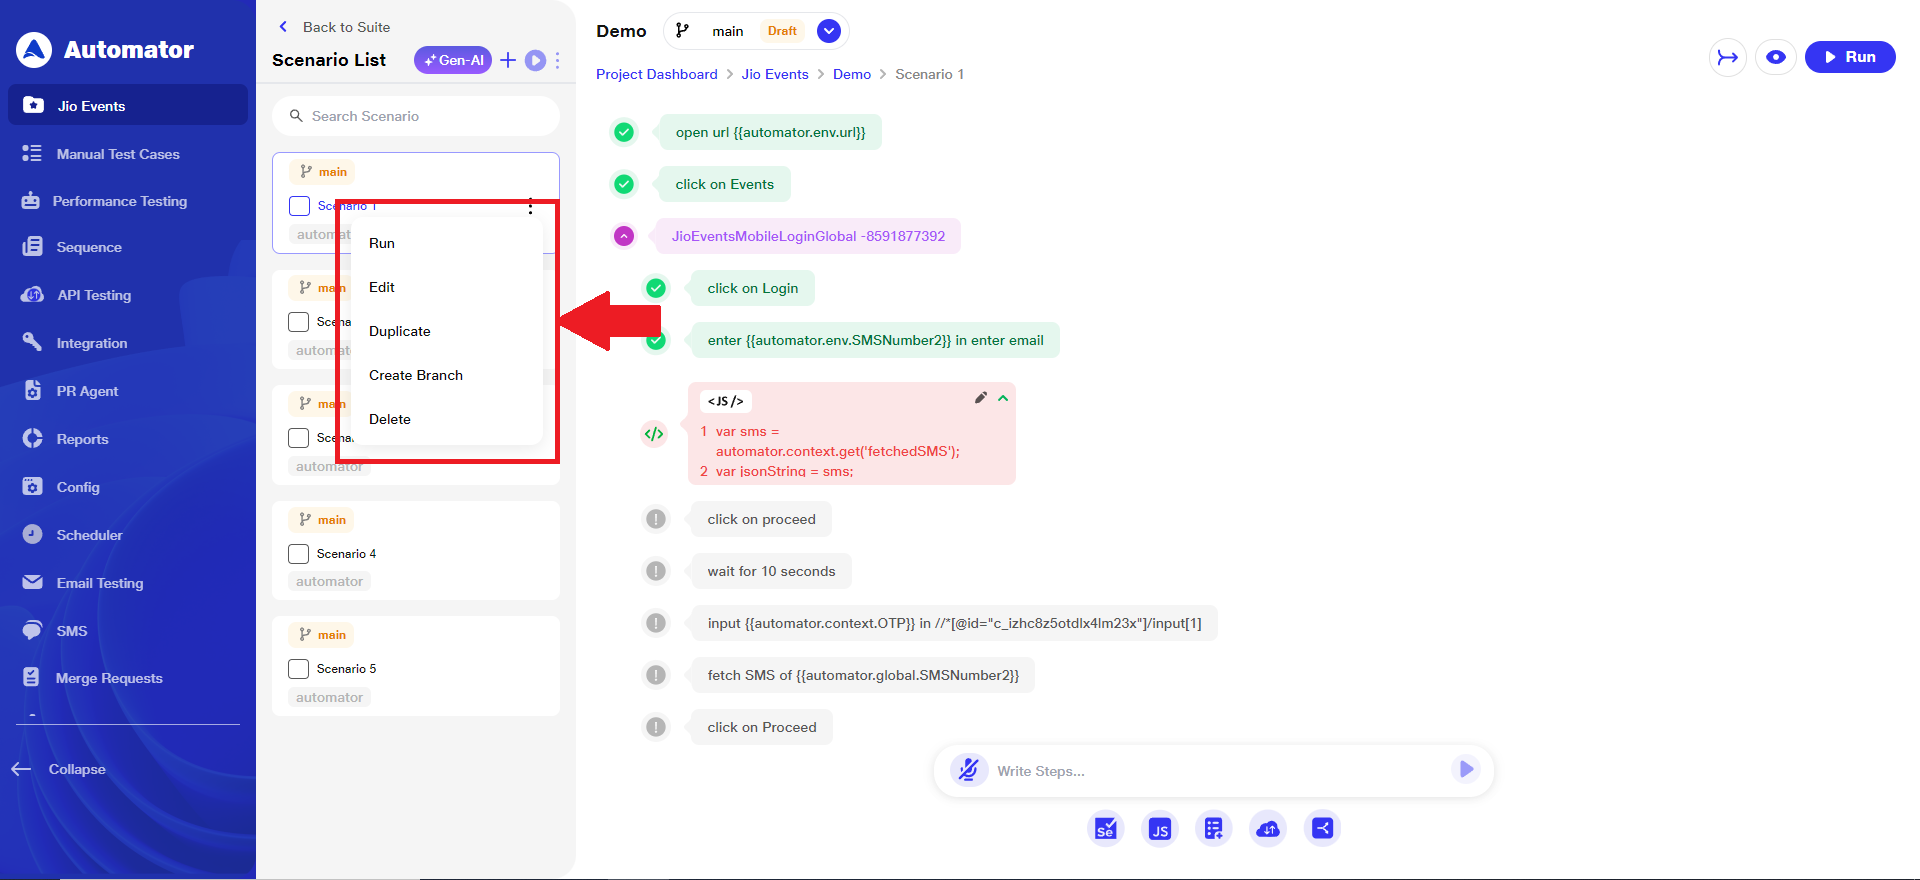 c) Run: Executes sequentially all the steps within the selected scenario.
d) Edit: Opens the scenario tab in edit mode. This allows users to modify fields such as Scenario Name, Base Environment Variable, and Enter Tags, as shown in the reference below.
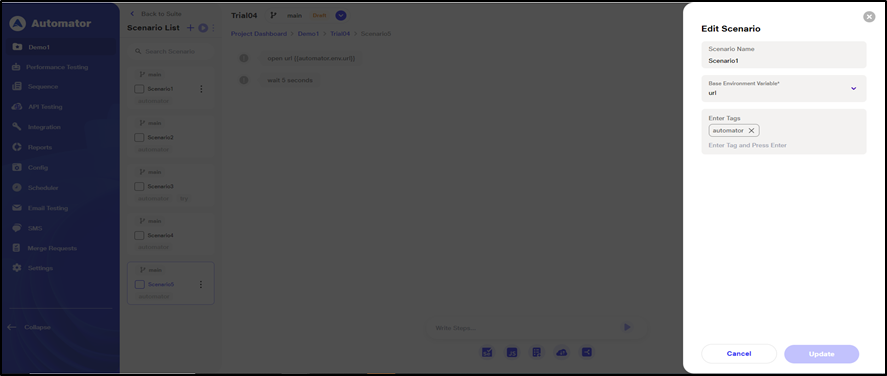 e) After making changes, click the Update button to save them successfully.
f) Duplicate: Creates a copy of the selected scenario.
g) Create Branch: Generates a branch (a variant) of the current scenario for alternate testing flows.
h) Delete: Permanently removes the scenario from the list.
i) Note: If an execution is already in progress and the user hovers over another scenario and clicks Run, the previous execution will stop, and the latest run will start. The screen will be overridden with the results of the new scenario.
5) Bulk Scenario Actions
a) There is another three-dot menu (also known as the Kebab Menu) located at the top, next to the Scenario List label.
b) This menu becomes active only when at least one scenario is selected using the checkbox beside each scenario.
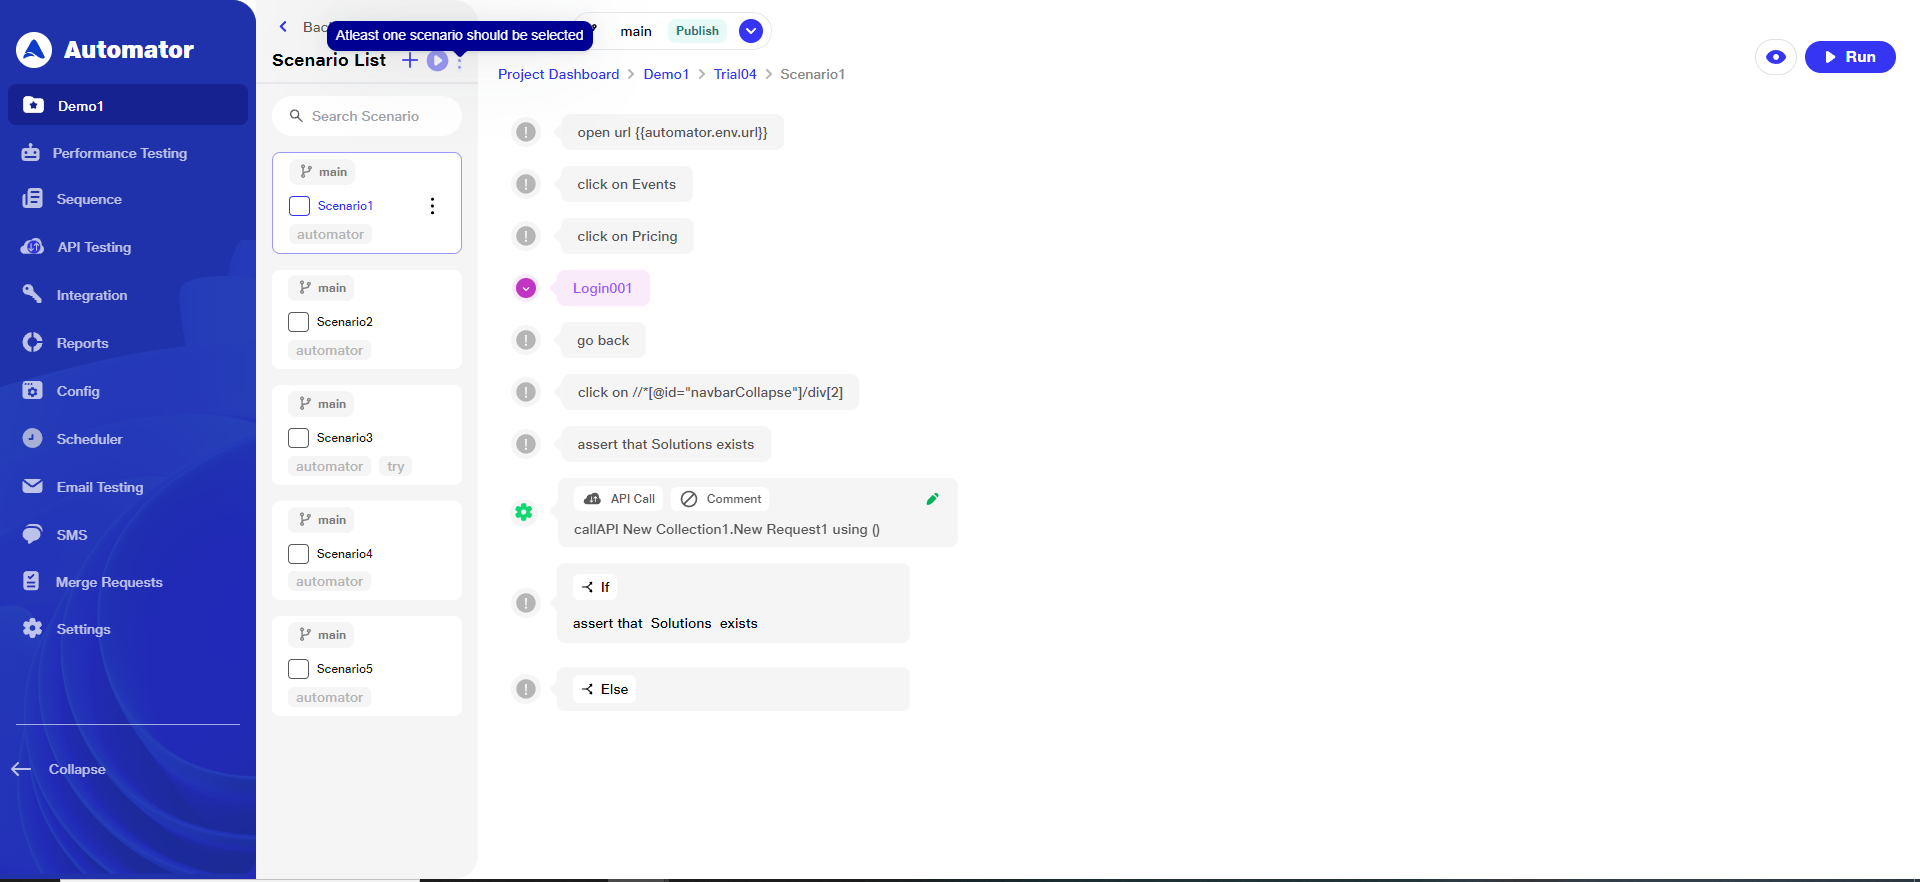 c) Users can select one or multiple scenarios using the checkboxes provided.
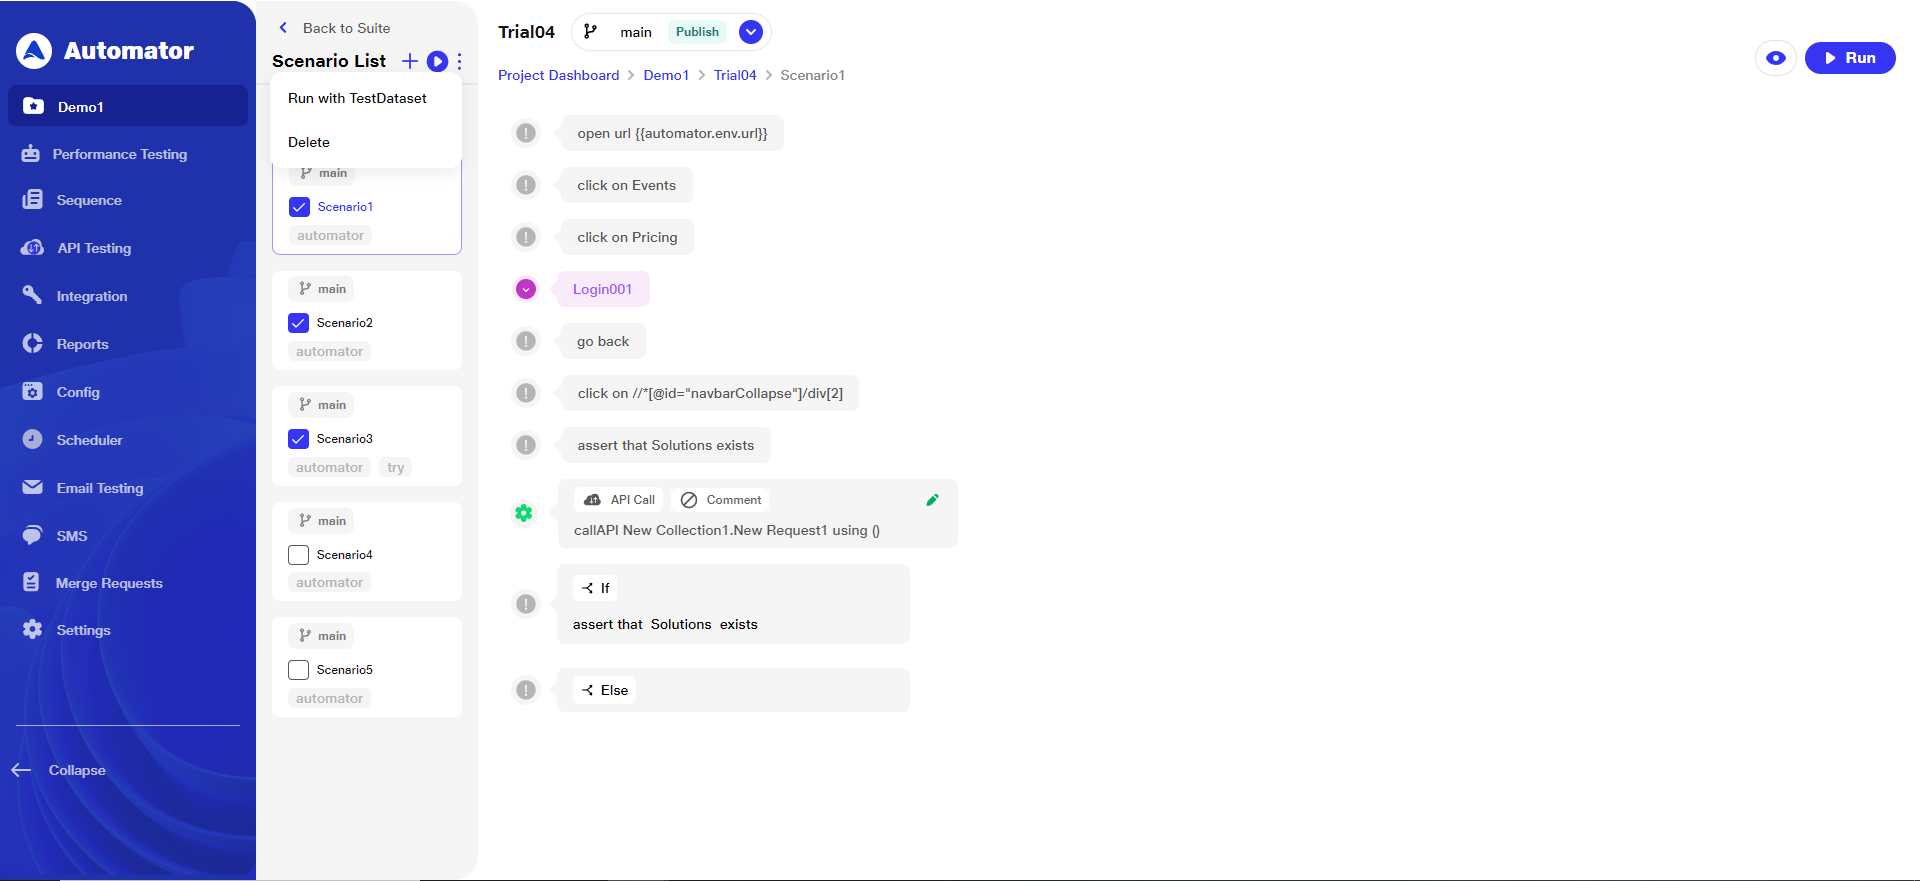 d) Clicking on this menu reveals two options:
i) Run with Test Dataset: Executes the selected scenarios using the associated test datasets. This is useful for data-driven testing where different inputs need to be applied during scenario execution.
ii) Delete: Permanently deletes selected scenarios from the list.
e) Note: When a scenario is selected using its checkbox, the Kebab Menu (three-dot icon) for that specific scenario will be disabled and will not appear on hover.