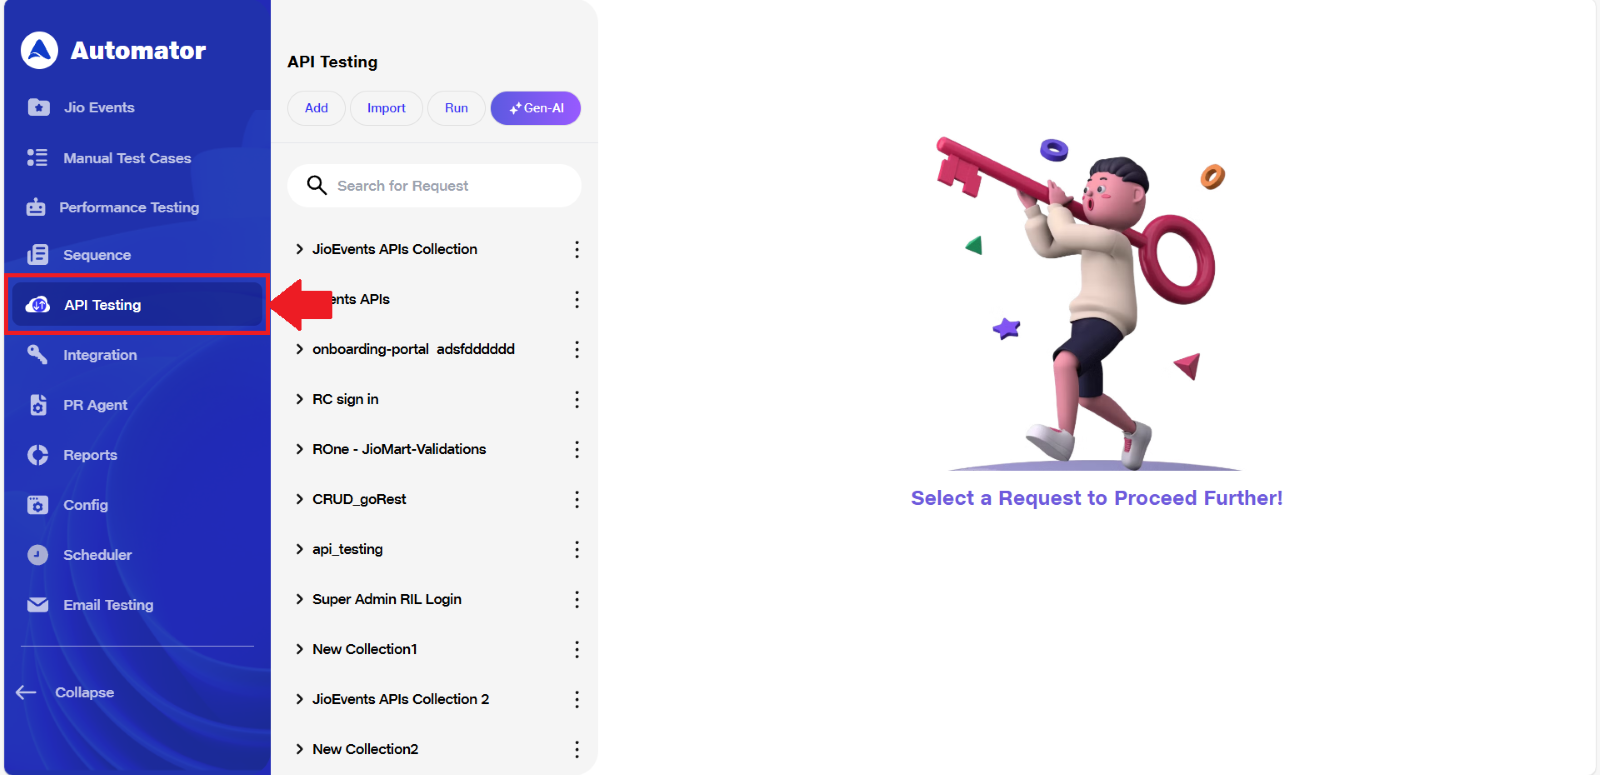
API Testing in Automator
In today's software landscape, API’s play a crucial role in facilitating communication with web servers for most modern applications. In Automator, we understand that testing APIs as part of end-to-end (E2E) tests can often be a challenging and time-consuming task. However, it is a vital component of a robust testing strategy. That's why we've developed an API builder tool to streamline the process. With this tool, you can define your APIs and seamlessly integrate them into your testing scenarios as individual test steps.
This API builder enables you to interact with your application's backend directly, bypassing the need to go through the application's user interface. This approach offers a multitude of advantages, such as the ability to swiftly access or modify data during your testing journeys and ensuring that your APIs themselves are functioning as intended. It simplifies the process of checking whether your APIs are working correctly and ensures that your tests are both comprehensive and efficient.
Basic API Testing Procedures
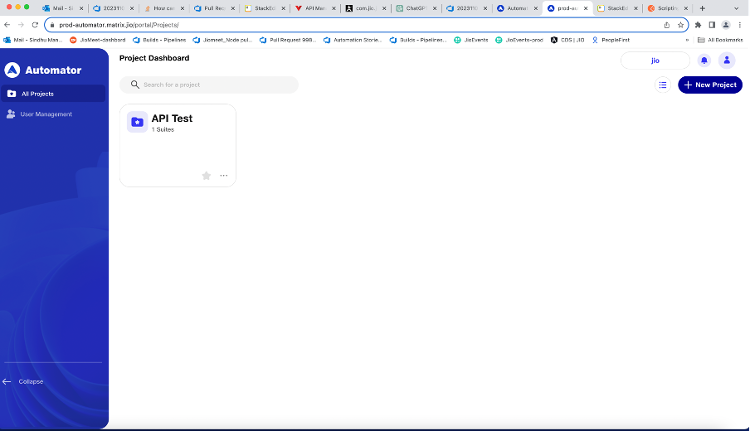
Let's kick off the API testing process using the Automator. Begin by creating a project and navigate to the API Testing module.
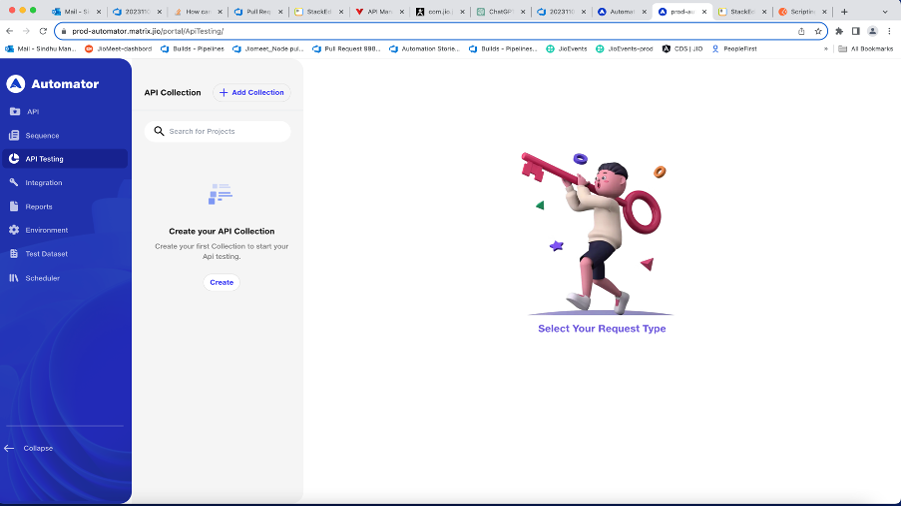
To start, we'll need to set up collections for our APIs. You can achieve this by clicking on the "Create" or "Add collection" button. This action will generate a new collection.
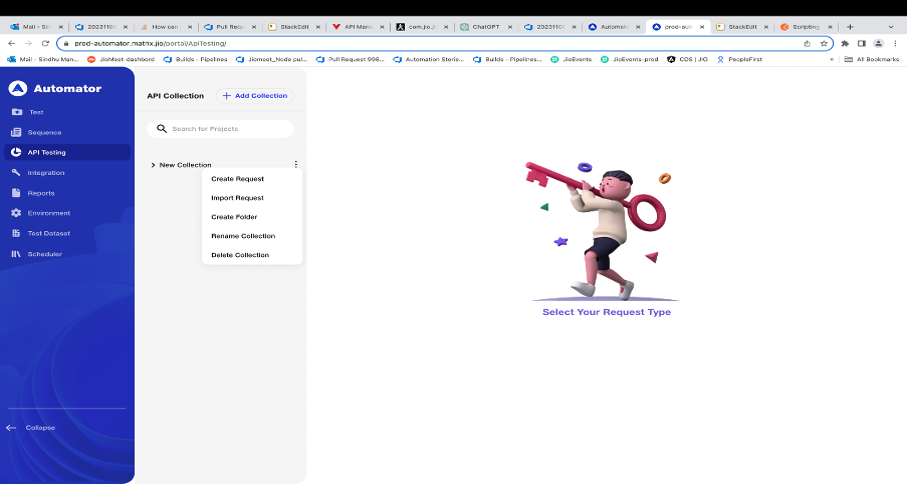
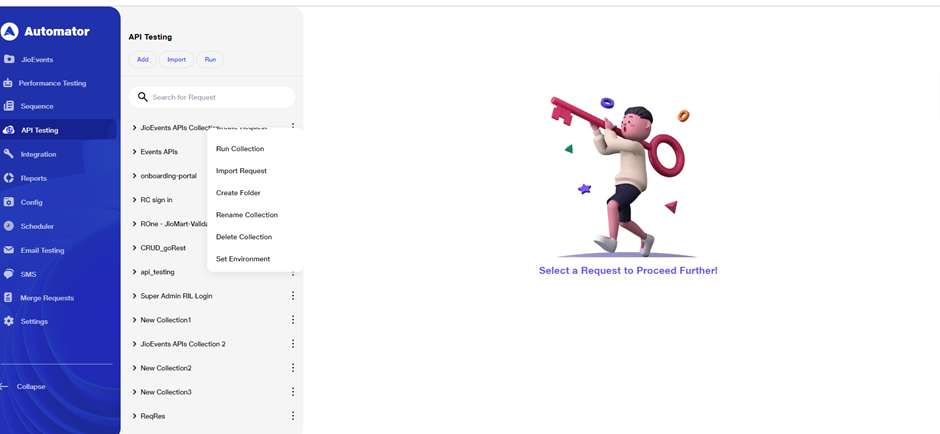
Once you click on the three dots menu, a dropdown or popup menu appears, presenting various options. These options may include:
-
Create Request: This functionality enables the creation of a fresh API request within the existing collection or folder. Selecting this choice initiates the procedure of generating a new API request, where you would commonly define particulars such as the HTTP method, endpoint URL, headers, and body.
-
Import Request: This option is useful for bringing in an existing API request from another location or file into the current workspace. It helps streamline the organization of your API testing environment.
-
Create Folder: If you want to organize your API requests into logical groupings, creating a folder is a useful option. Folders provide a structured way to manage and categorize related requests.
-
Rename Collection: If you need to modify the name of the current collection, selecting this option allows you to edit and update it.
-
Delete Collection: Offers the option to delete the entire collection, including all its contained requests and folders.
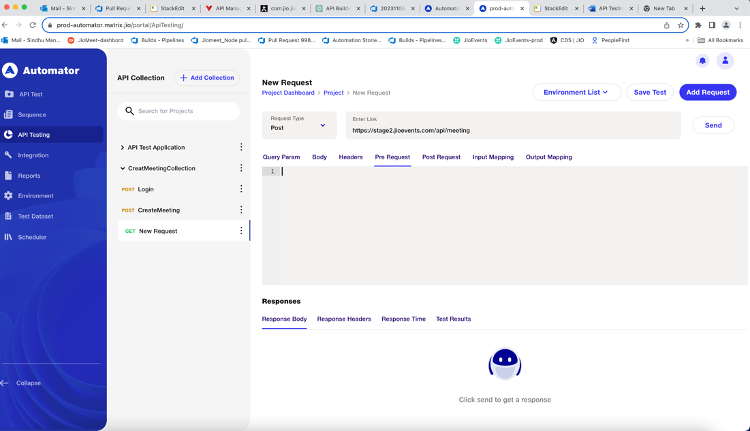
Select "Create Folder" to organize your API requests. Then, click on "Create Request."
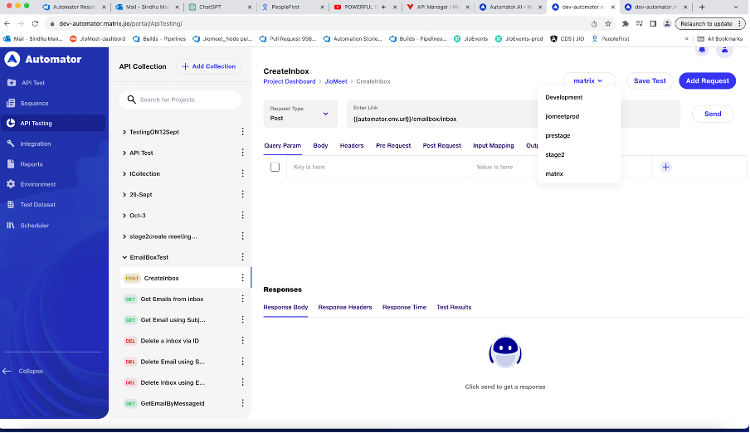
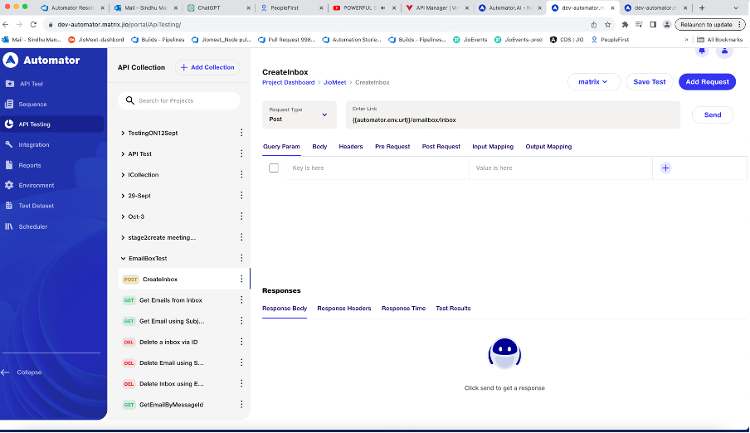
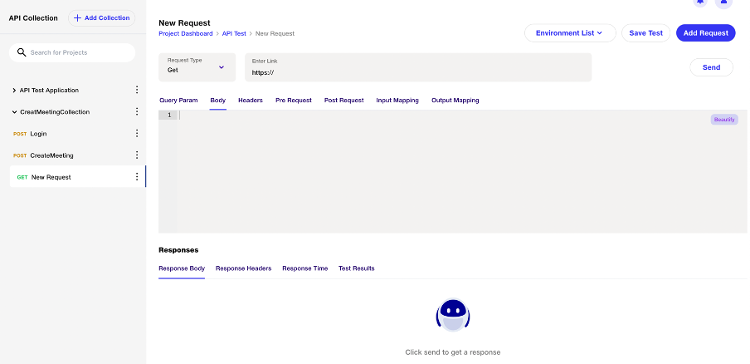
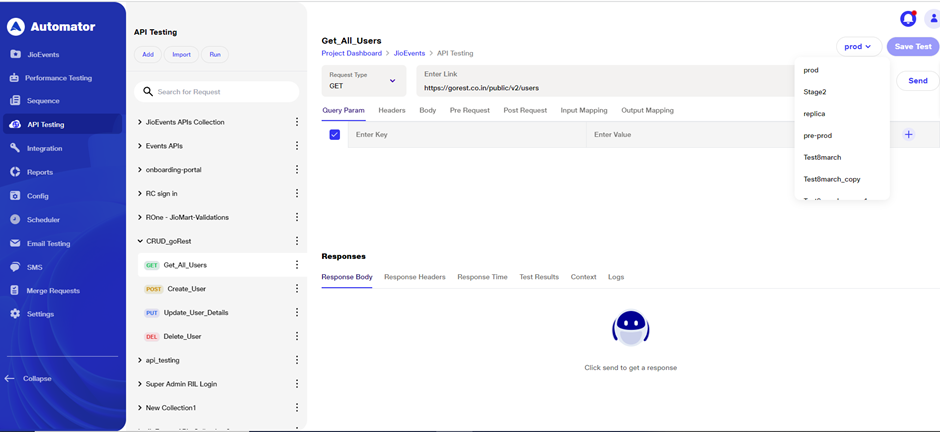
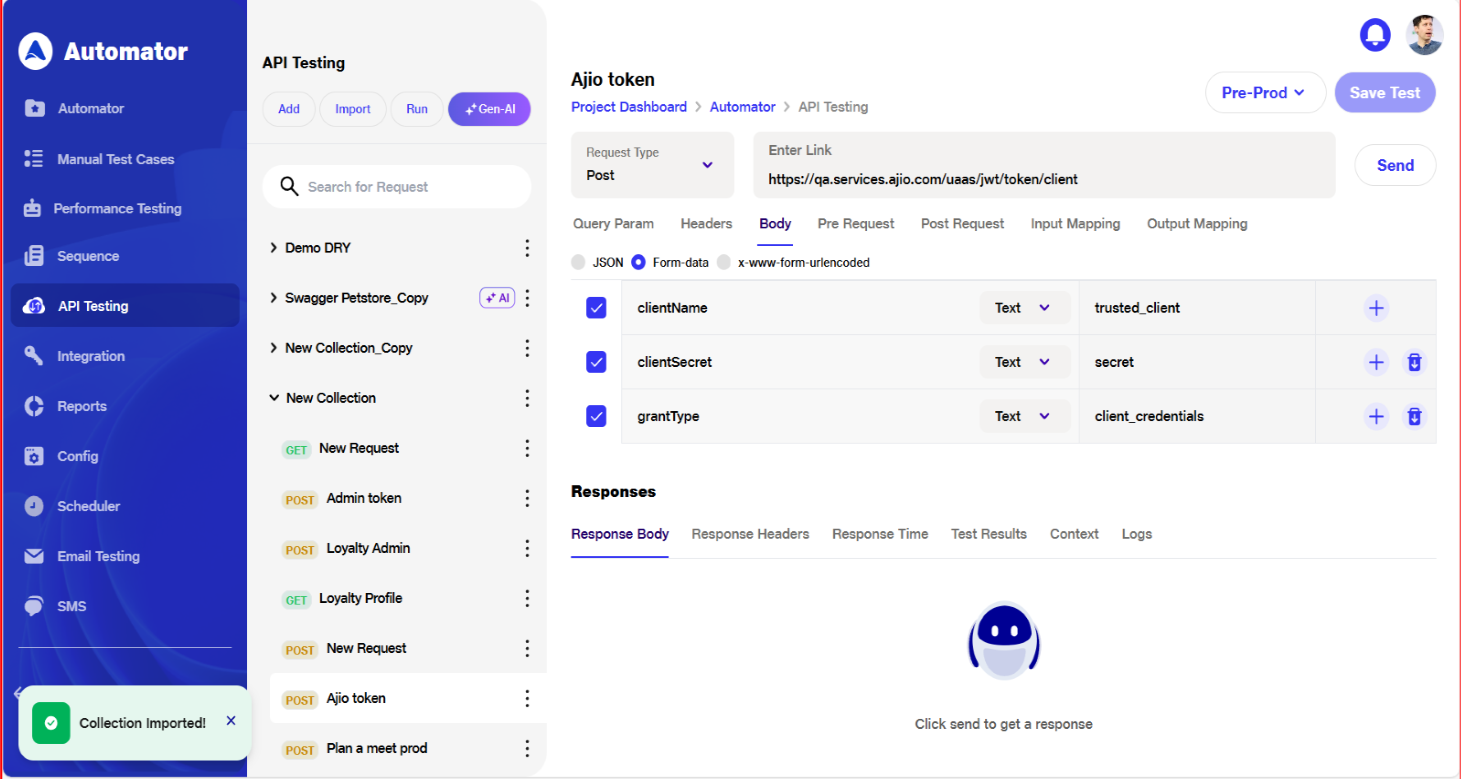
Request Type in API Testing: When you're working with API testing, the "Request Type" refers to the HTTP method that will be used for your API call. HTTP methods include GET, POST, PUT, DELETE, and PATCH, each serving a specific purpose in interacting with a web server.
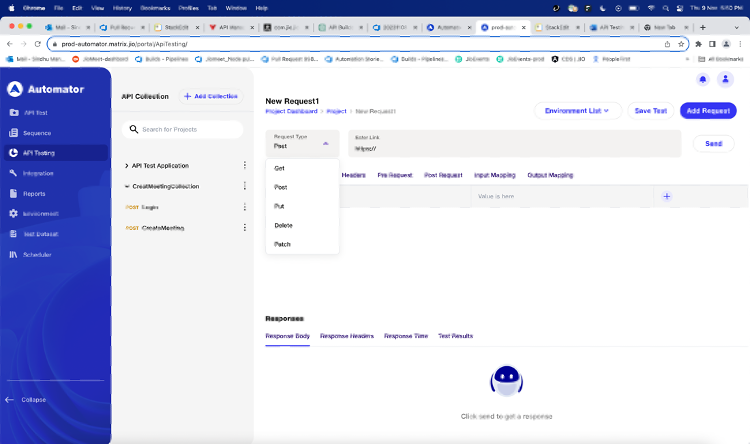
Enter Link: Specify the API's Endpoint URL in Enter Link.
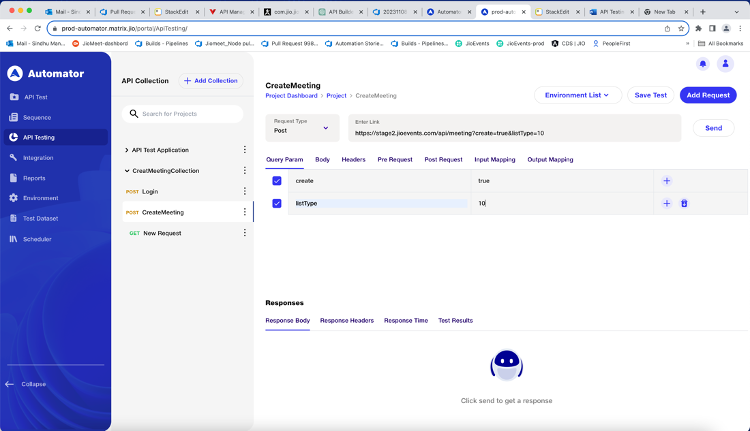
Query Param: Here, you can add parameters as key-value pairs to your API URL by selecting and deselecting the parameters in the query parameters. Add the parameter named "create" with a value of true; the key here is "create," and the value would be "true." Similarly, if we want to add "listType" with a value of 10, the key and value would be, respectively. Click on the plus icon to the right, and you can add other parameters.
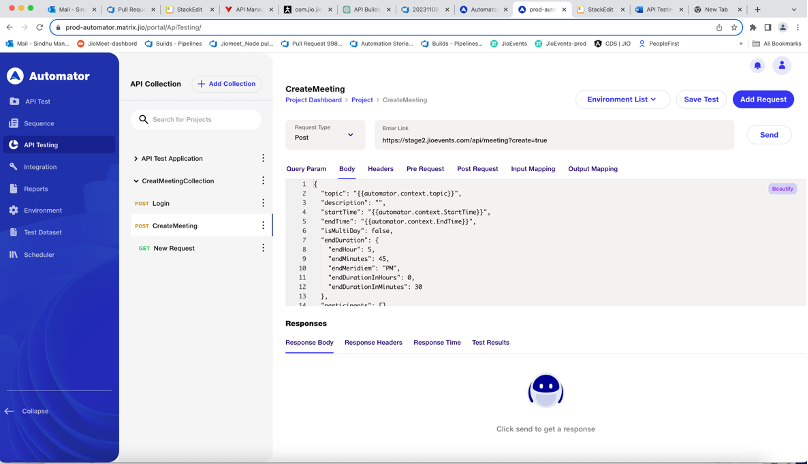
Body: Use the body section to add a payload to the request, you have the flexibility to format and organize the content in a readable and well-structured manner
Examples: Here scheduling the meeting
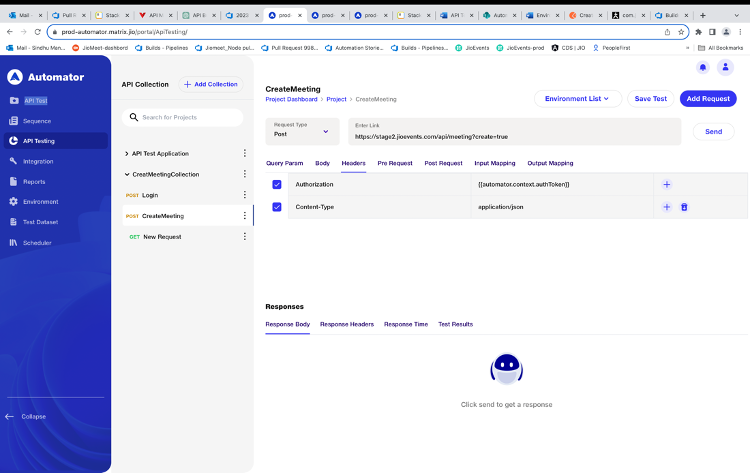
Headers: Headers are presented in the form of key-value pairs, similar to query parameters, by selecting and deselecting.
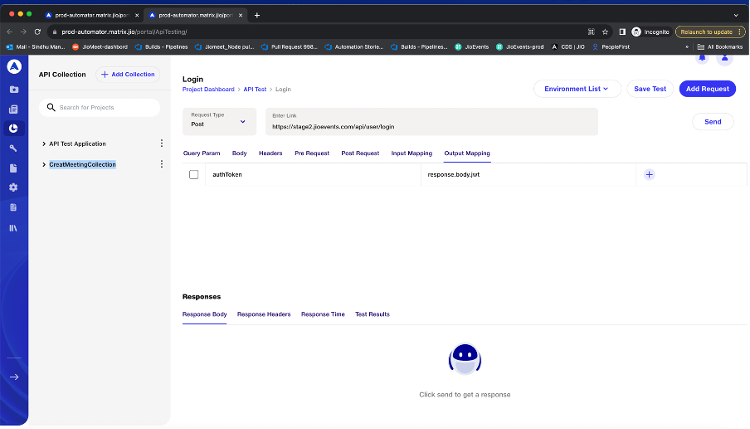
For example, if your API requires the header "Content-Type" with the value "application/json," you can add it by entering these values respectively. Similarly, add another parameter, such as "Authorization," with a value stored in the Other API output mapping as "authToken." You can define it as {{automator.context.authToken}}.
Pre-Request: In Automator, you have the option to employ pre-request scripts to execute JavaScript code before a request is initiated. By incorporating code within the Pre-request Script tab for a request you gain the ability to perform pre-processing tasks. This includes tasks such body data prior to the execution of the request.

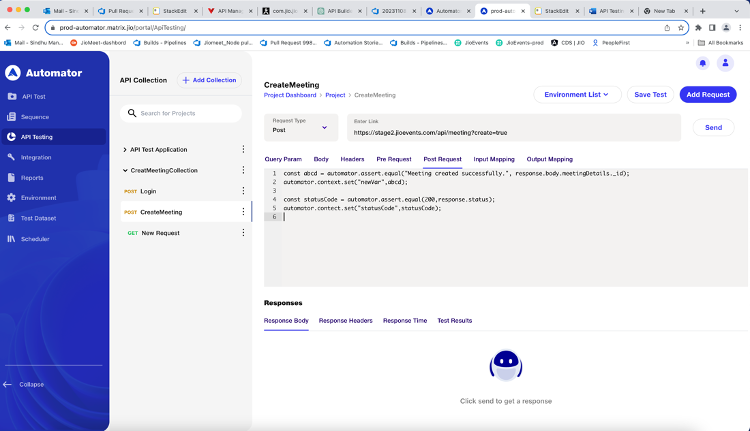
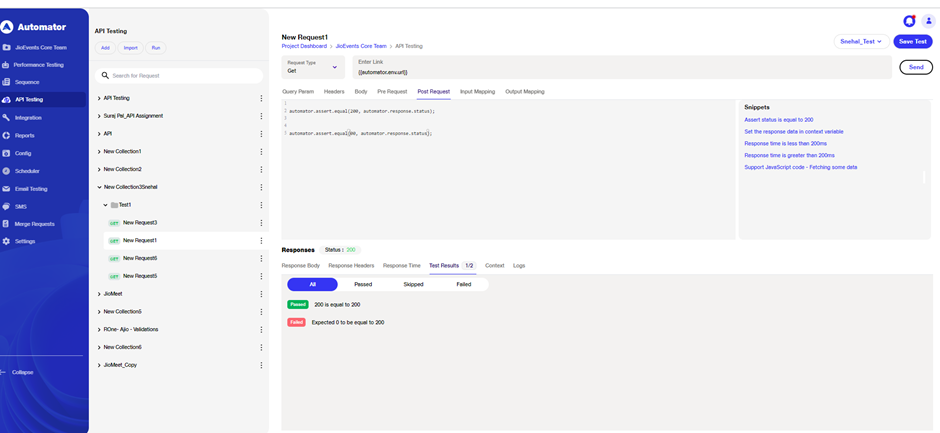
Post-Request: In Automator, you have the option to employ post-request scripts to execute JavaScript code after hit the api to server. Then we can assert the API response we are getting expected or not.
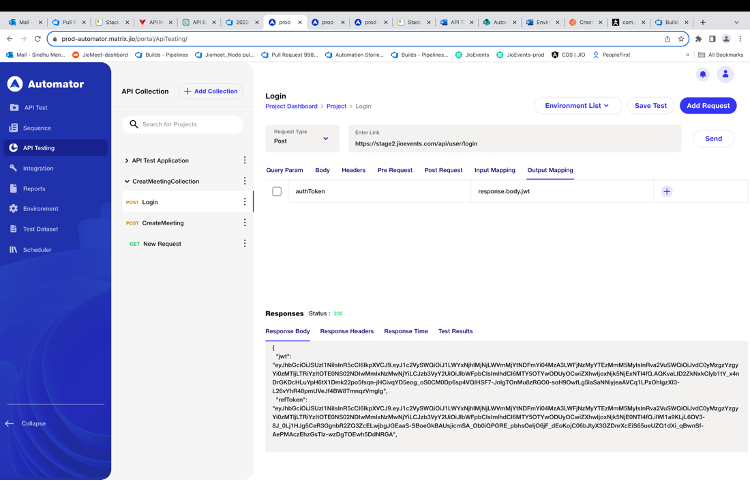
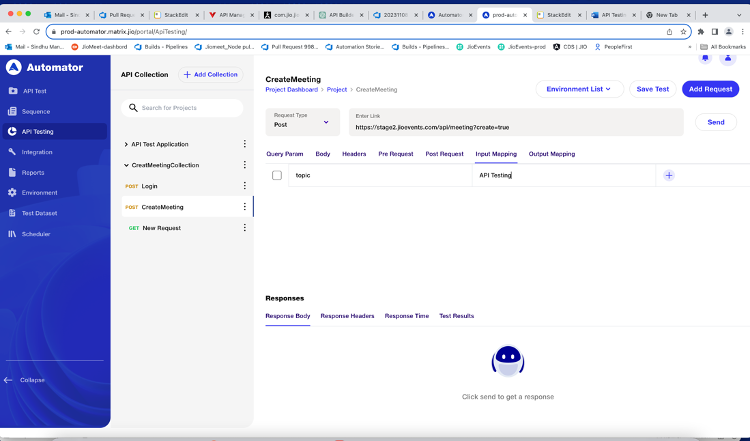
Input Mapping: We have the Input Mapping API we can send the values to API and header, by defined value by using the key and pair values. We are using the value in send to API request body at time calling.
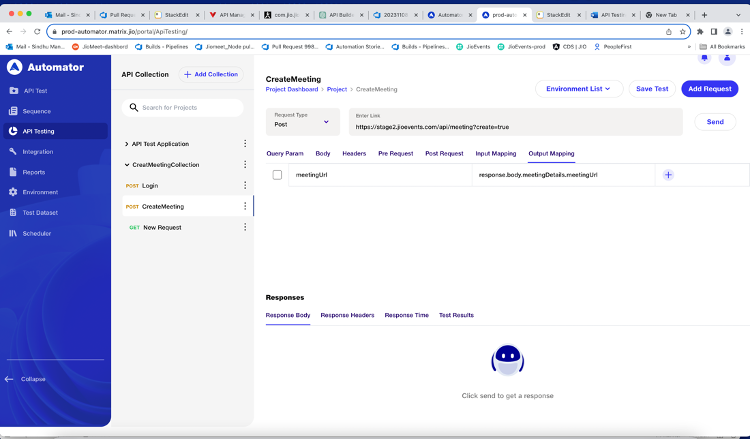
Output Mapping: We are defining values in API response. we use can use those values in next call API scenario.
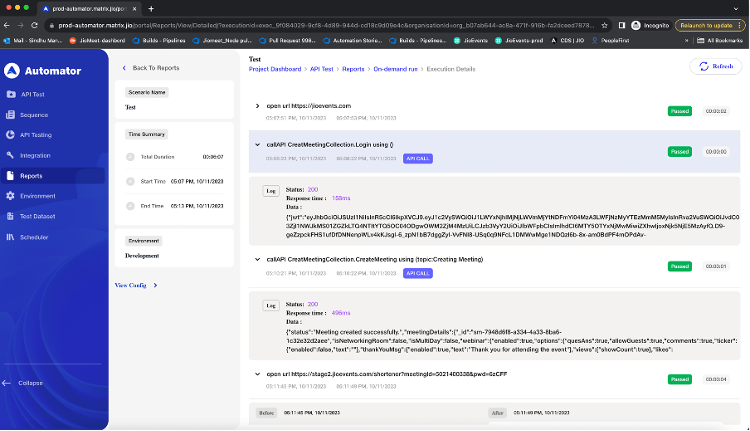
Once you've configured the request, save it and click on the "Send" button. Upon sending the request, you'll receive the response body from the API, and you'll be able to view the API's status.
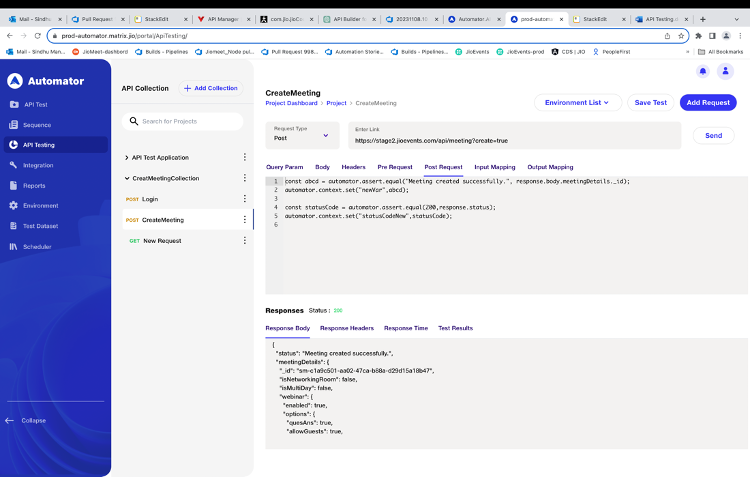
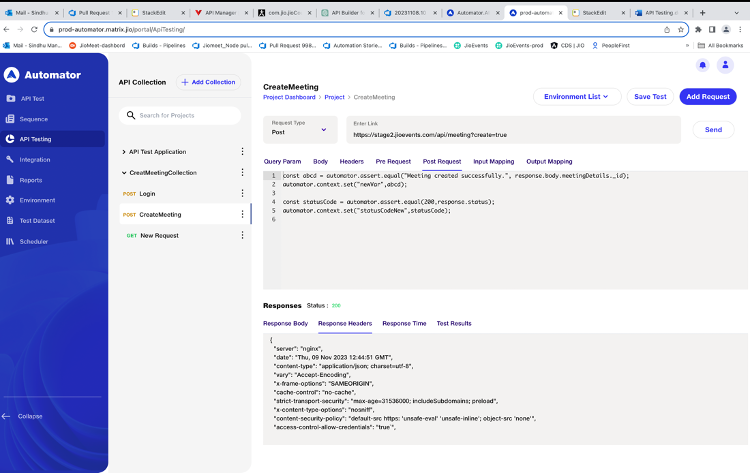
Response Headers: You can be able to see the response header in the response header of the API.
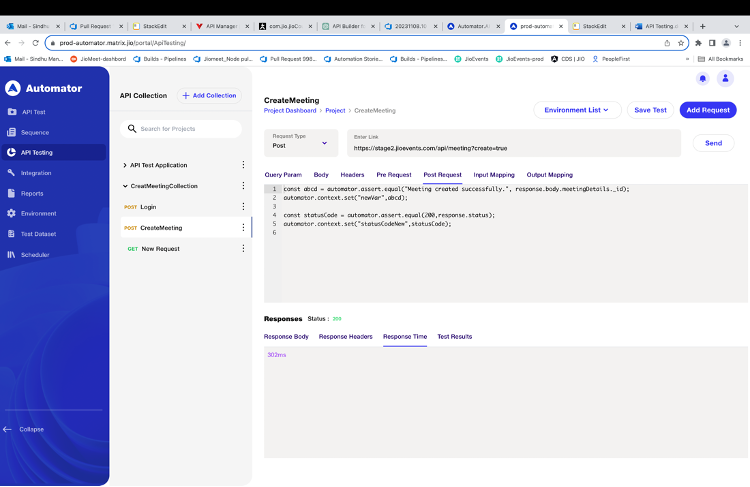
Response Time : We can be able to see the response time give API .
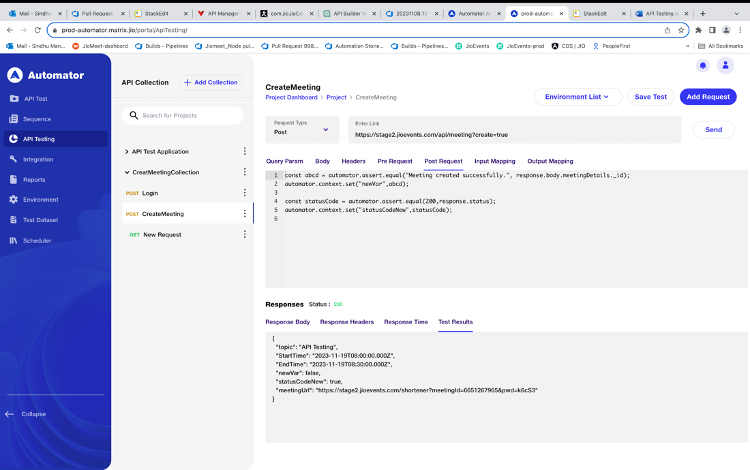
Test Result
We can be able to see the result in the post request body and value you define in Pre-Request and input and Output Mapping values Test Result.
Collection List is Displayed on the Right-side API in which each API is order queue. Creating the collection is the easy by click on by button is “Add Collection “.
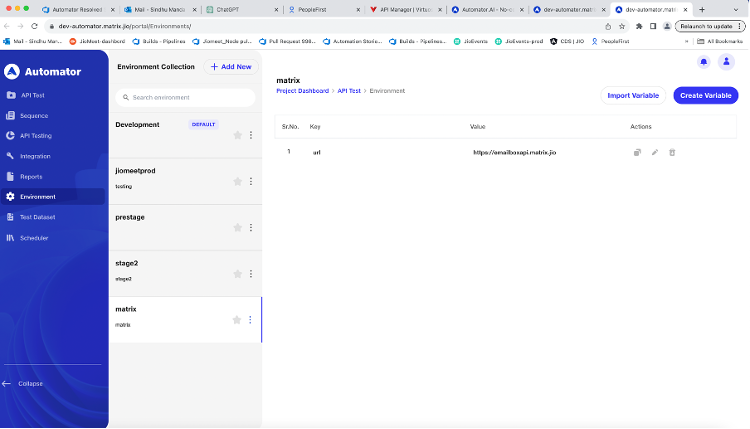
Environment List
Here, we have the ability to test the API in various environments by choosing different environment variables from the environment list. We can get the base of url of the API as {{automator.env.url}}.
Add Request
Easy we you able to create new API request by click on the “Add Request†button within the same collection.
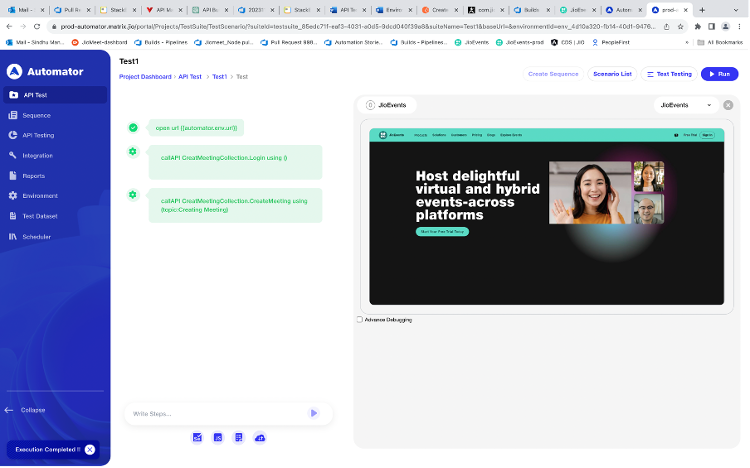
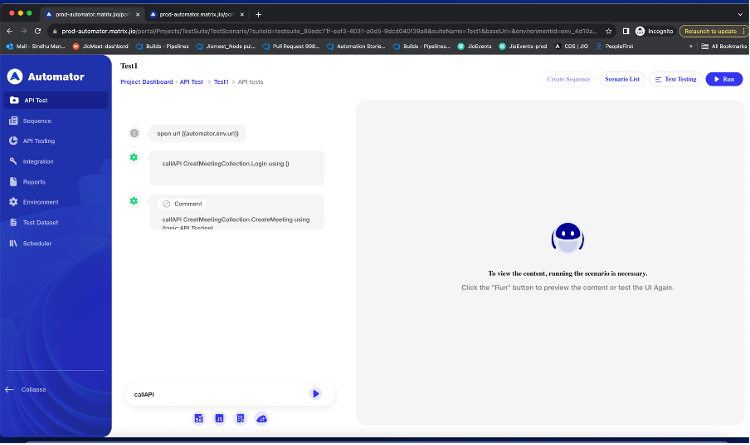
Here we are combining the UI an API testing, we can be able to schedule the meeting and using the API.So can reduce the time.
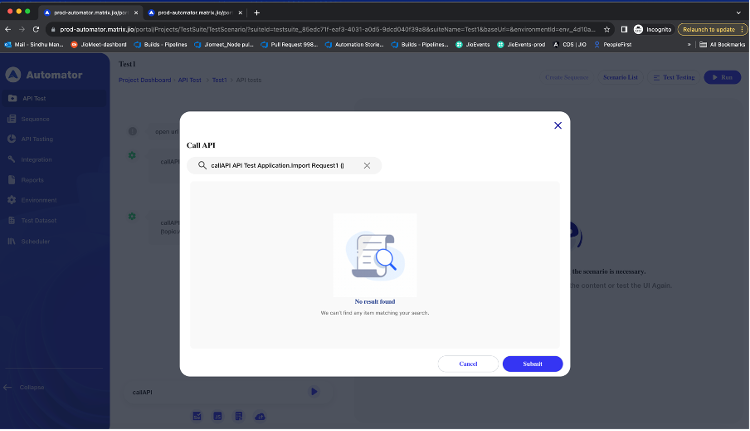
While run the scenario we can call the API, by click on the  we can be able to search for the required API in the search.
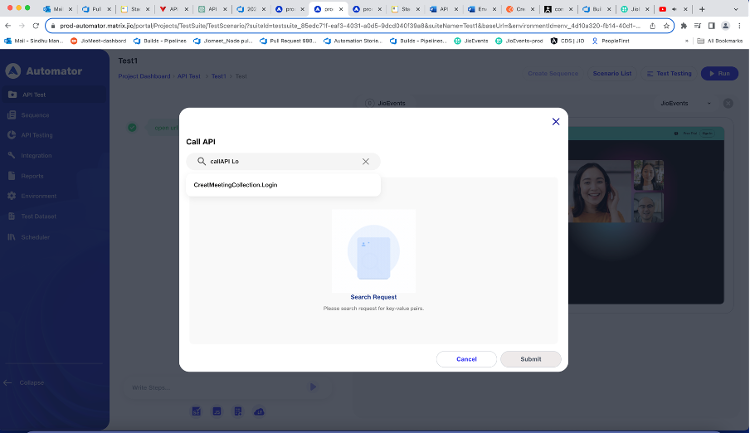
Once you selected the require API form the list.
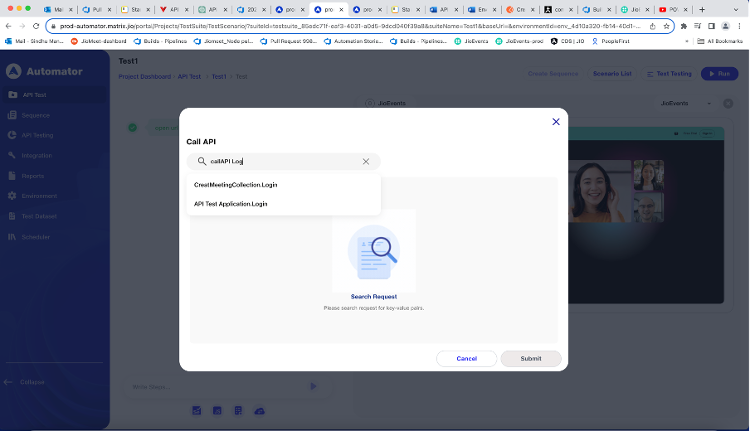
We can call the API without input values.
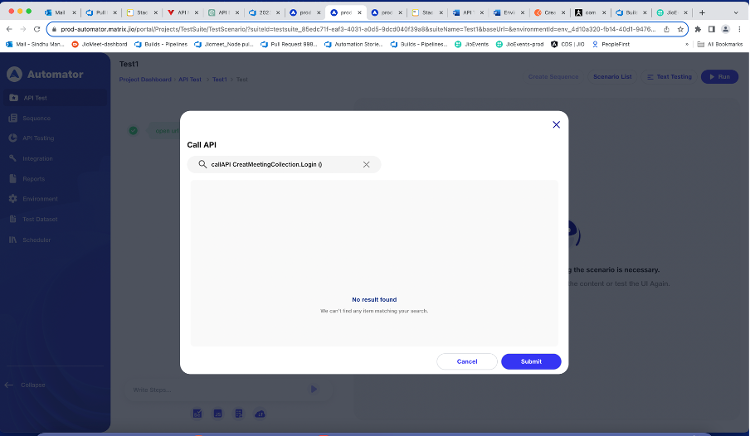
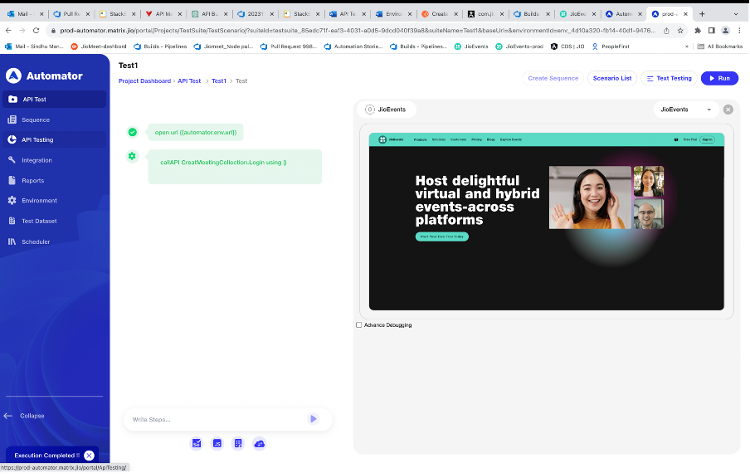
Again, we can be able to Call API then you can be able to update the value dynamical which we defined in the input mapping values.
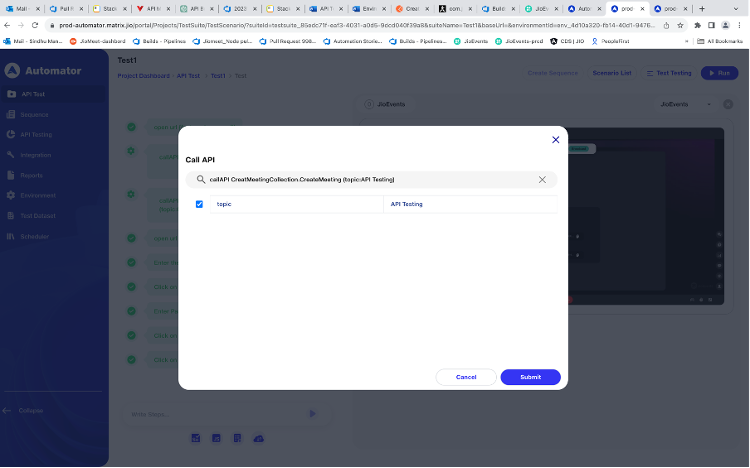
Here we are updating the topic as API Testing with Creating Meeting.
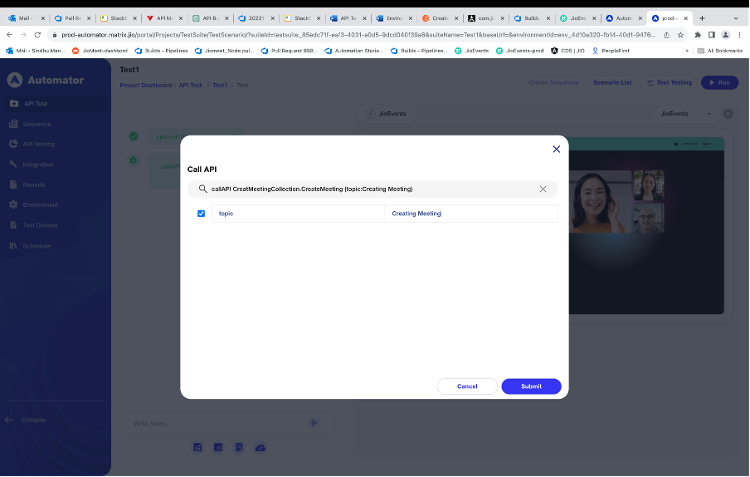
Meeting is created with topic name as “Create Meetingâ€.
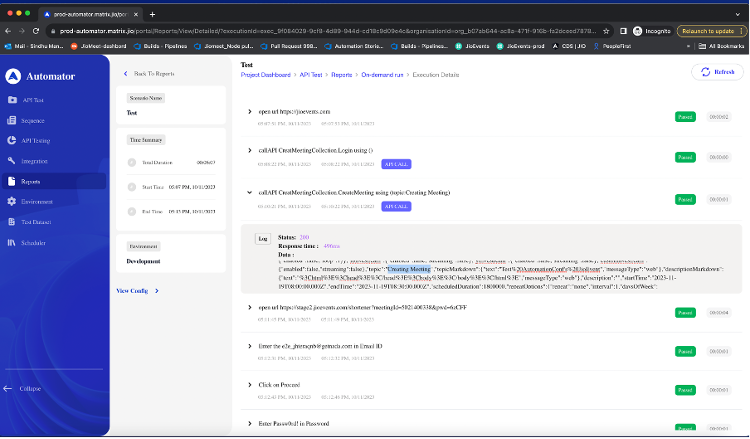
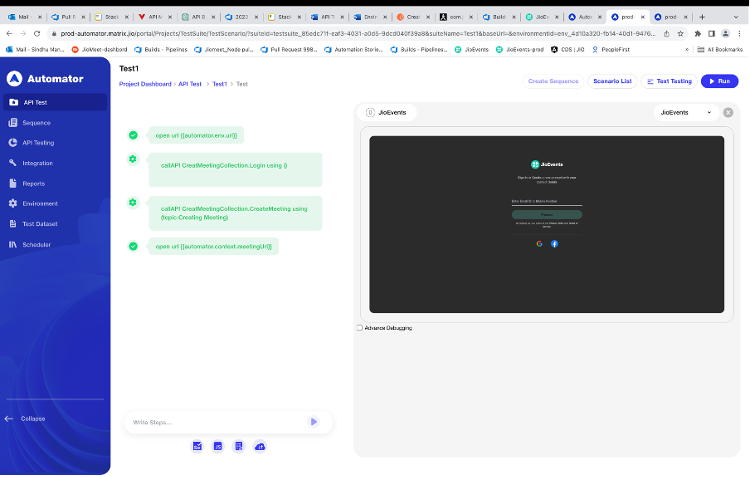
Now, we are joining the meeting with meeting URL link, which we stored in output mapping value by calling {{automator.context.meetingUrl}}. By Providing the user details and join the meeting.

Add Api call
We can be able to add the step, in between the step by click on plus and call the Add API call.

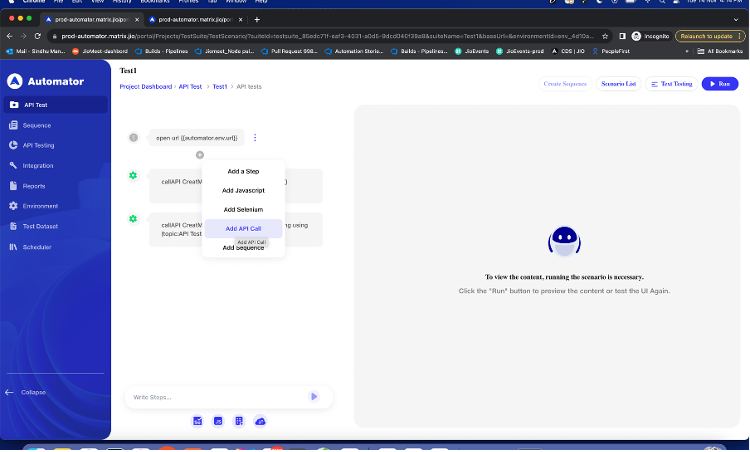

Here we have the option to comment each step API step.
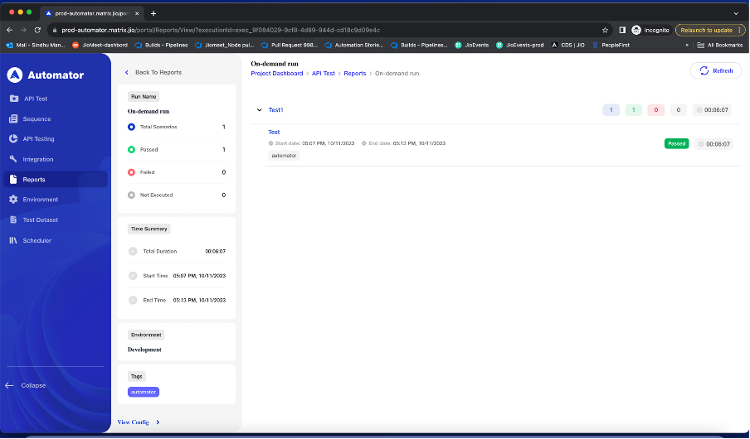
Once the Execution completed, you able to see the completed report in Report.

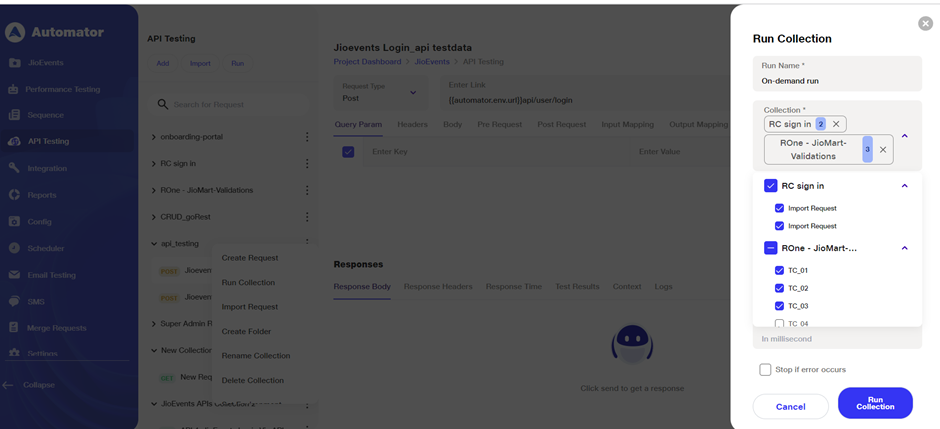
Run collection with selected request
Run collection allows users to execute an API collection, focusing specifically on selected requests within the collection. It streamlines the testing process by enabling targeted testing of individual API endpoints or specific scenarios within a larger collection. Providing flexibility to select or deselect individual API requests within a collection when running the collection.
This will be useful when user wants to validate the functionality of a specific API endpoint without executing the entire test suite. They can use this feature to select and run only the relevant requests.
Select specific Requests and execute collection
Click on the run collection option to open a popup window.
Users will select a collection, and upon clicking the dropdown, all requests within that collection will be displayed.
Provide flexibility to select or deselect individual API requests within a collection when running the collection.
The number of selected request will be displayed beside the collection name.
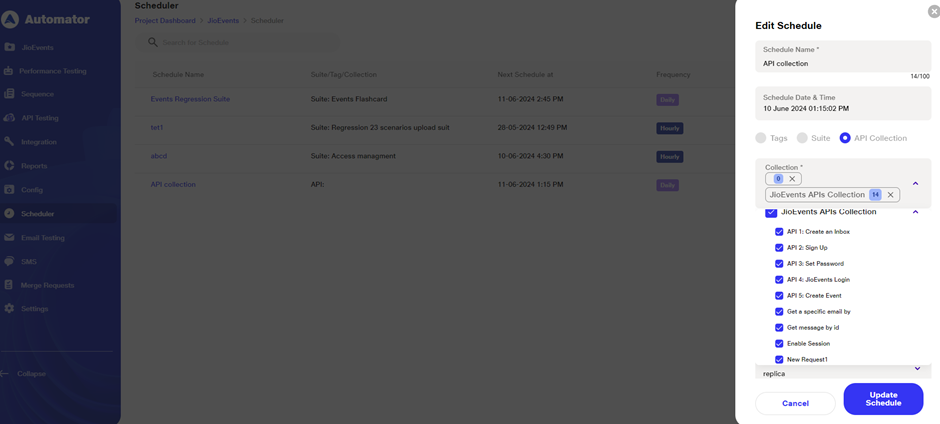
Scheduler Section:
When creating or editing a scheduler, the user will have to select the API collection. Like the manual run, users can select or deselect requests within the scheduler popup. The selected requests will run at the scheduled time, ensuring flexibility in automated testing.

Integration Section :
Users can integrate API testing with CI/CD tools. Here as well while selecting a collection, allows users to select or deselect individual requests. This ensures precise control over which requests are included in the automated CI/CD pipeline, streamlining the testing process within the development workflow.
Multiple Collection Handling:
User can selects multiple collections at a time in run collection , scheduler or integration then all requests inside each collection will be displayed under selected collection.
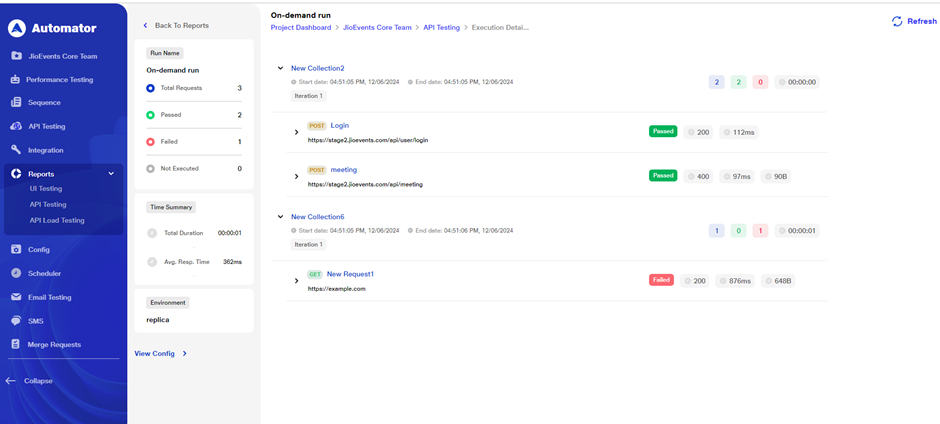
Report Generation:
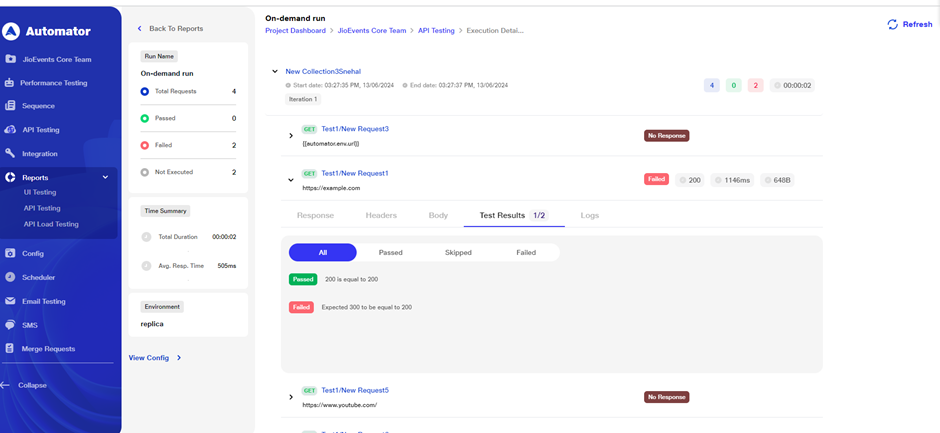
When execution is completed , reports will be generated.The report will specifically show the requests that were selected and executed during the collection run, providing clear insights into what was tested.
The results of the test run are displayed in a detailed report, showing the status, response times, and data for each selected request. Users can analyze the outcomes to identify issues or confirm the correctness of the API responses.
Benefits:
Targeted Testing: Focus on specific areas of interest without running the entire collection, saving time and resources.
Efficient Iteration: Quickly re-run modified requests within a collection during development cycles for faster feedback.
Organized Test Runs: Maintain clear testing structures by executing grouped requests while retaining an overview of your test suite.
Enhanced Scheduler Functionality: Create more granular scheduled tests that target specific API requests.
Functionality to apply environment to API collection.
To apply different environments (e.g., development, staging, production) to an API collection, facilitating comprehensive testing across various deployment scenarios. It ensures that tests are conducted under different conditions to validate functionality in different environments.
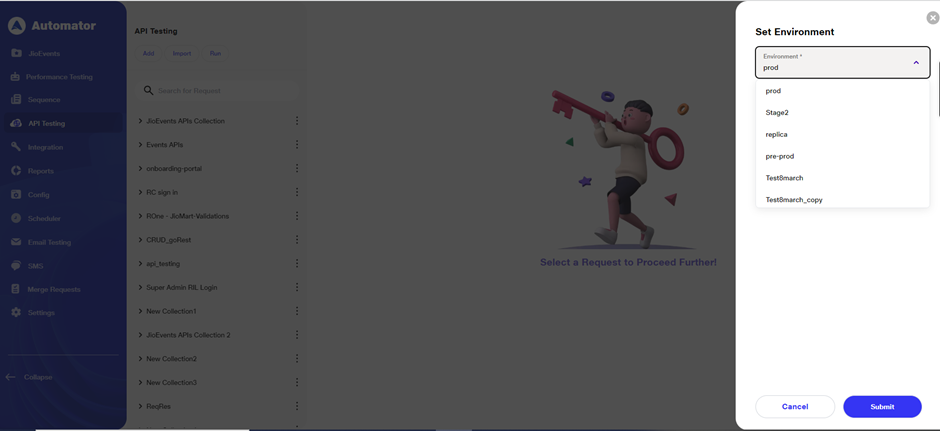
Environment Selection:
Click on the 3-dot menu of collection Set environment option will be visible.From the dropdown menu, select the Set Environment option.
A list of existing environments will appear. Choose the desired environment from this list. Confirm your selection by clicking on the Submit button.
Verify environment:
Once set, you can verify the environment applied to each request within the collection. Open any request in the collection to ensure the selected environment is properly displayed. The selected environment will be displayed on top right corner.
Execution and Generation of reports :
Click on the run collection and select the collection on which you have set the environment. Initiate the run to execute all requests within the collection.
The execution will proceed based on the selected environment. Upon completion, reports will be generated reflecting the outcomes under the set environment.
This streamlined process ensures that all requests within a collection are executed consistently within the specified environment, providing accurate and environment-specific results.
Benefits:
Scenario Testing: Validate API behavior across multiple environments to ensure consistent functionality.
Efficiency: Execute tests without manually adjusting variables for each environment.
Flexibility: Easily switch between different environments to accommodate different deployment stages.
Comprehensive Reporting: Capture and compare results across different environments for thorough analysis.
Retained the response body of API
Ensures that response body data is retained during API testing in the following scenarios:
Data should be retained when switching between APIs and returning to the original API.
Response data must remain visible even after navigating to a different API and returning.
Response data should be retained after refreshing the page or navigating away and returning.
Data should remain intact when switching between tabs within the responses.
Response data should be preserved when switching to other browser tabs and returning to the API tab.
Error logs for pre-request and post-request.
The Error Logs in the Automator tool provides comprehensive logging for errors encountered during both the pre-request and post-request phases of API testing. This functionality is essential for diagnosing and troubleshooting issues, ensuring that users can identify and address problems efficiently.
Scripting Errors for pre-request and post-request
Captures errors from any pre-request or post-request scripts, including syntax errors, runtime exceptions, or script execution failures. Provides clear error messages with the exact line numbers where the errors occurred for quick debugging.

Test Results Integration:
Threshold Count: Updates the count of passed and failed test cases in the Test Results tab, reflecting the results of post-request test cases.
Detailed Test Case Display: Lists passed, failed, and skipped test cases, showing expected outputs and error details for failed test cases.
Filtering Options: Provides filtering options (All, Passed, Failed, and Skipped) to view test cases based on their status.
Execution and Reporting:
Collection and Scheduler Execution: Results from pre-request and post-request test cases appear in the Test Results tab when running collections or scheduled API collections.
Report Generation: After execution completes, reports capture and display results in the Test Results tab, including the received response body.
Benefits:
Enhanced Debugging: Provides detailed error logs and messages to quickly identify and resolve issues in API requests and responses.
Improved Test Visibility: Offers clear visibility into the results of pre-request and post-request test cases, aiding in testing efficiency and accuracy.
Comprehensive Reporting: Facilitates comprehensive reporting and analysis with detailed insights into test case results and error occurrences.
Form-Data
What is Form Data?
Form-data enables sending key-value pairs using the multipart/form-data format. It is commonly used to submit form fields, including file uploads. This format is compatible with web-based forms and allows sending complex structured data.
1) Where to Add Form-Data
a) Navigate to the API Testing page of your project.
 b) Open the desired request from your collection.
c) Go to the Body tab.
d) Select the form-data radio option (second option in the list).
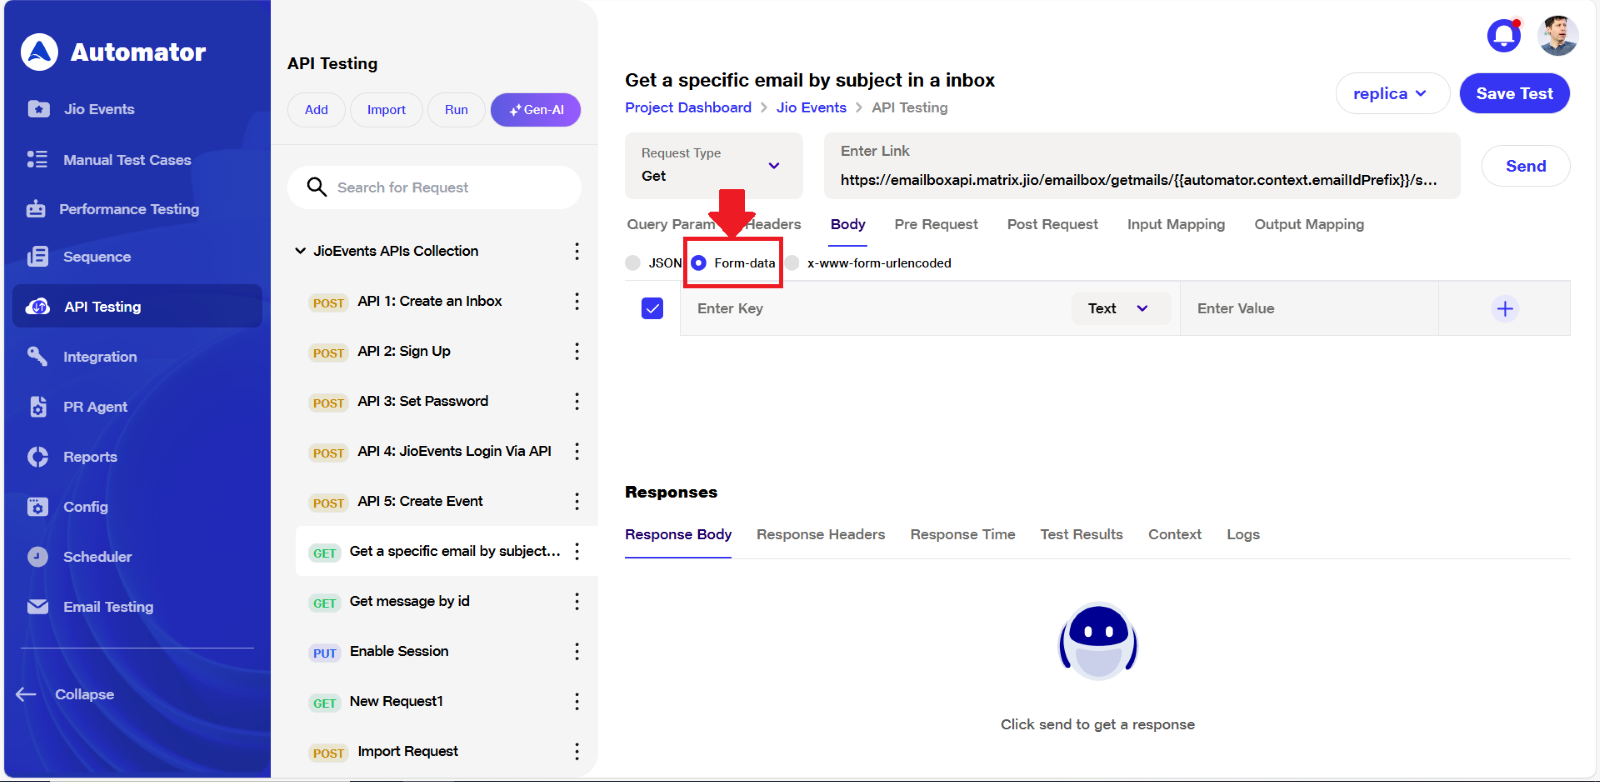
2) Adding Form-Data Entries
a) A table will appear where you can enter:
i)Key: the field name.
ii)Value: the field data (text, URL, or any valid input).
b)Click the + (➕) icon to add additional rows.
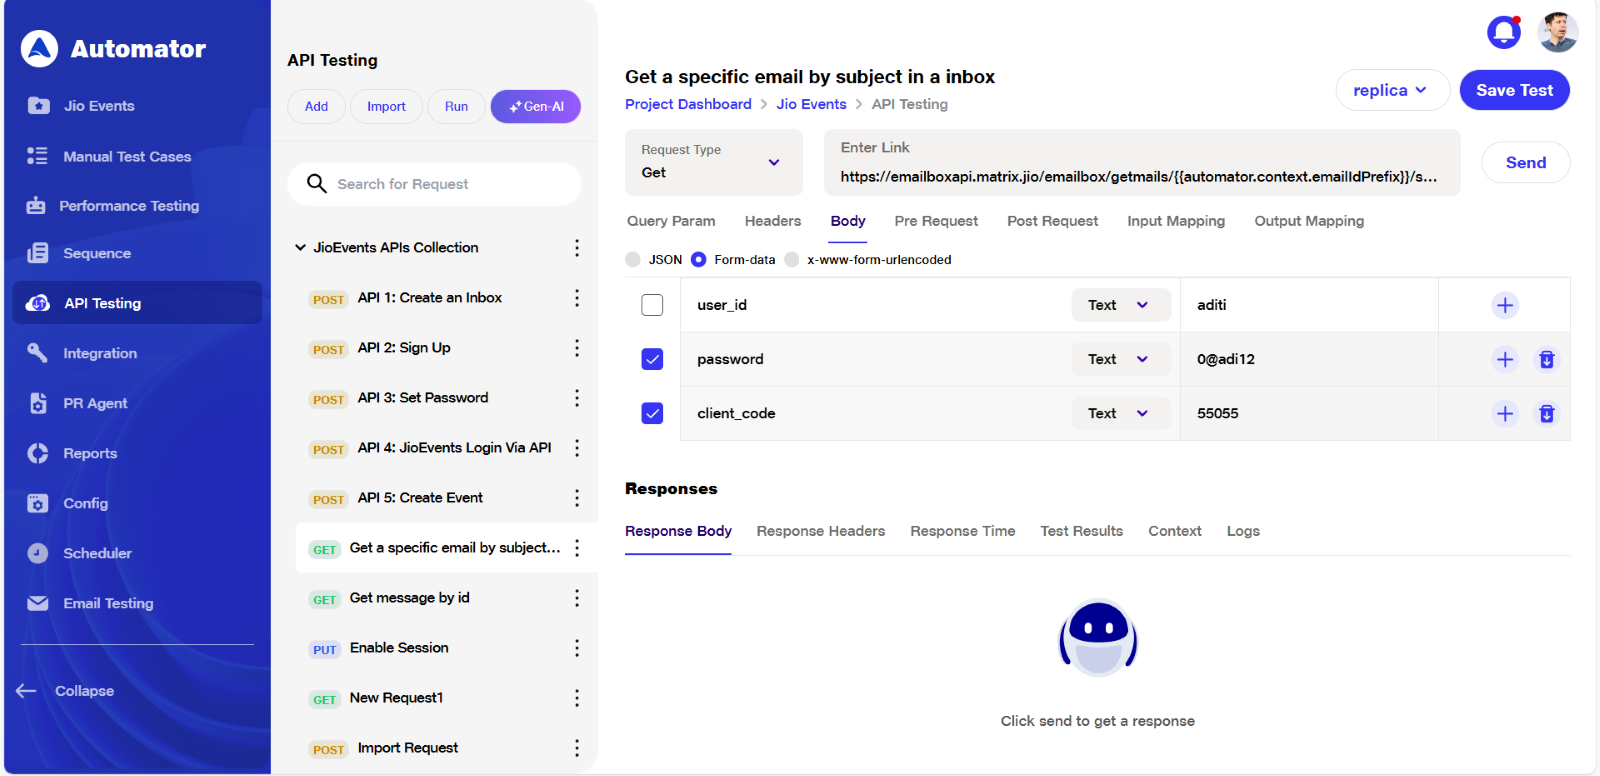
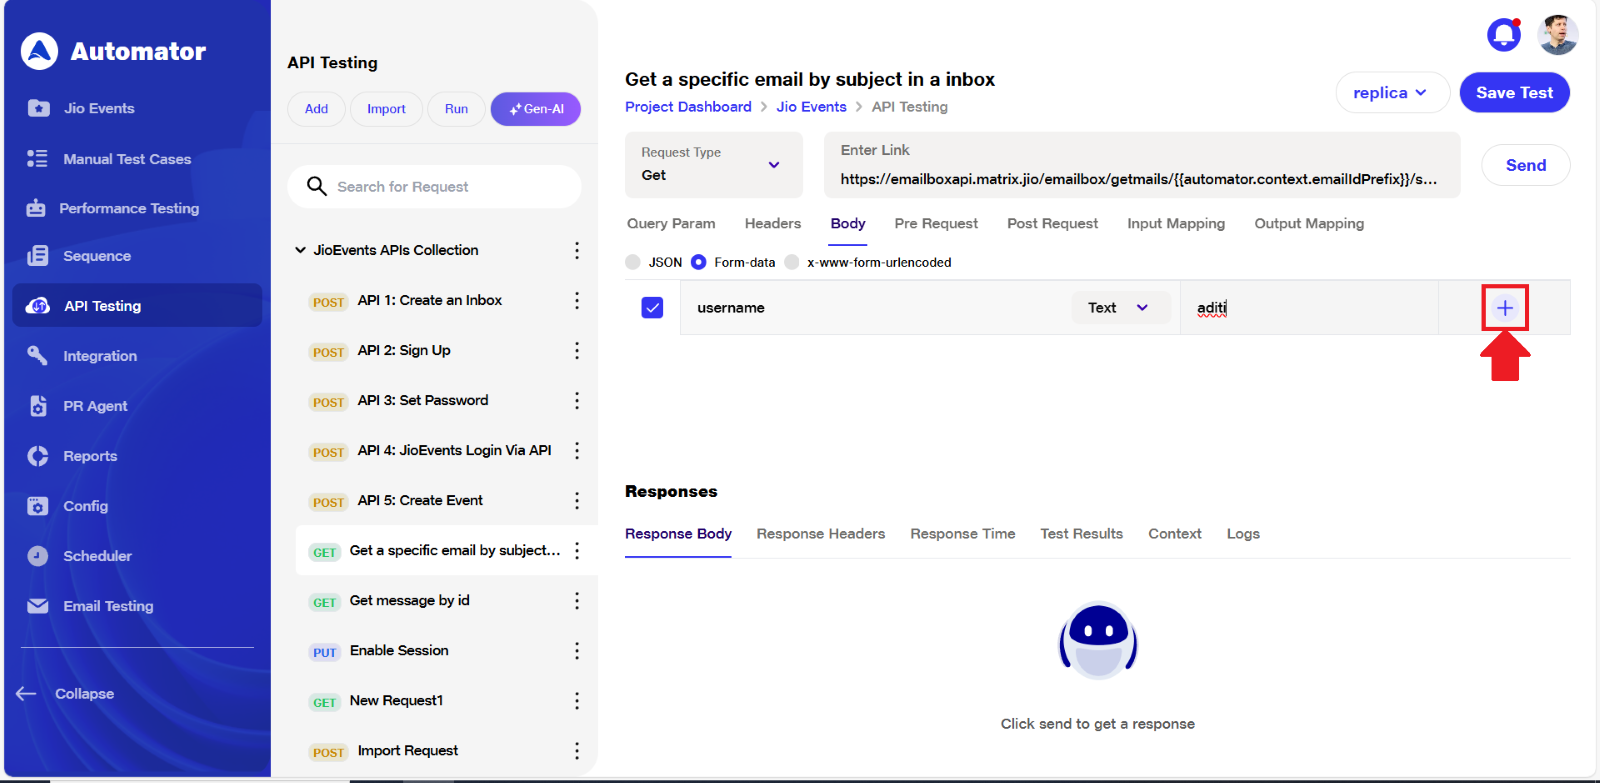 c) Users can add multiple key-value pairs per request.
d) Each row includes a checkbox to enable or disable entry.
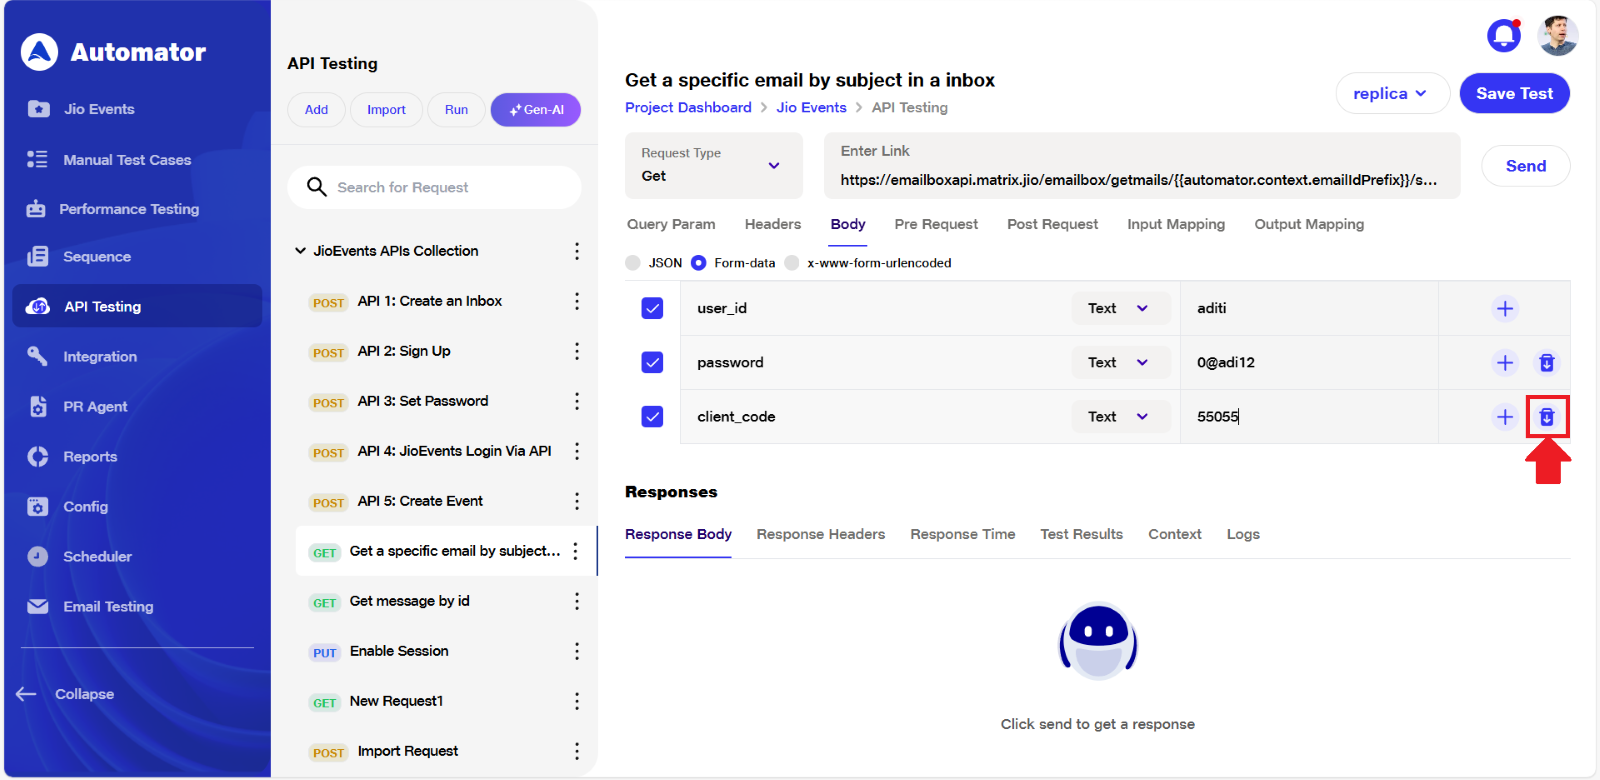
3) Deleting Form-Data Entries
a) The first row is default and cannot be deleted.
b) From the second row onward, a delete icon appears.
c) Click the delete icon to remove the selected entry.
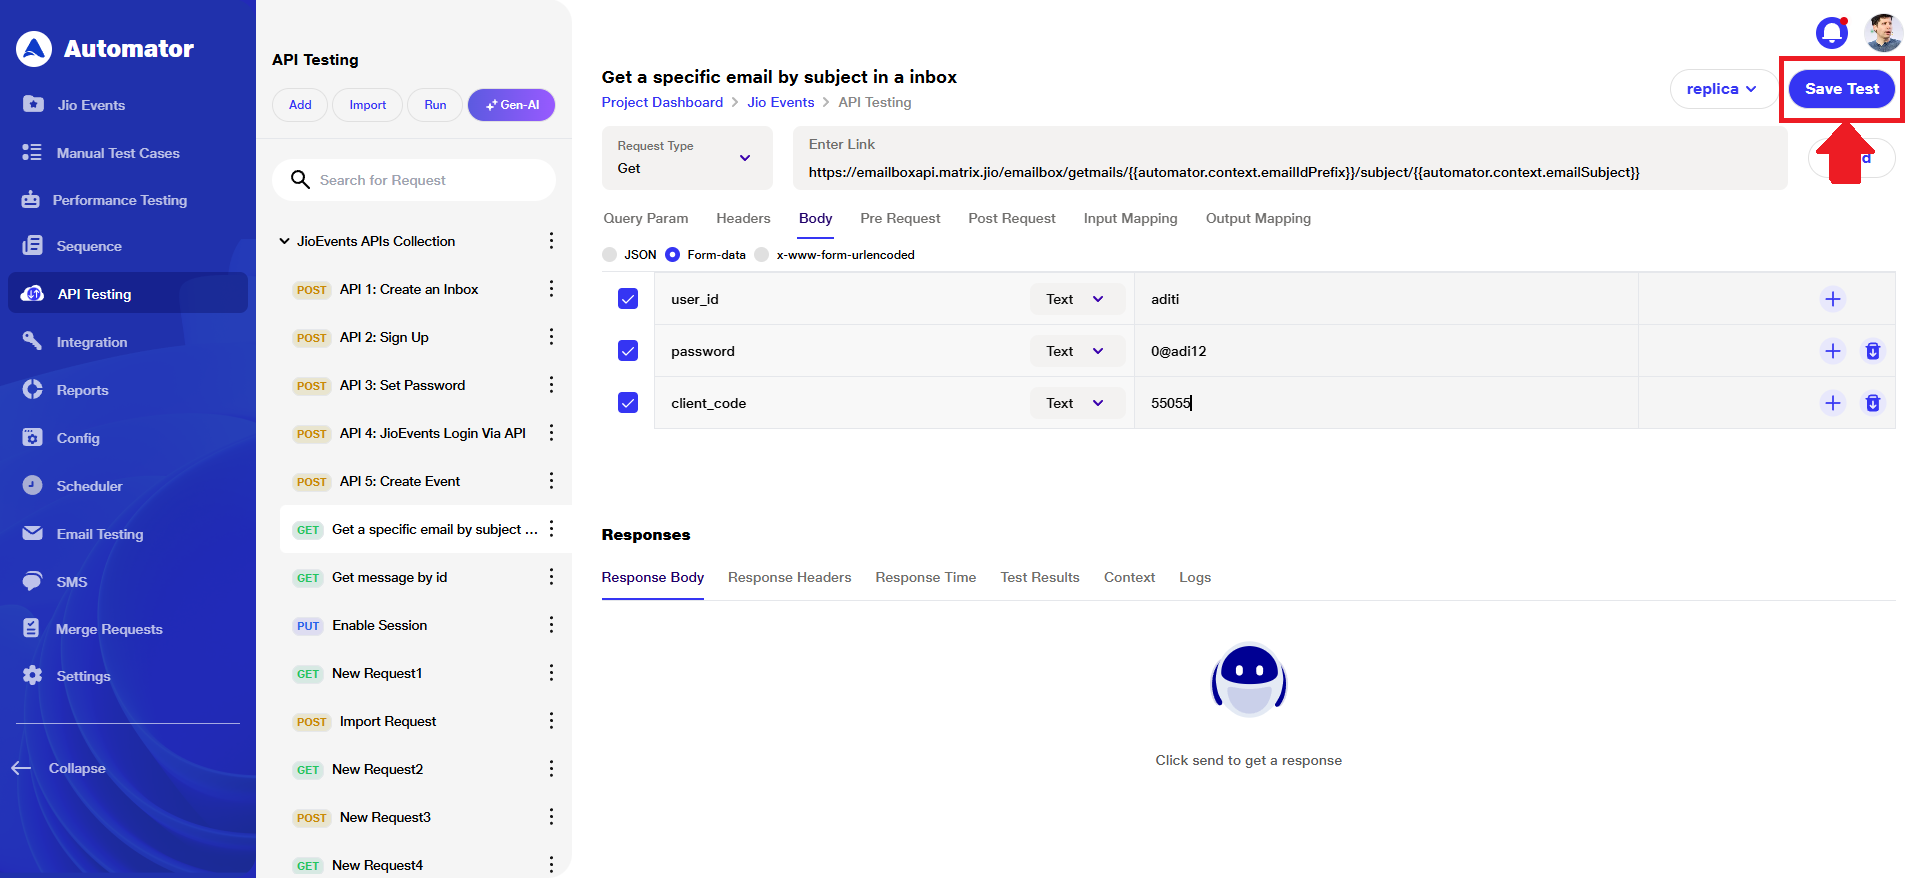
4) Saving Form-Data
a)After entering your key-value pairs, click Save Test to save your form-data configuration.
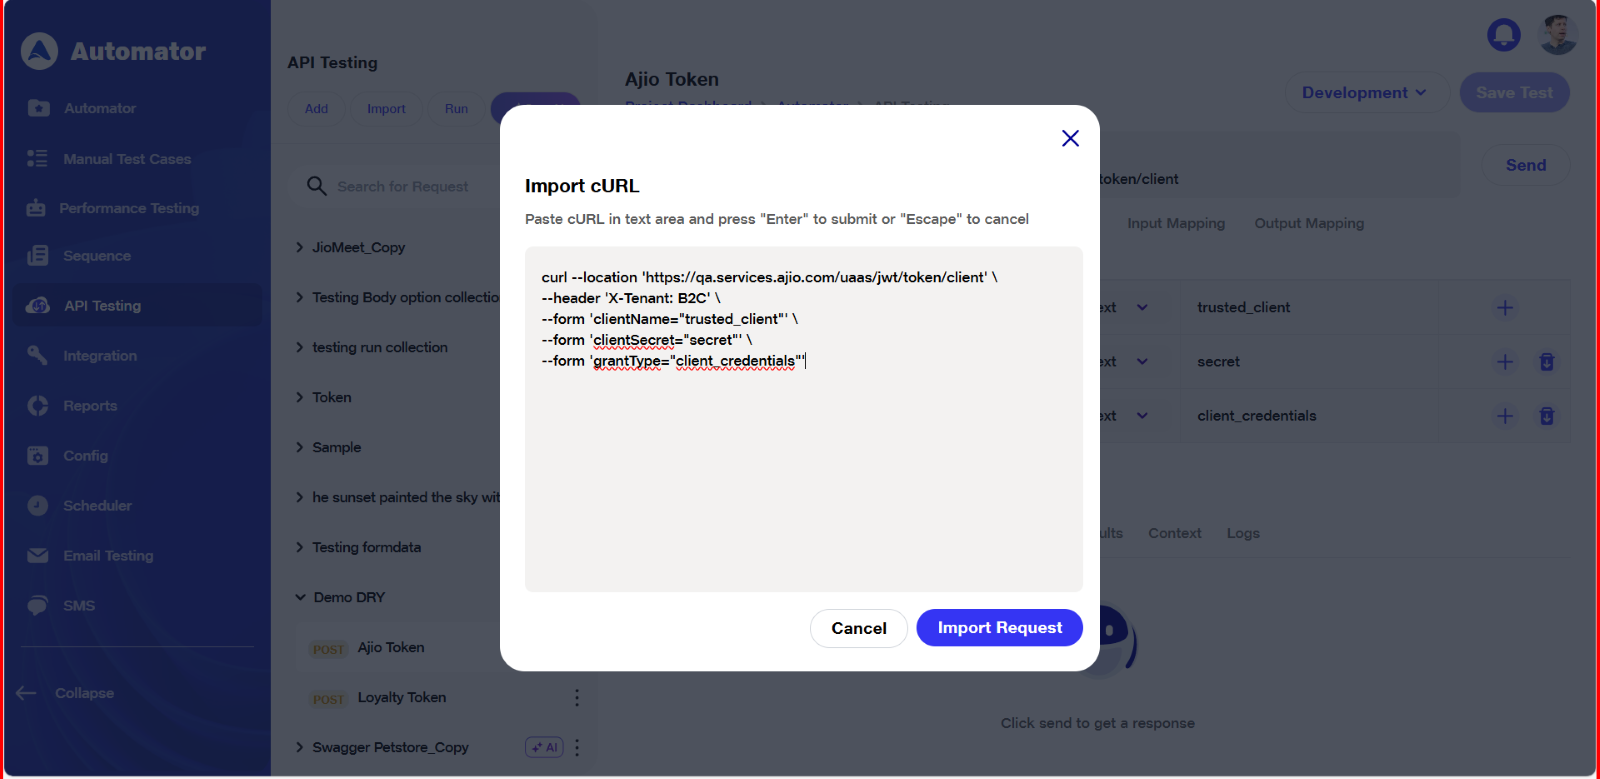
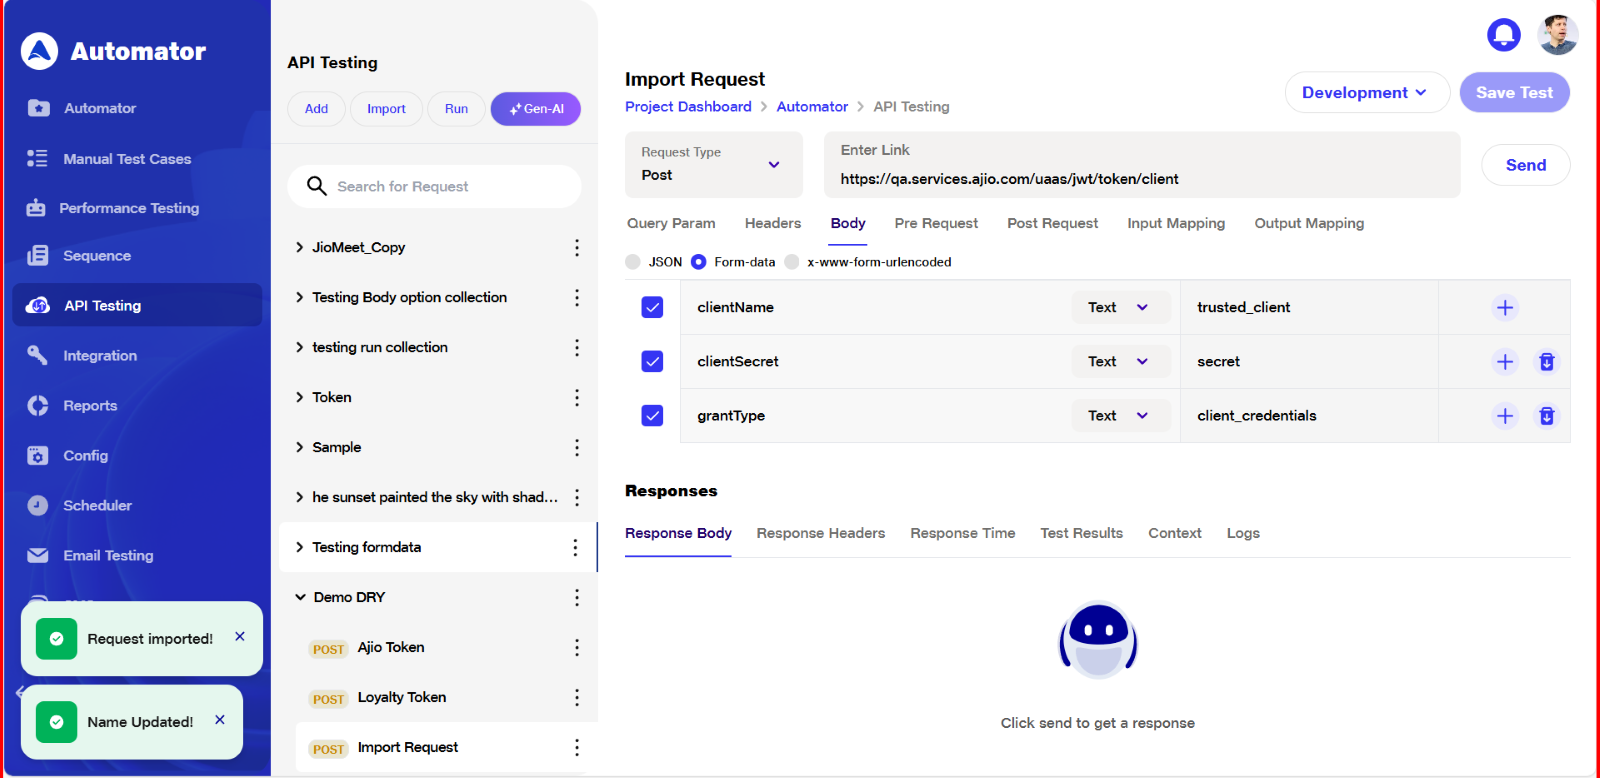
5) Importing Requests with Form-Data
a) When you import a collection that includes form-data, the request editor will automatically display the form-data in tabular form.
 b) The same applies when importing a cURL command with form-data — all key-value pairs are shown and editable. This ensures accuracy and saves time by avoiding manual re-entry.
6) Reporting with Form-Data
a) If a request uses form-data, the Reports section will display the exact structure, including all submitted key-value pairs.
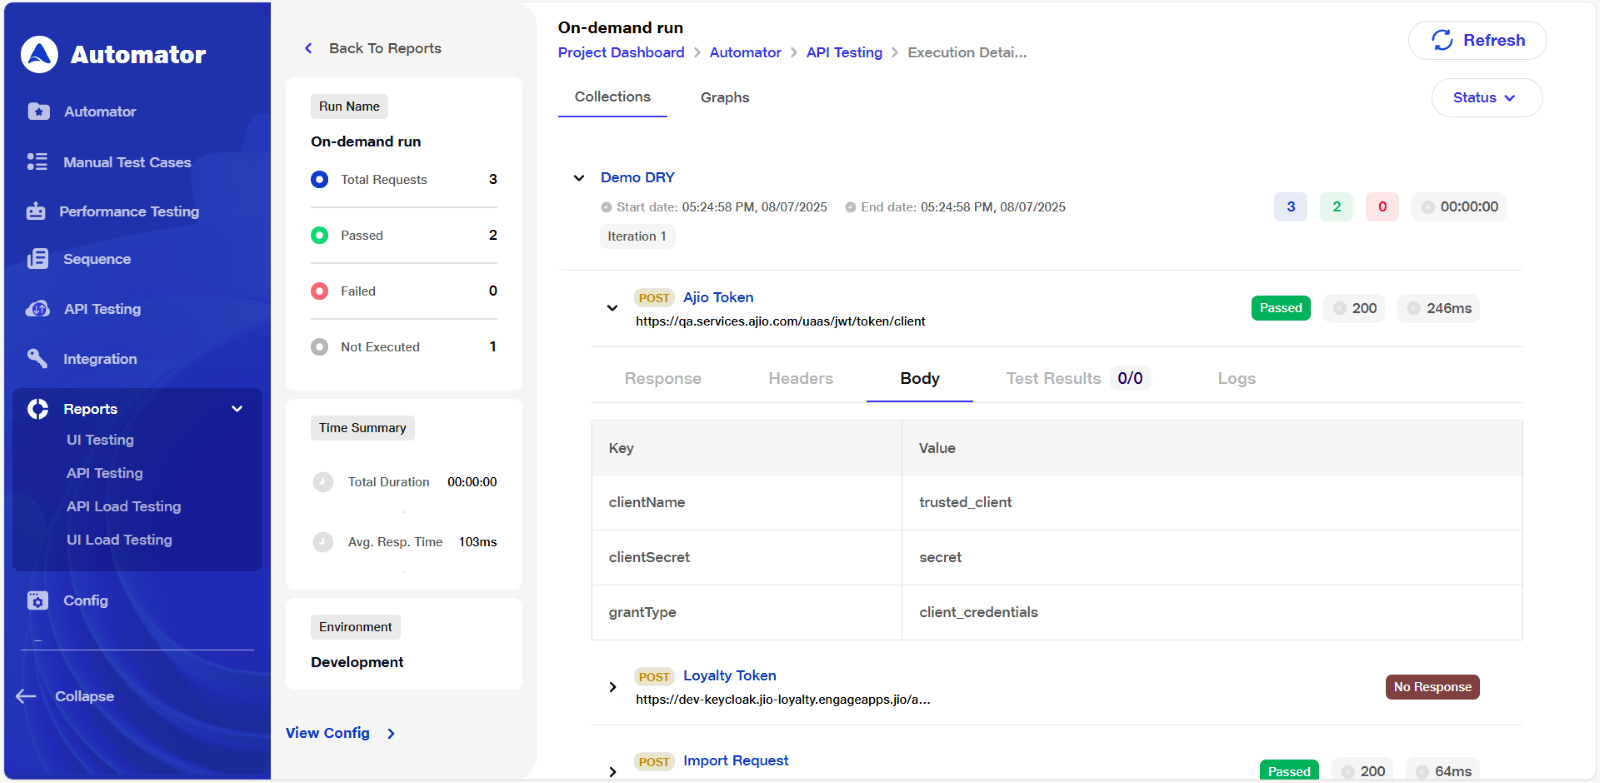 b) This helps validate and debug what data was sent during execution.
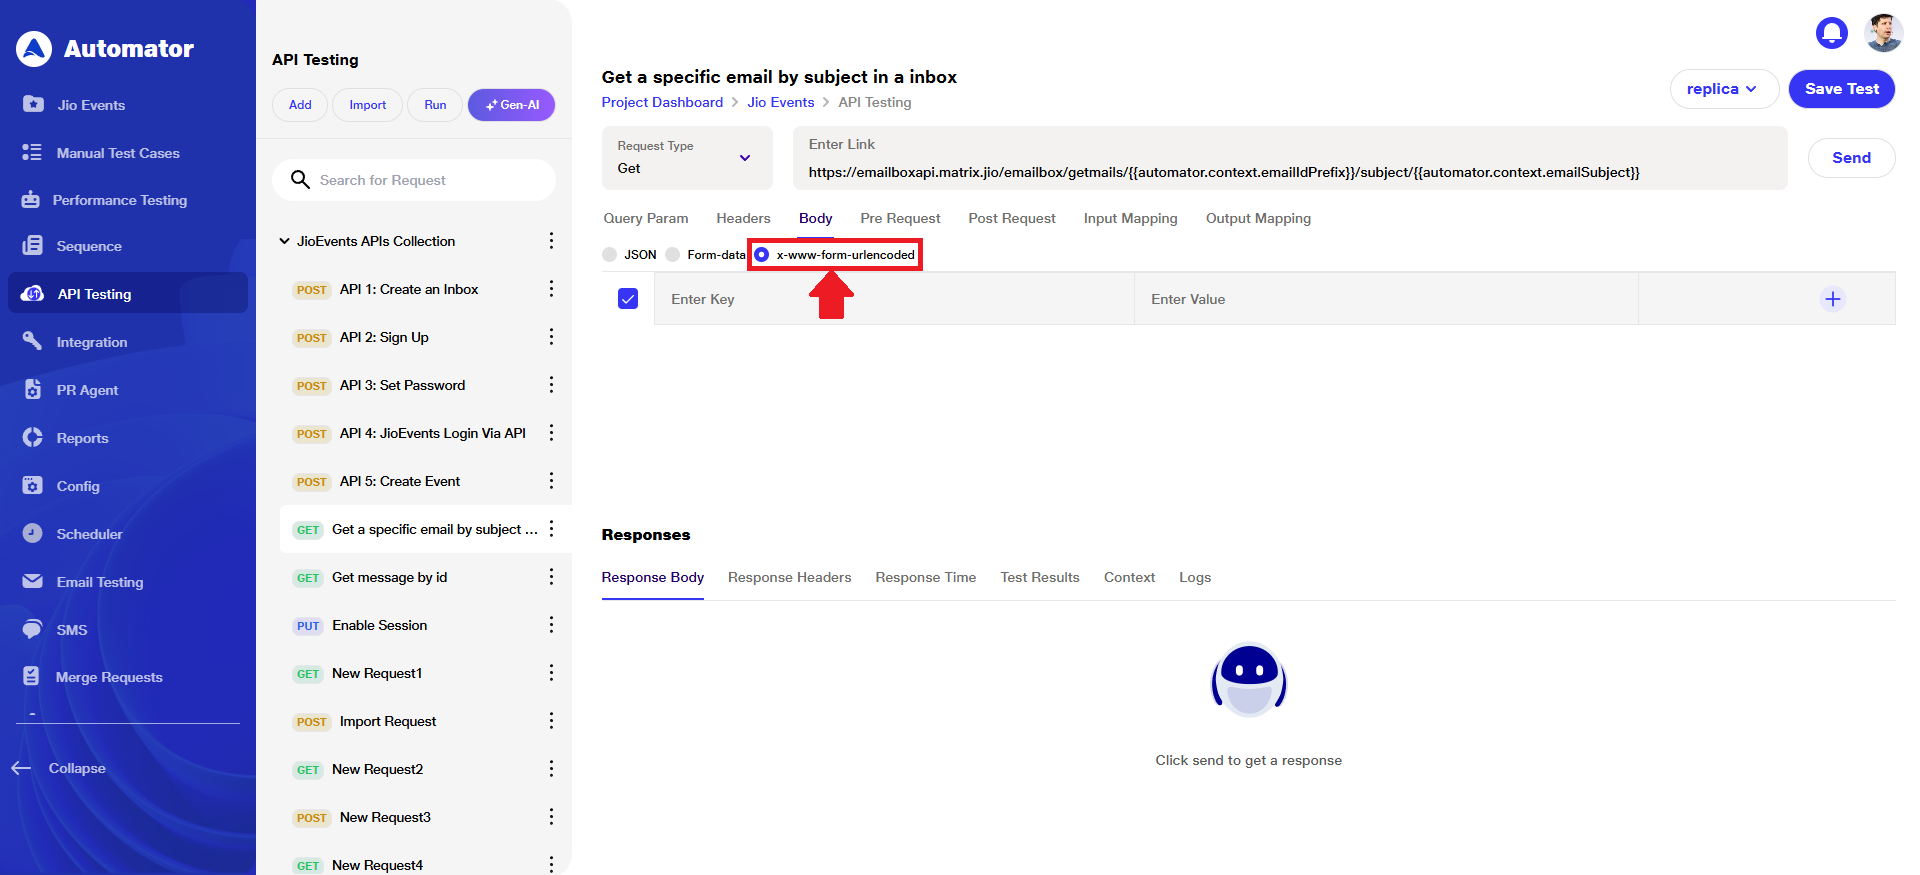
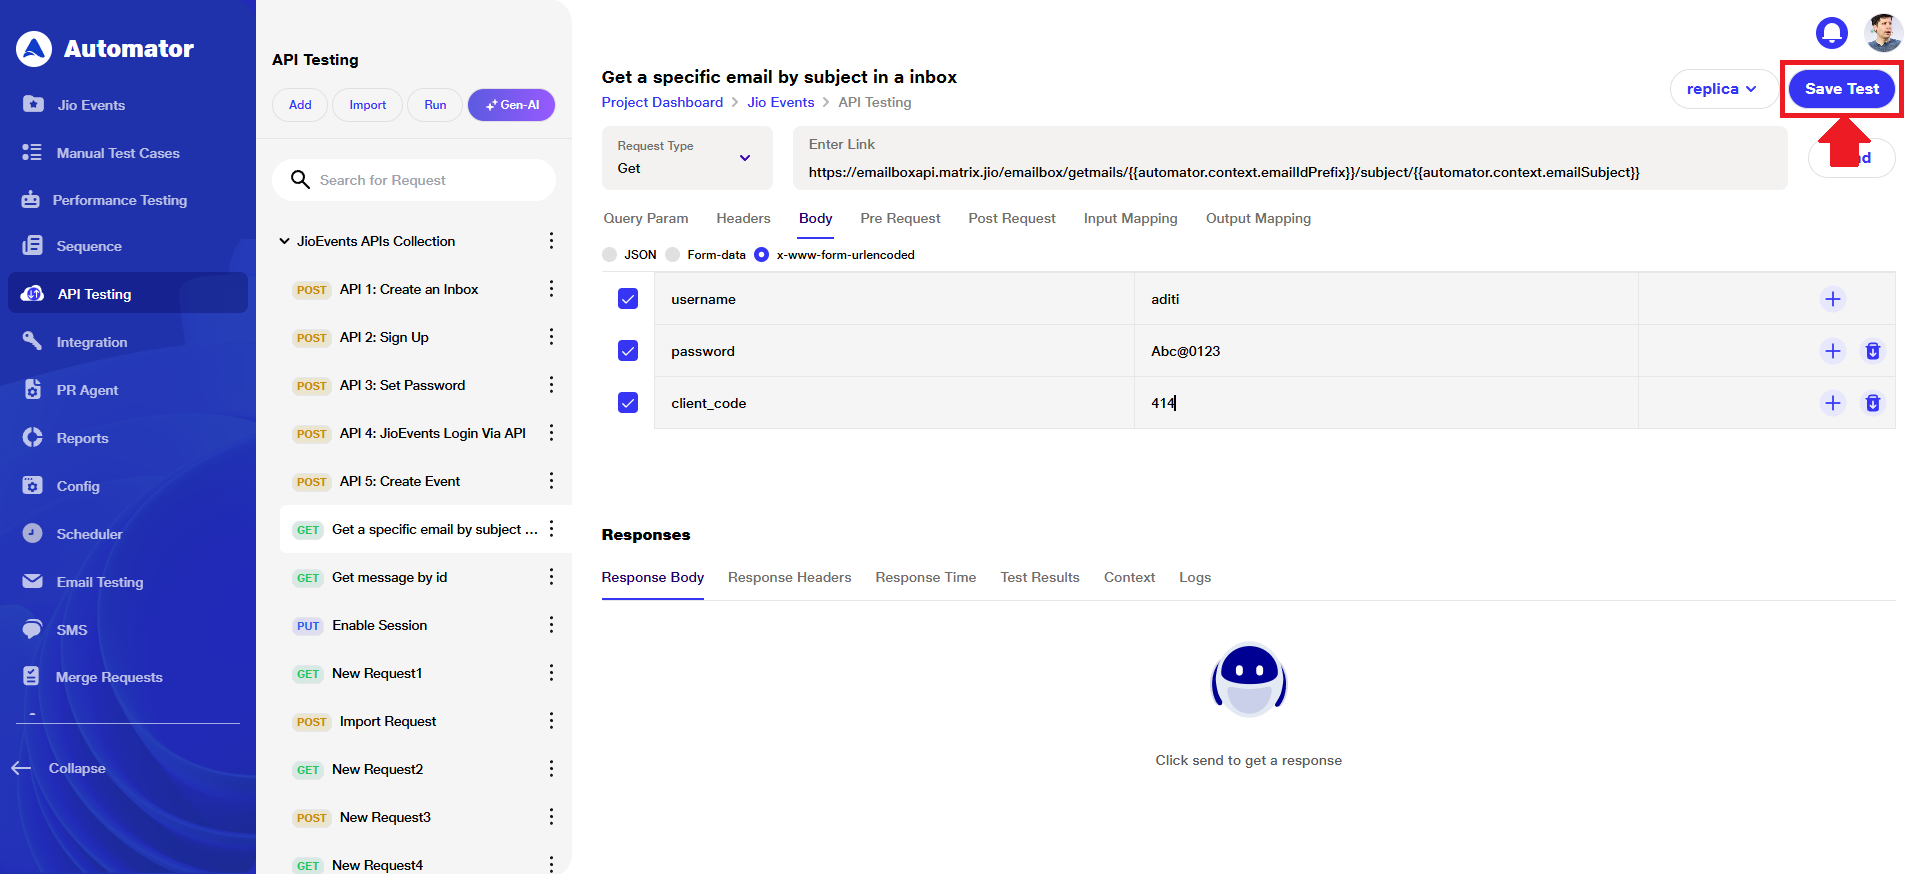
x-www-form-urlencoded
What is URL-Encoded Format?
The x-www-form-urlencoded format also sends key-value pairs in the request body but encodes them as a URL query string(e.g.,key1=value1&key2=value2). It’s commonly used for simple form submissions where files are not needed. This format is lightweight and widely supported across web APIs.
1) Where to Add URL-Encoded Data
a) Navigate to the API Testing page of your project
 b) Open the desired request from your collection.
c) Go to the Body tab.
d) Select the x-www-form-urlencoded radio option (third option in the list).
2) Adding URL-Encoded Entries
a) A table will appear where you can enter:
i)Key: the field name
ii)Value: the field’s data (text, number, or valid input).
b)Click the + (➕) icon to add additional rows.
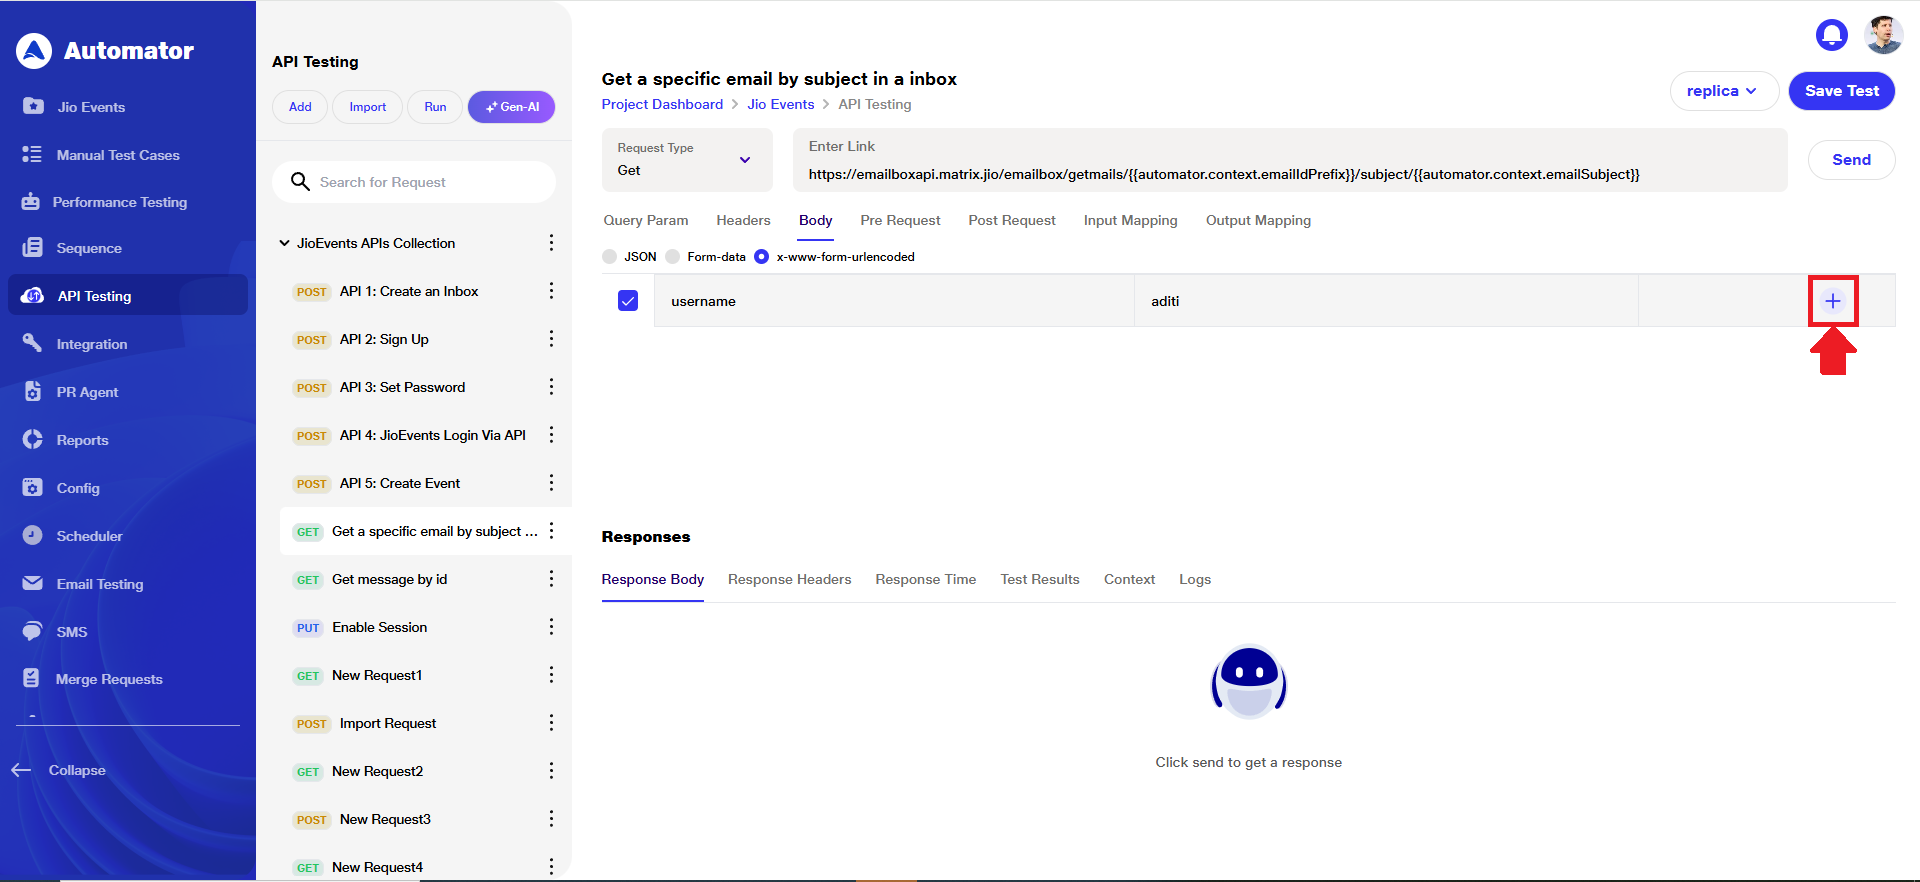 c) Users can add multiple key-value pairs per request.
d) Each row includes a checkbox to enable or disable entry.
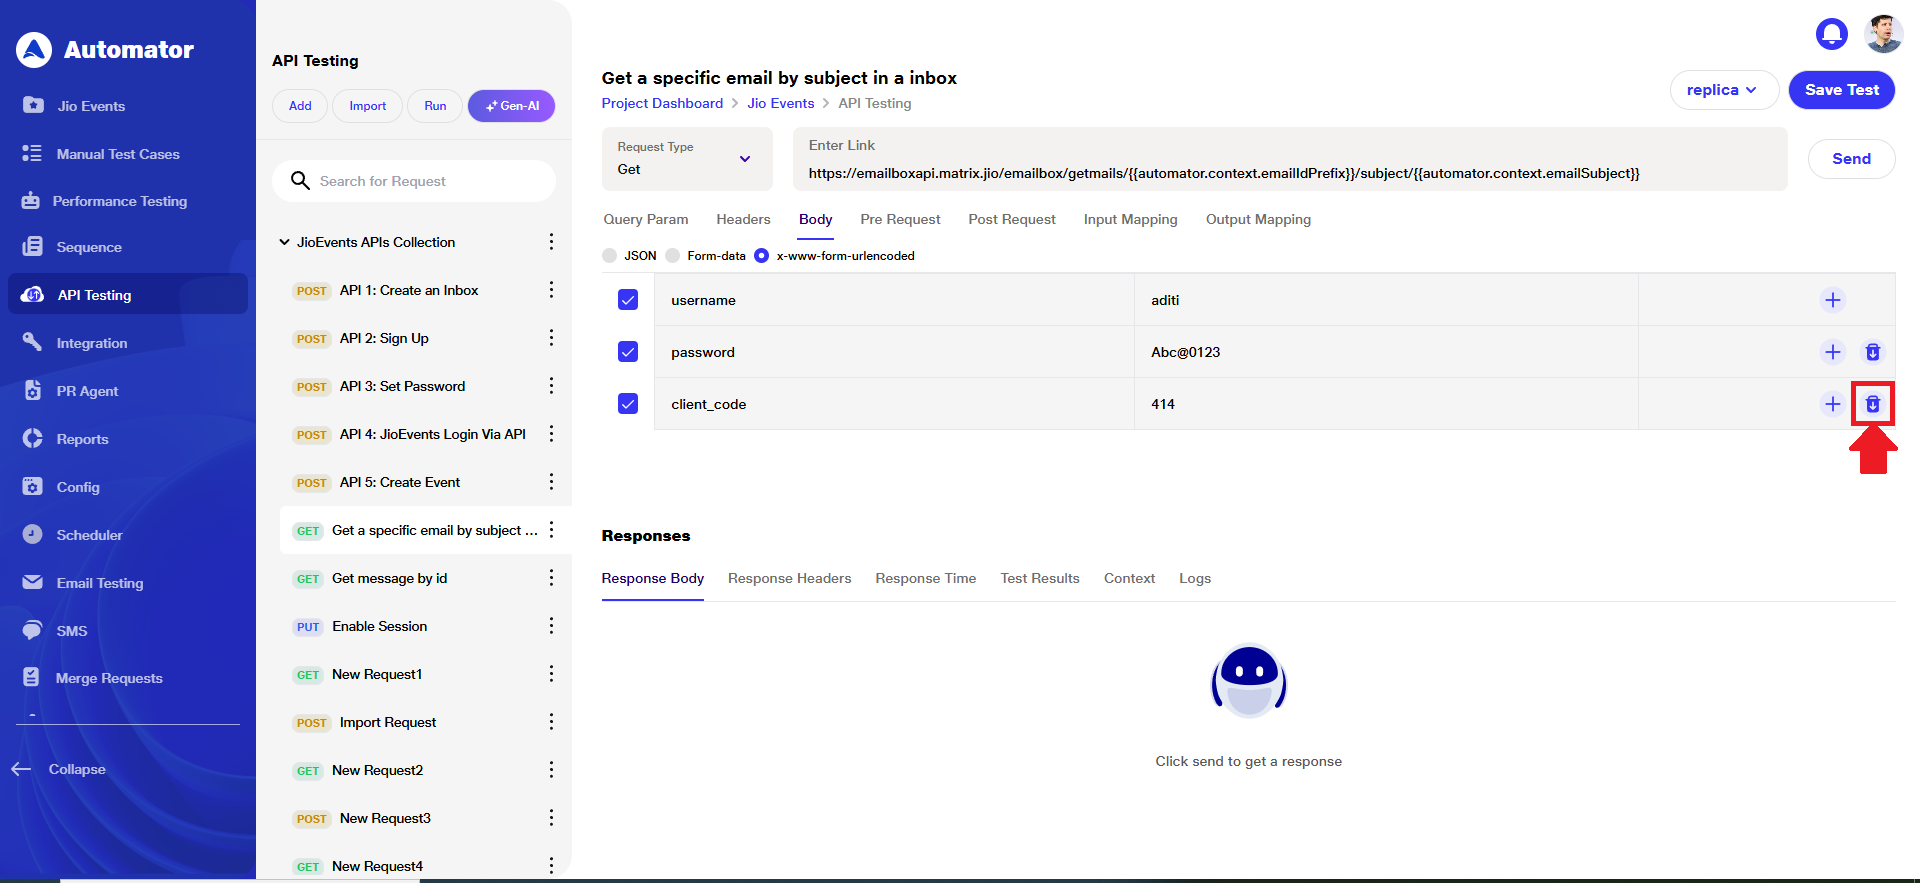
3) Deleting URL-Encoded Entries
a) The first row is default and cannot be deleted.
b) From the second row onward, a delete icon appears.
c) Click the delete icon to remove the selected entry.
4) Saving URL-Encoded Data
a) After entering your key-value pairs, click Save Test to save your URL-encoded configuration.
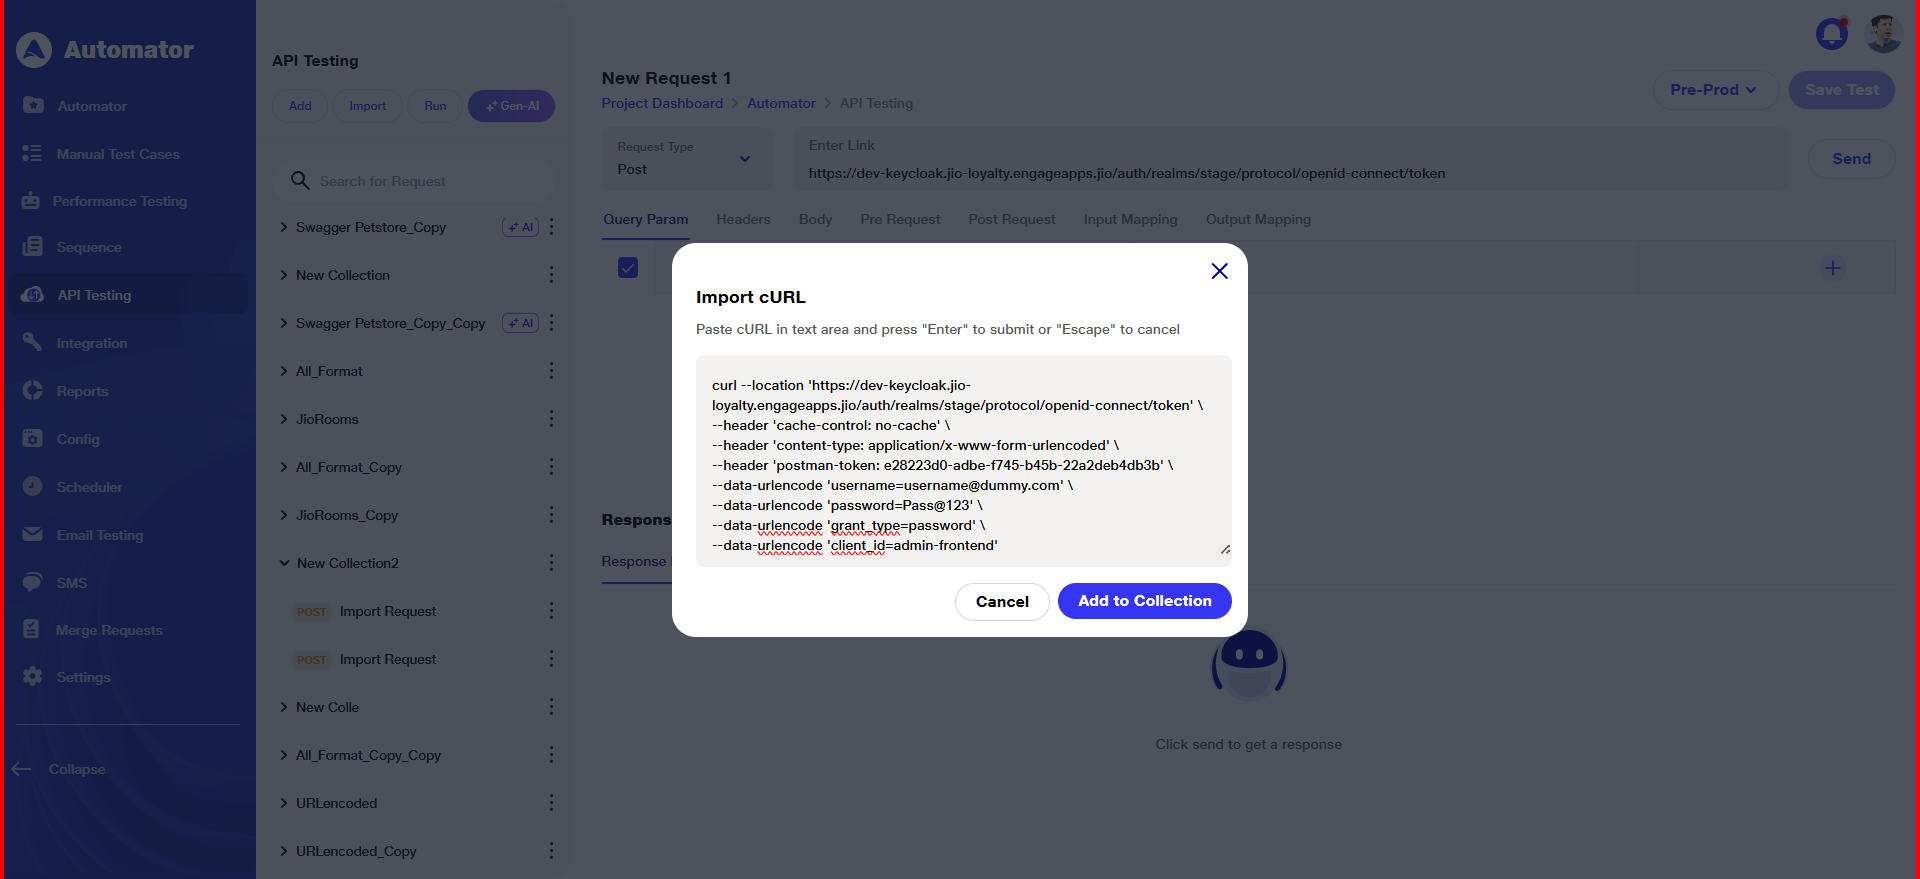
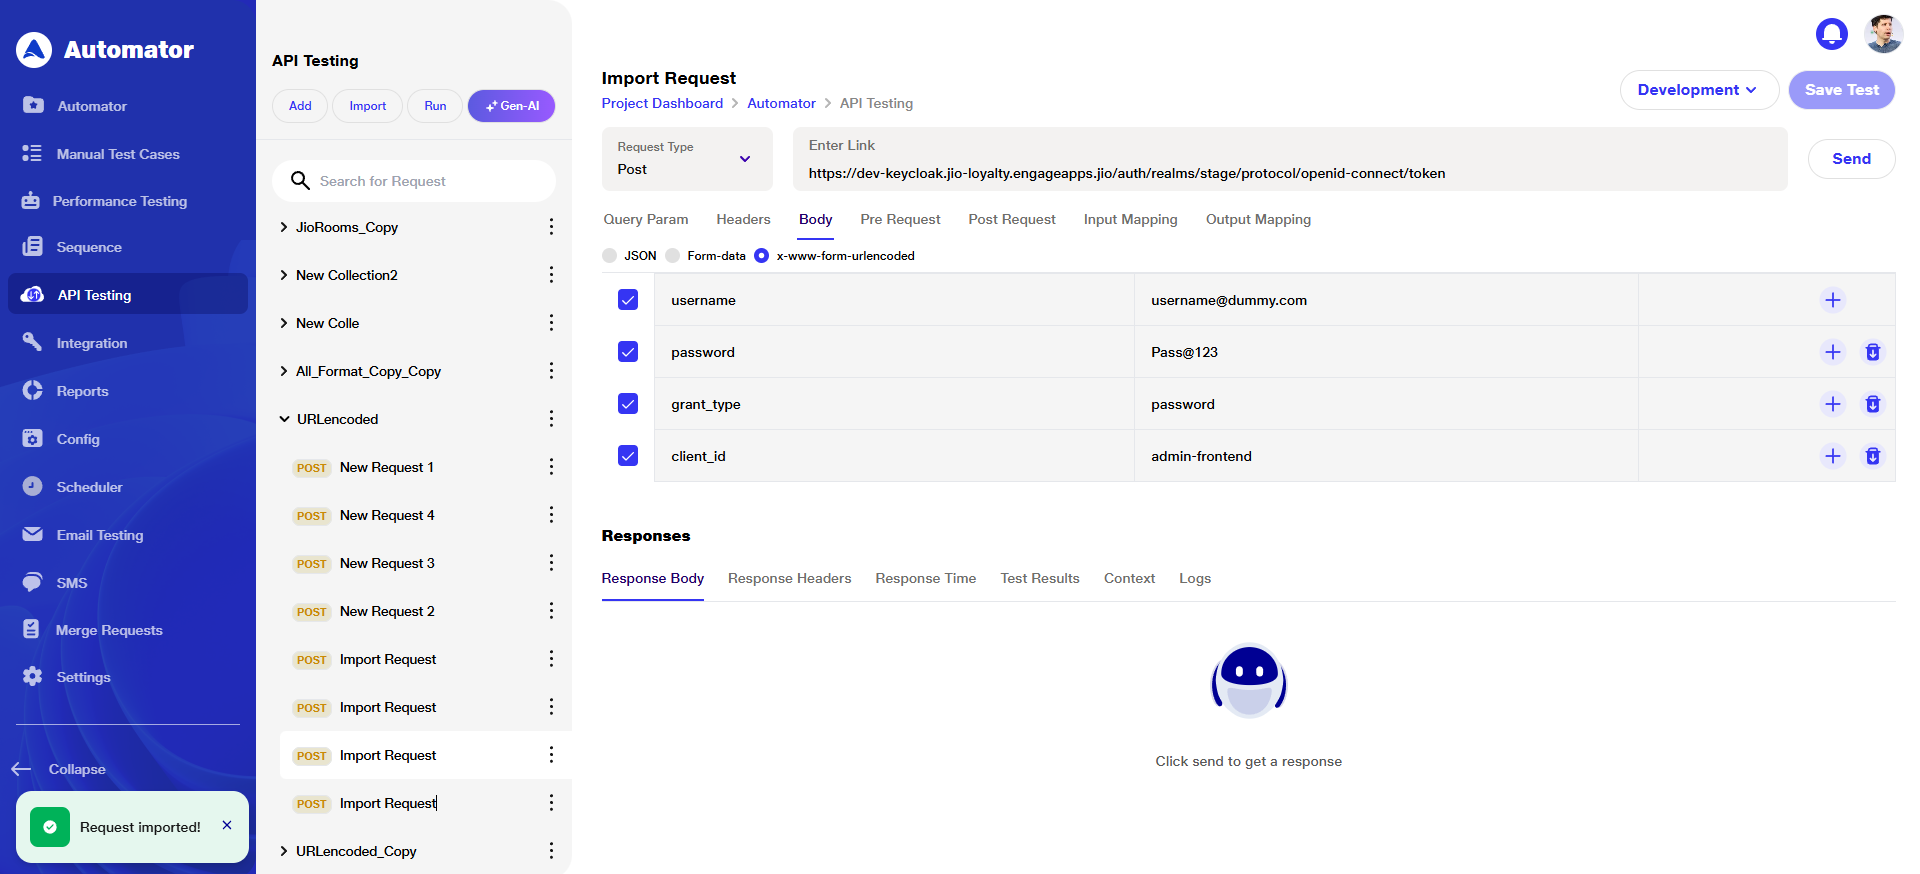
5) Importing Requests with URL-Encoded Data
a) When you import a collection that includes x-www-form-urlencoded data, the request editor will automatically display the key-value pairs in a table.
 b) The same applies when importing a cURL command using this format — all fields are shown and editable, helping ensure accuracy and saving time.
6) Reporting with URL-Encoded
a) If a request uses URL-encoded data, the Reports section will display the exact structure, including all submitted key-value pairs.
 b) This helps validate and debug what data was sent during execution.